.png.69024921a814b31f7ecf6f53989bf0c8.png)

Swedish_Medic
-
Posts
37 -
Joined
-
Last visited
-
Donations
48.80 USD -
Points
0 [ Donate ]
Content Type
Profiles
Forums
Gallery
Twitch
Running Commentary
Events
Store
Downloads
Everything posted by Swedish_Medic
-
Good ol' music
-
-
You can fill in the application form here https://goo.gl/forms/094yDuMwHG8cLnEZ2 Alternatively you can find the Minecraft discord on the home page on this site, where at you can find the above application form.
-

n2's Infamous Screenshot Dump
Swedish_Medic replied to n2galaxy's topic in Minecraft's Minecraft Discussion
Maybe you lack taste -
So you failed installing Optifine
Swedish_Medic replied to Swedish_Medic's topic in Minecraft's Minecraft Discussion
Optifine D6 works as well https://optifine.net/adloadx?f=OptiFine_1.7.10_HD_U_D6.jar -
n2's Infamous Screenshot Dump
Swedish_Medic replied to n2galaxy's topic in Minecraft's Minecraft Discussion
So what's the plan for the layout? Do you chunk split or build cross chunks? Spot loading, mass loading or non loading? Most importantly, what the are you building? I expect to be able to copy this when you're done, so take good screenshots with explanations suited for us who are less gifted. I like that you blacked your storage monitors btw. -
Some Awolnation doesn't hurt.
-
Looks like some Roblox wannabe with influx of Lego games. I'm sure there's some audience for it.
-
suggestion Ghostwood Sapling in Admin shop
Swedish_Medic replied to Swedish_Medic's topic in Minecraft's Minecraft Discussion
Natura is planned to be updated with the modpack's next update https://github.com/xJon/The-1.7.10-Pack/issues/1845 -
suggestion Ghostwood Sapling in Admin shop
Swedish_Medic replied to Swedish_Medic's topic in Minecraft's Minecraft Discussion
These bastards and moving links. Link 1: https://www.curseforge.com/minecraft/mc-mods/natura/files/2254552 Link 2: https://www.curseforge.com/minecraft/mc-mods/natura/files/2257670 -
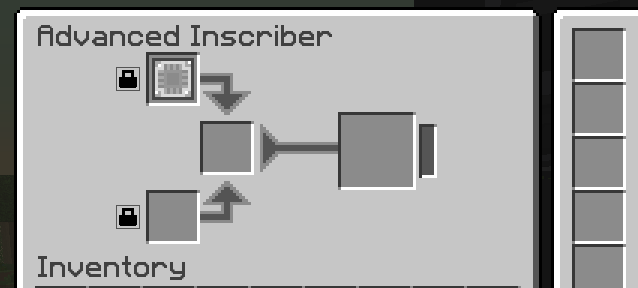
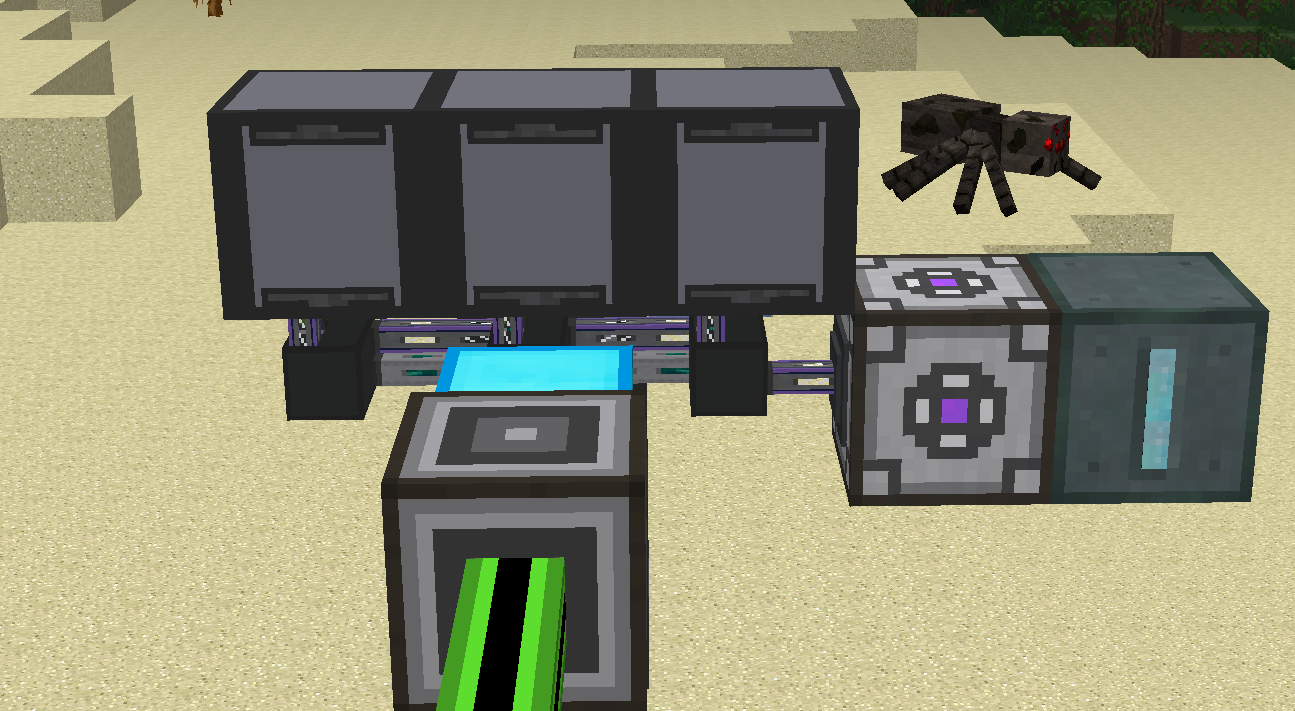
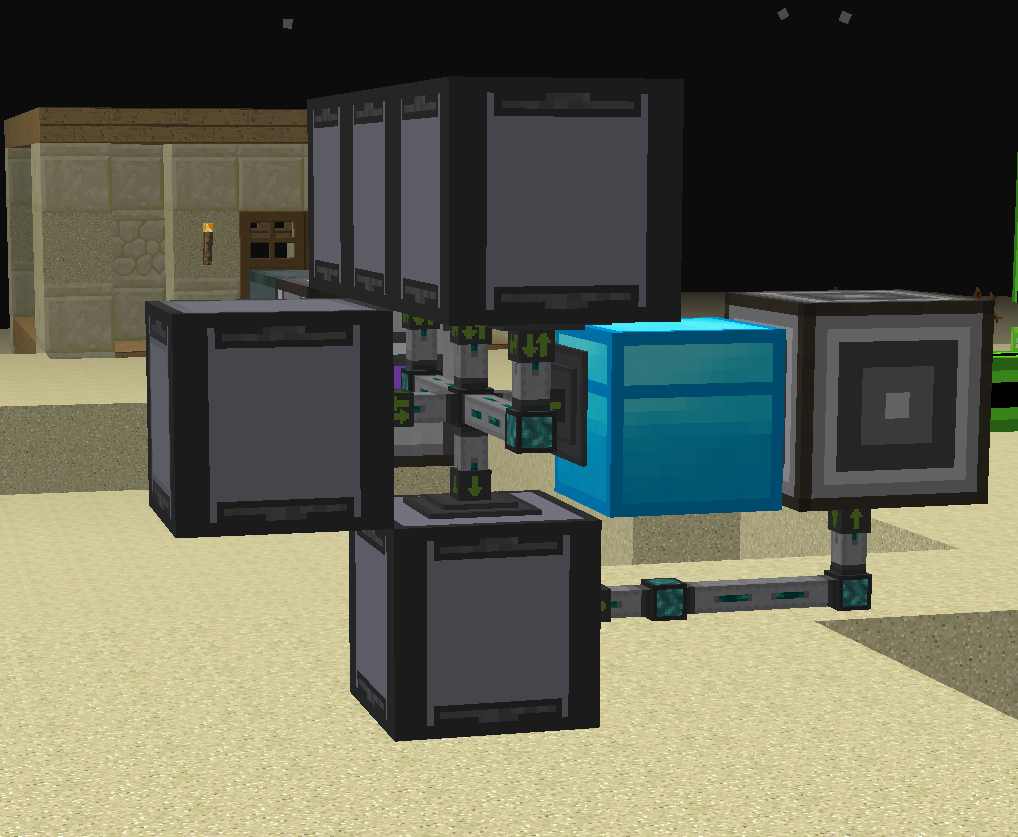
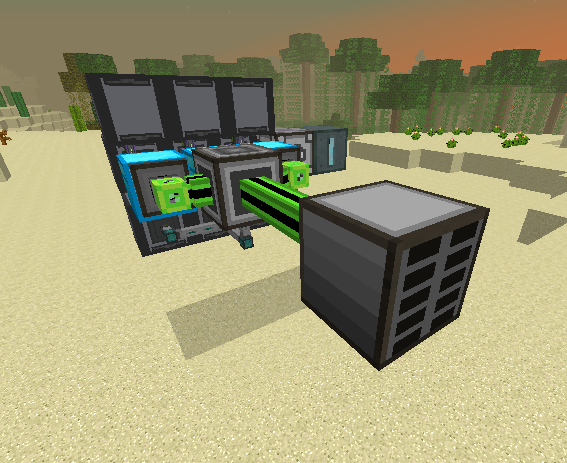
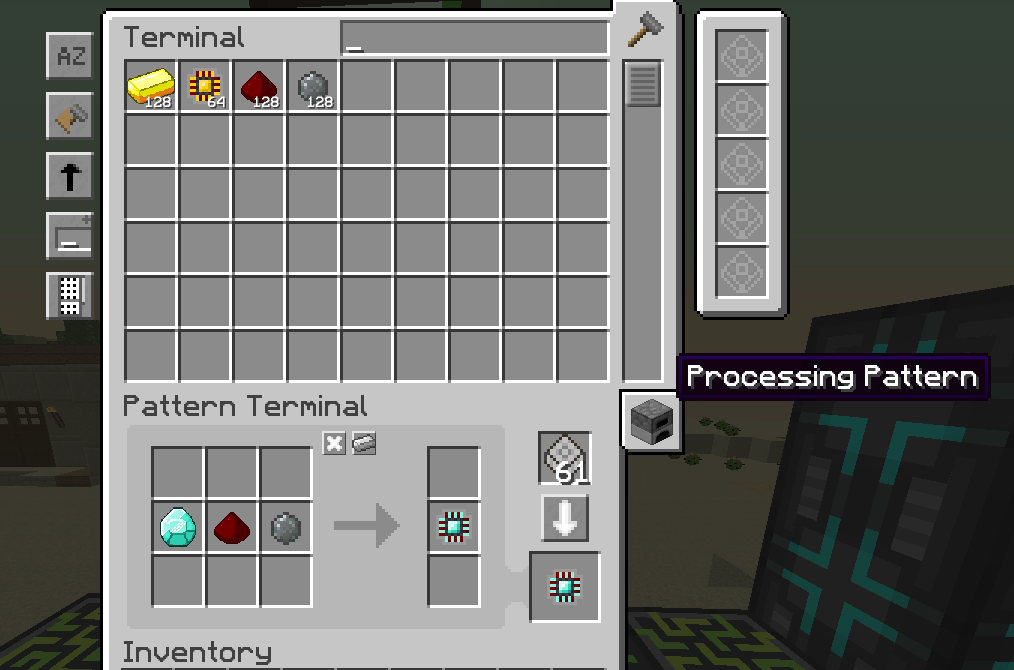
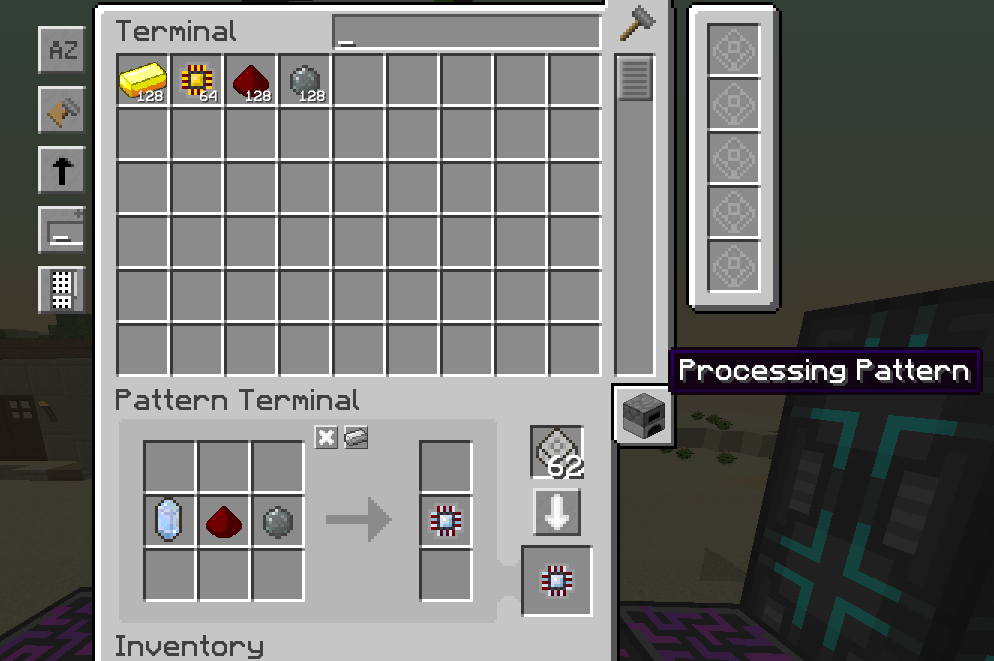
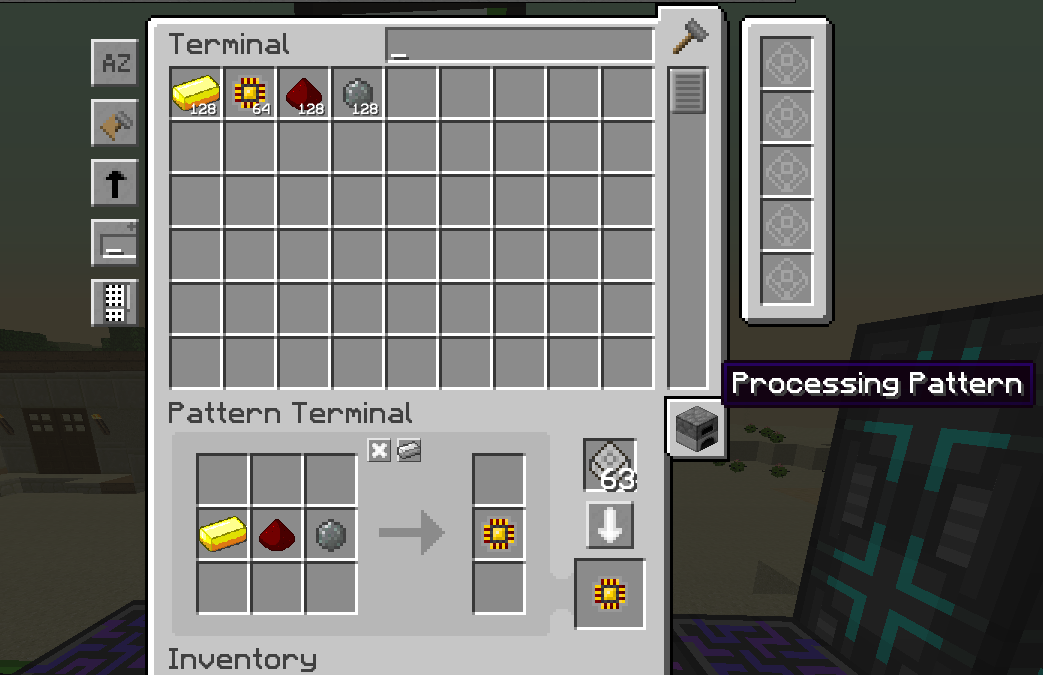
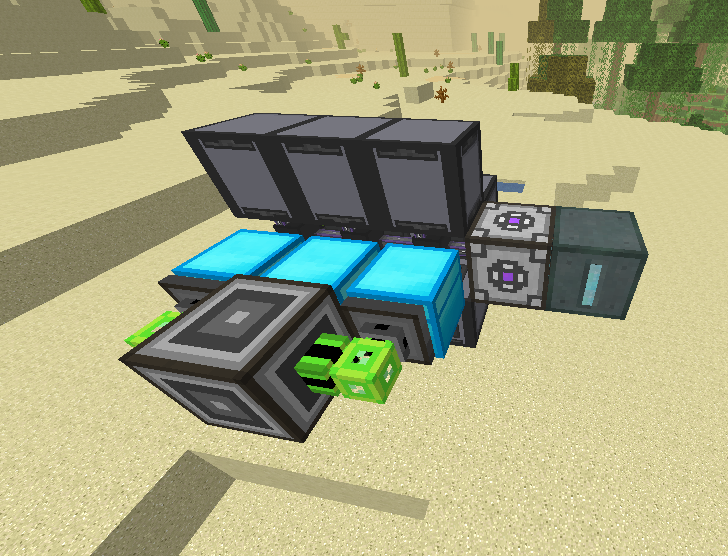
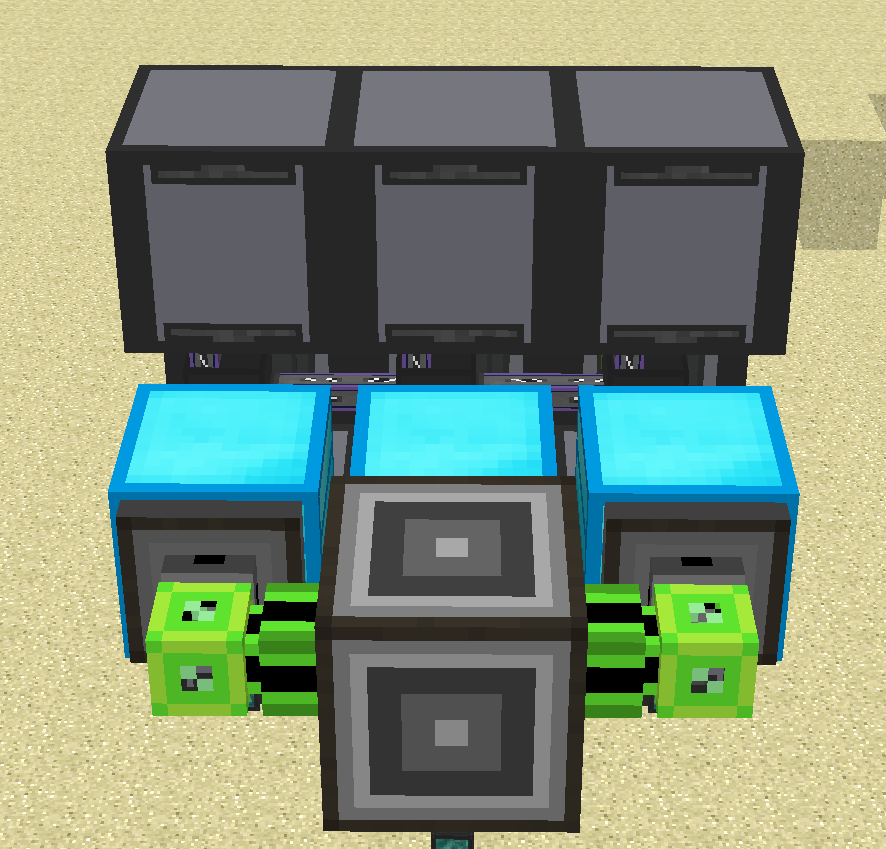
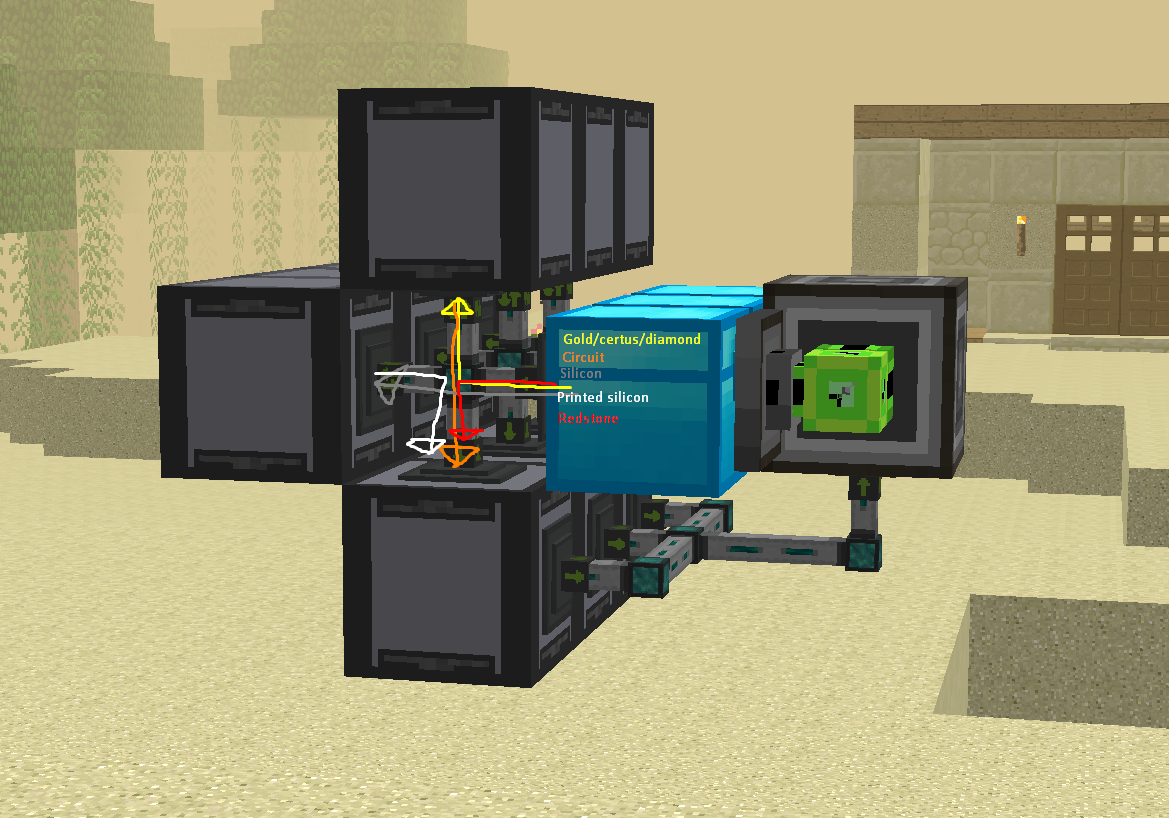
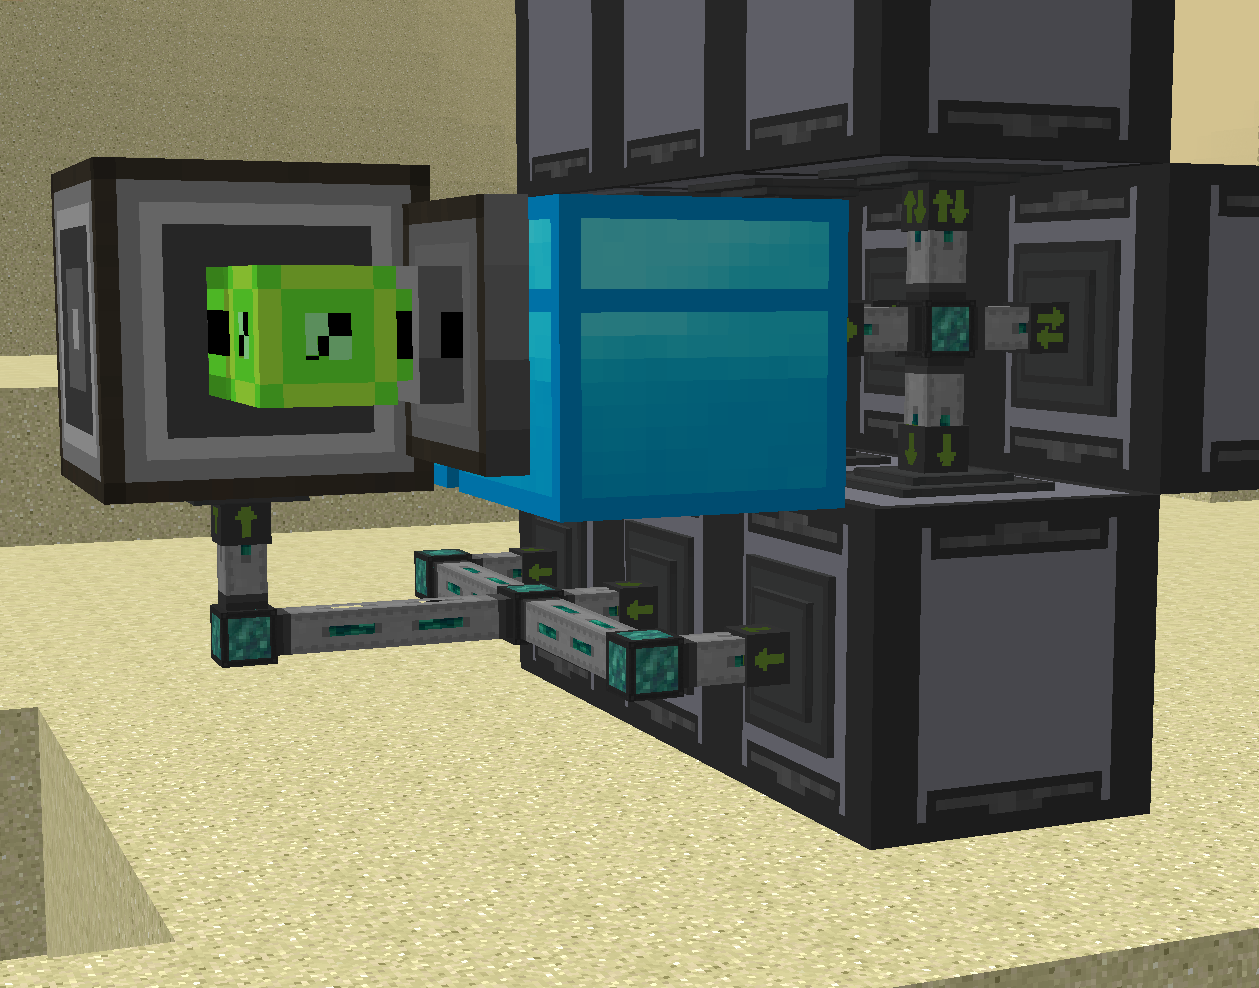
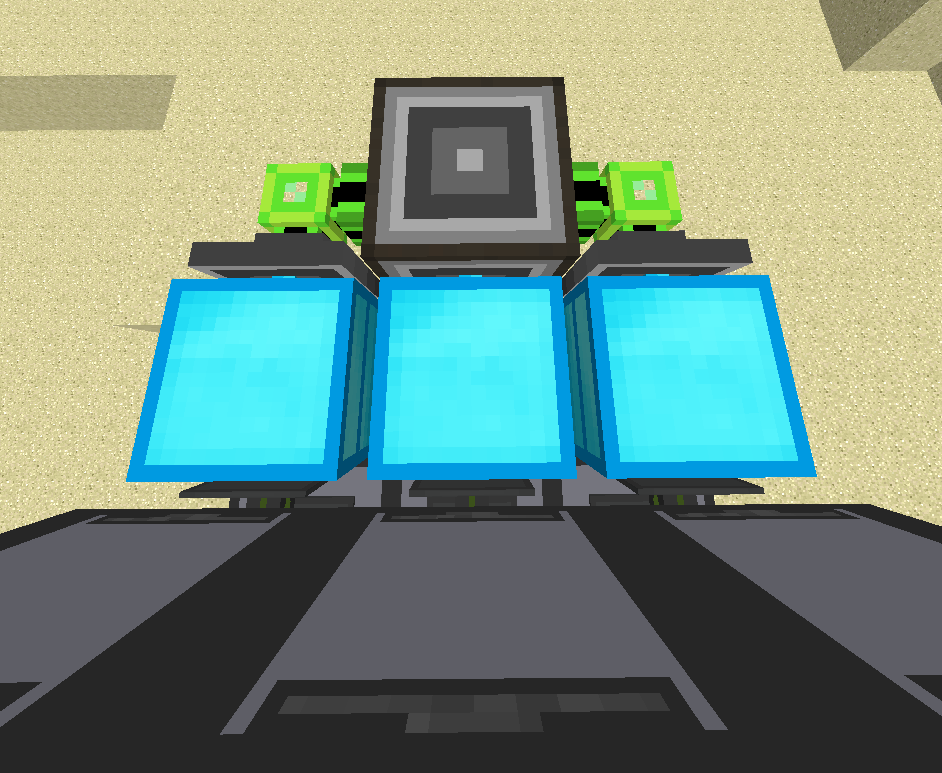
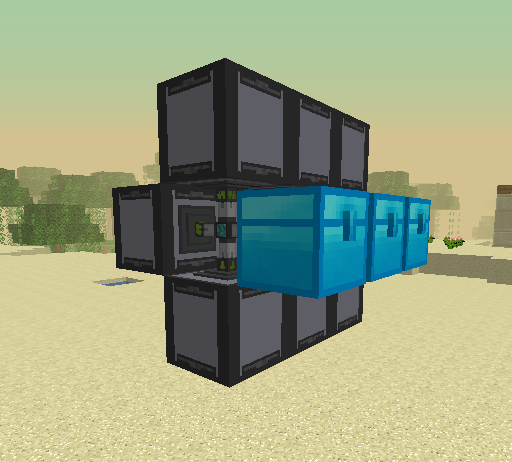
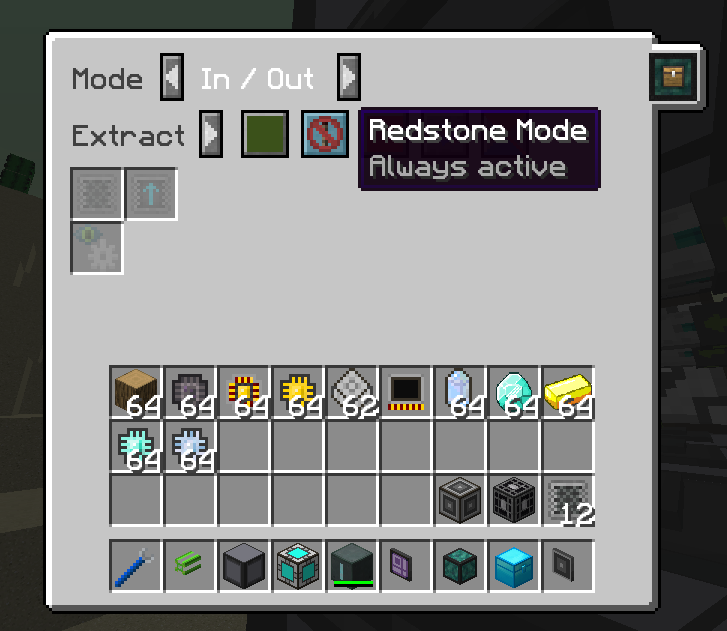
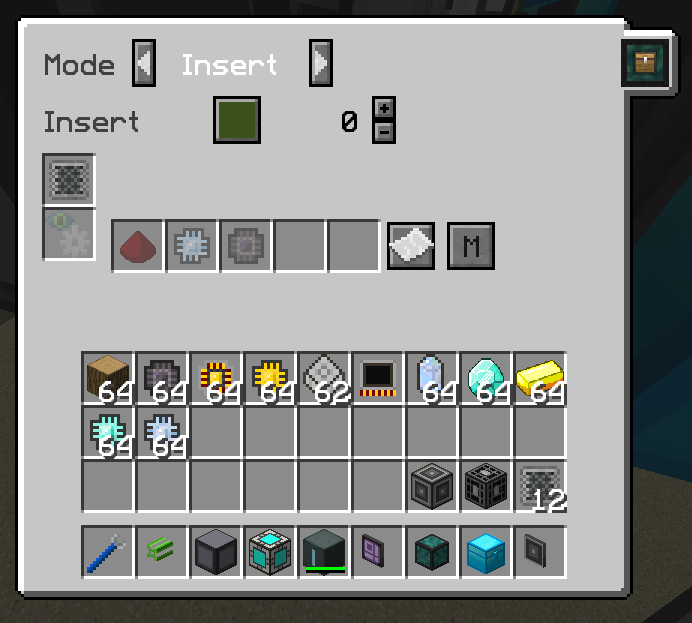
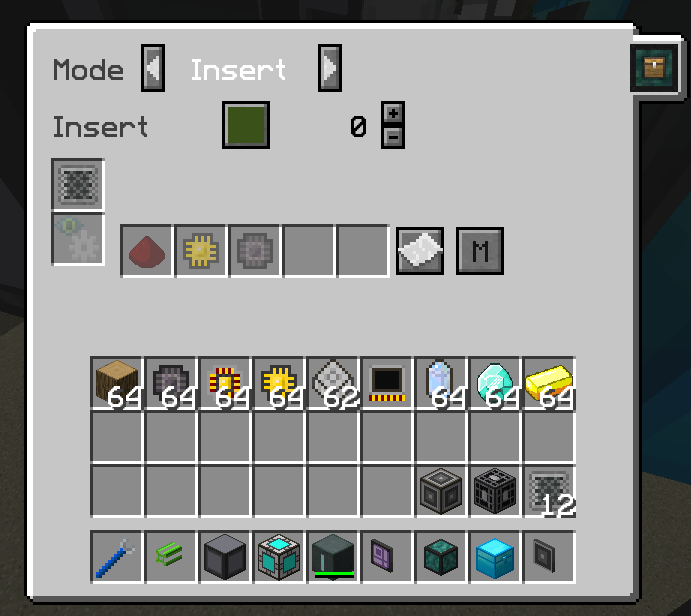
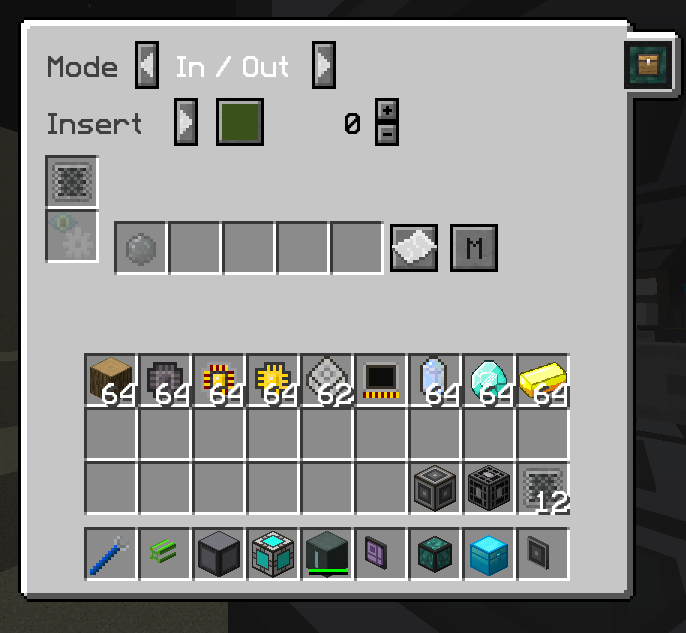
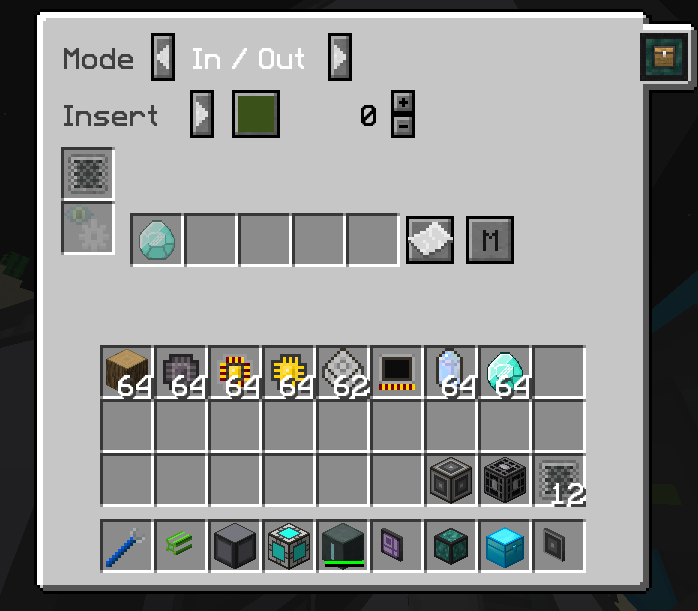
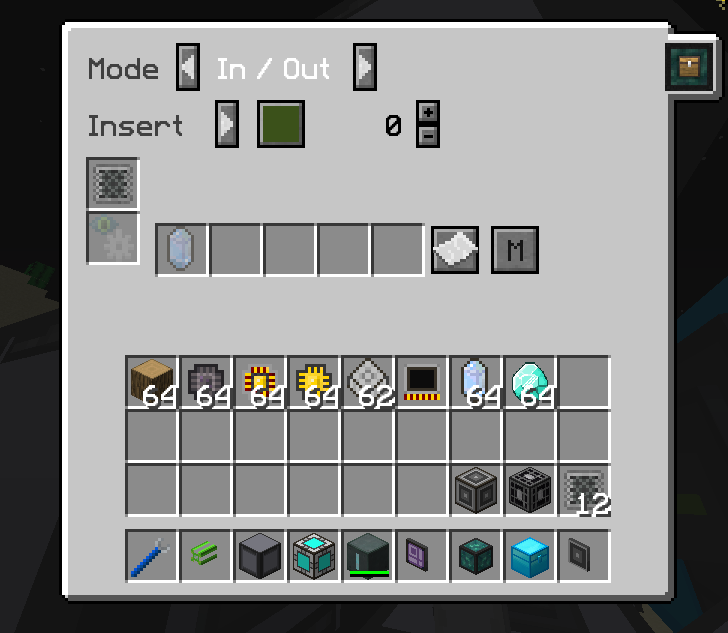
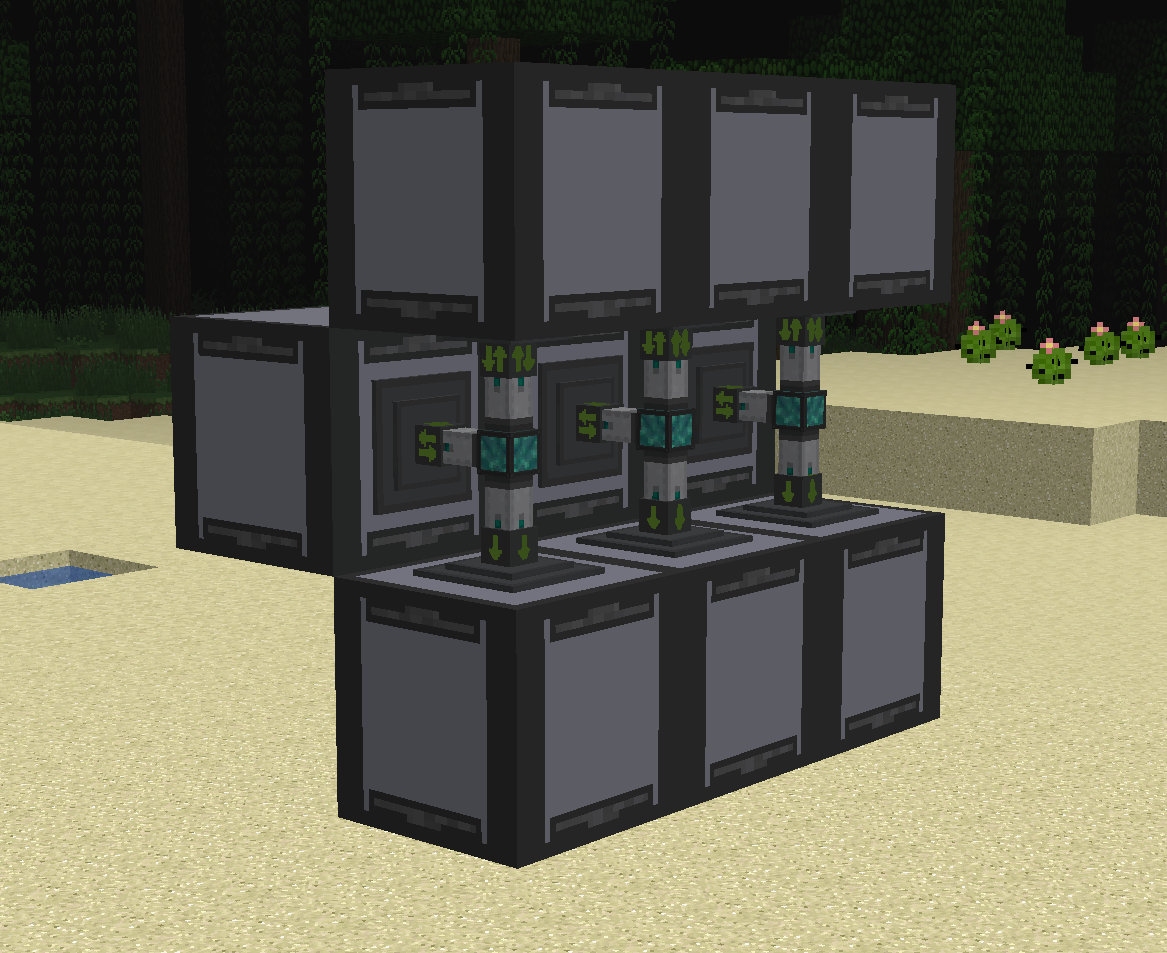
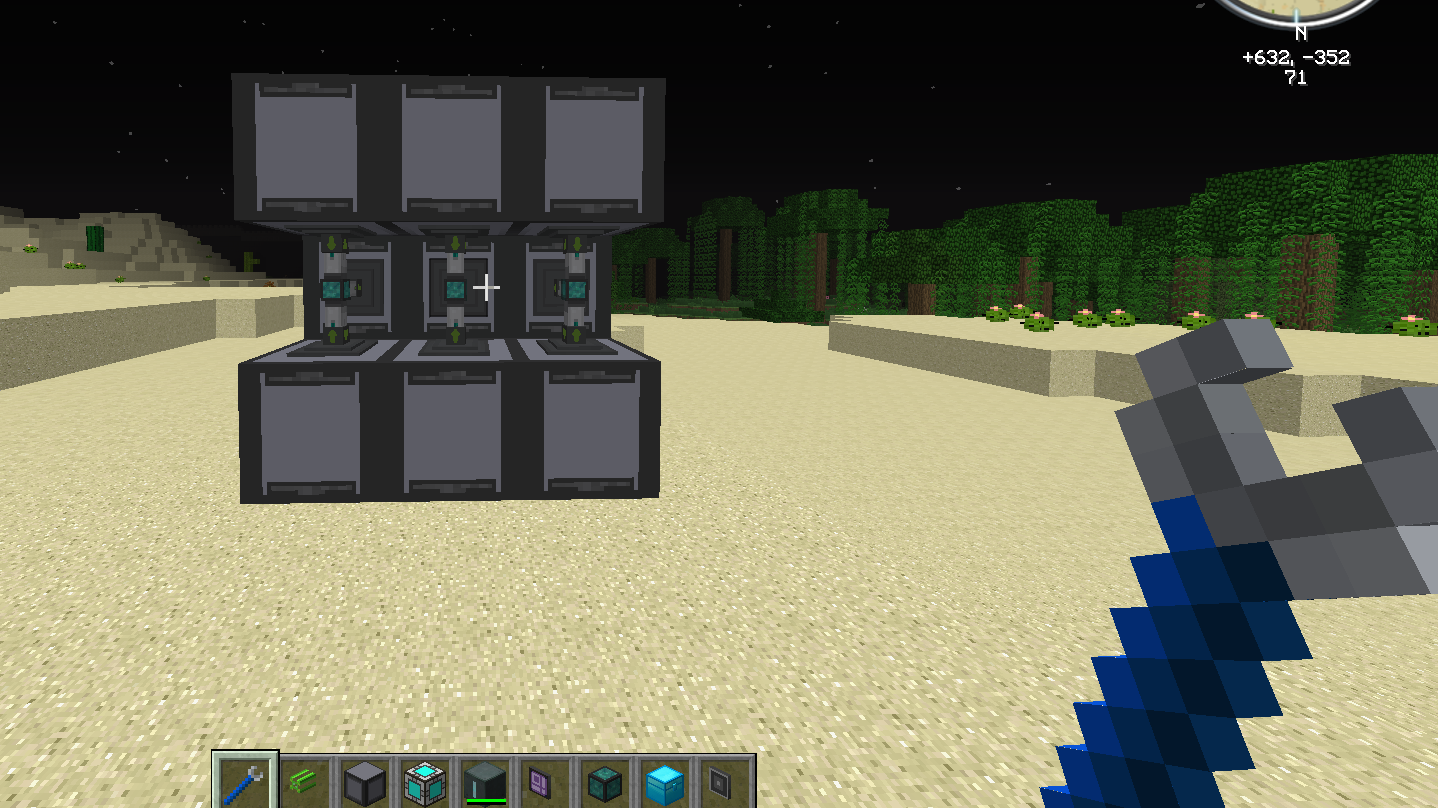
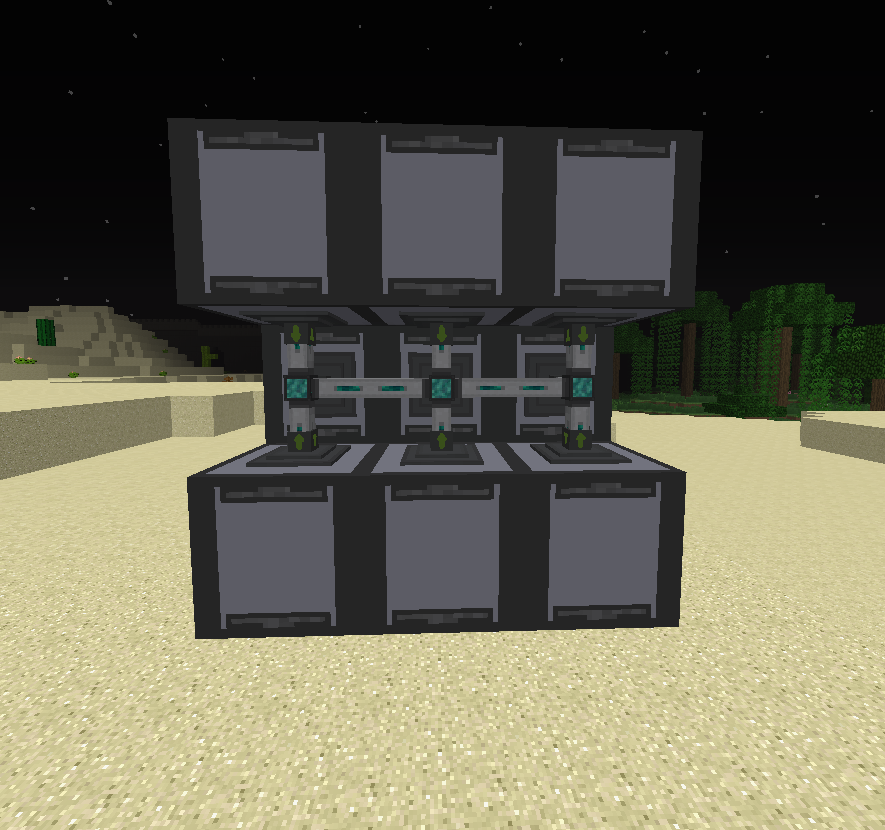
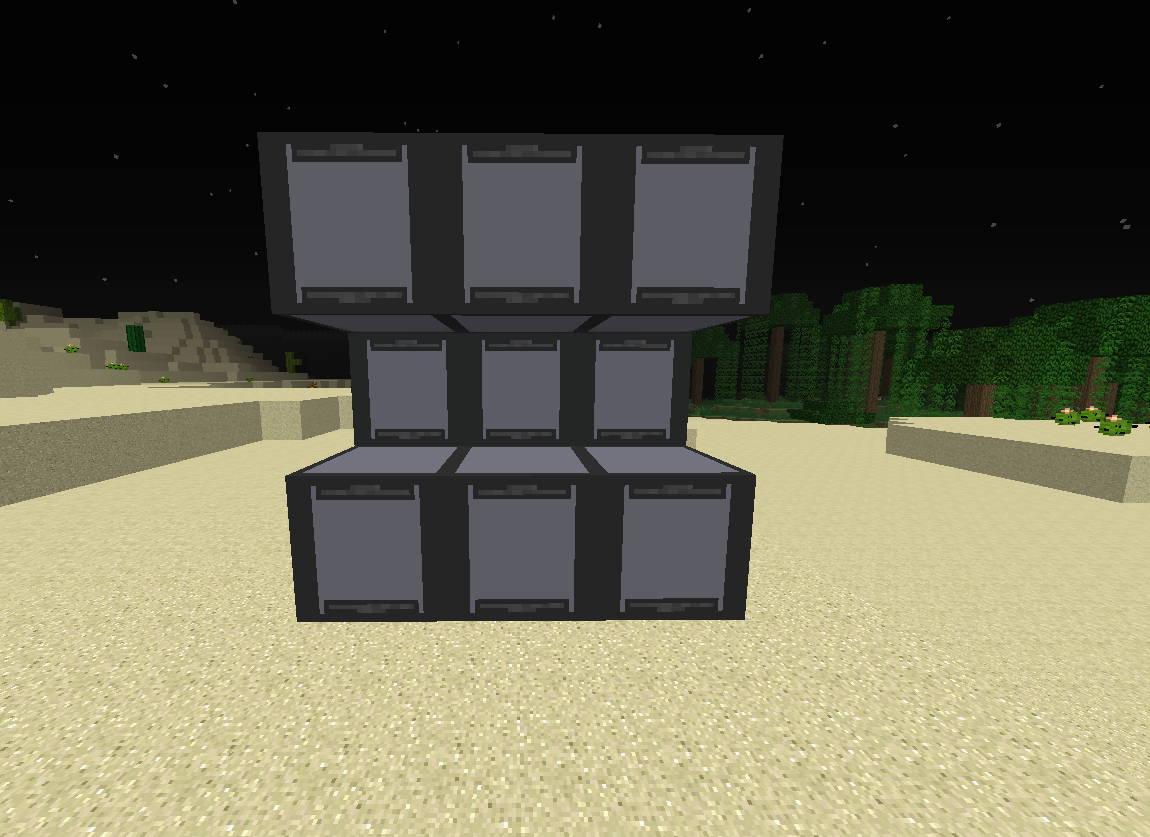
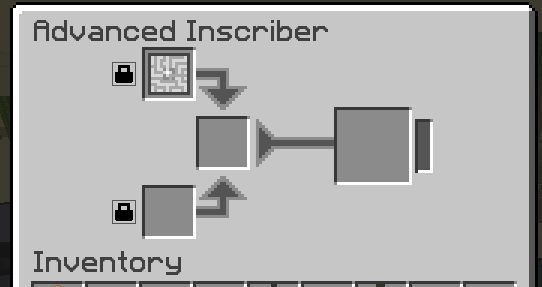
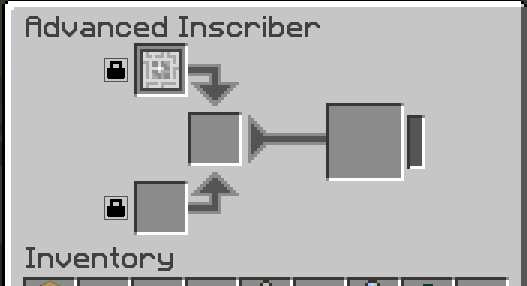
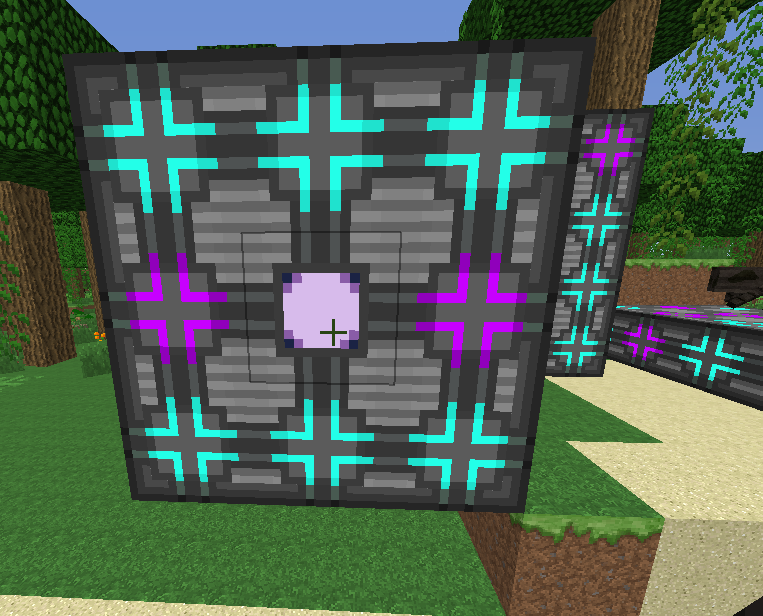
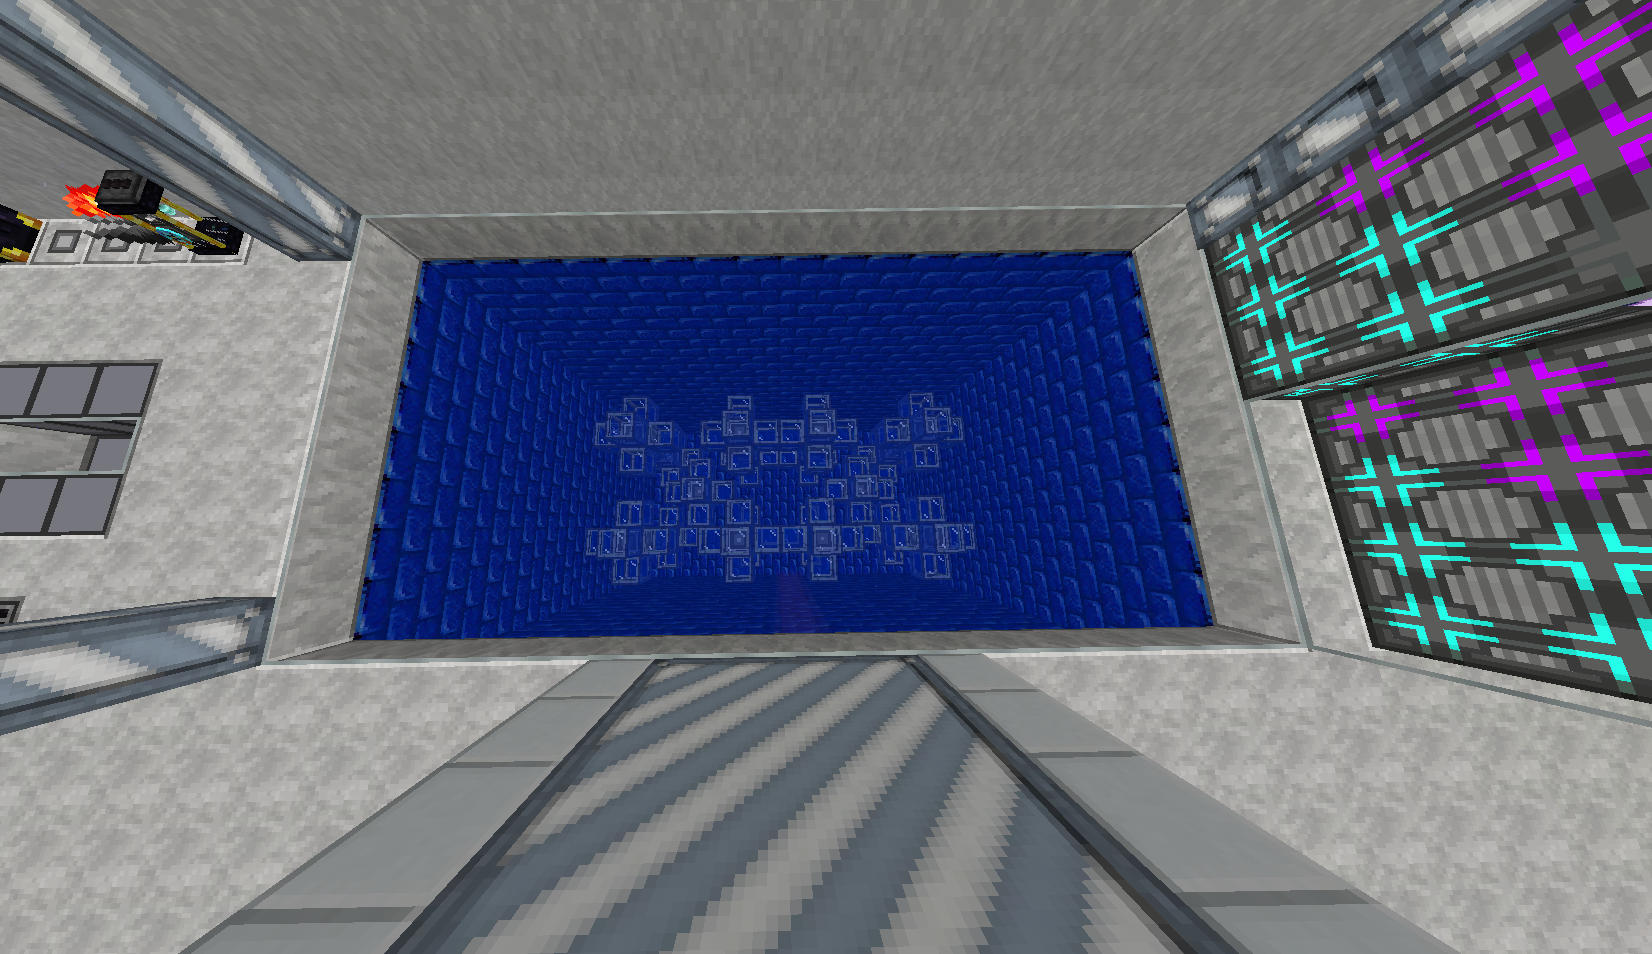
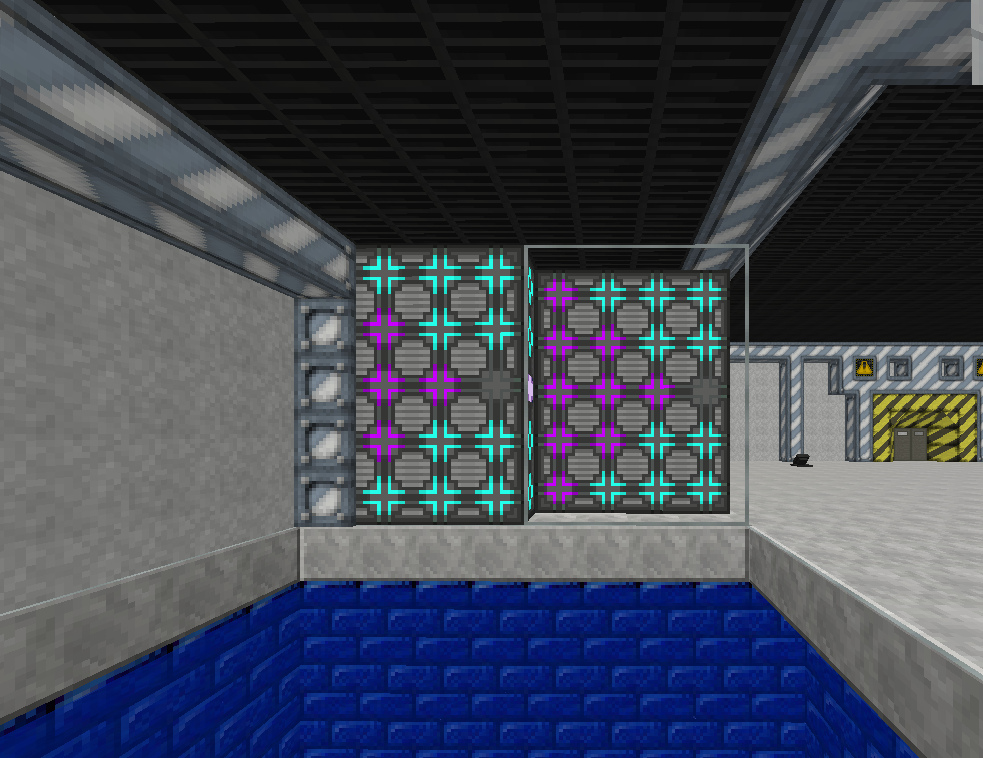
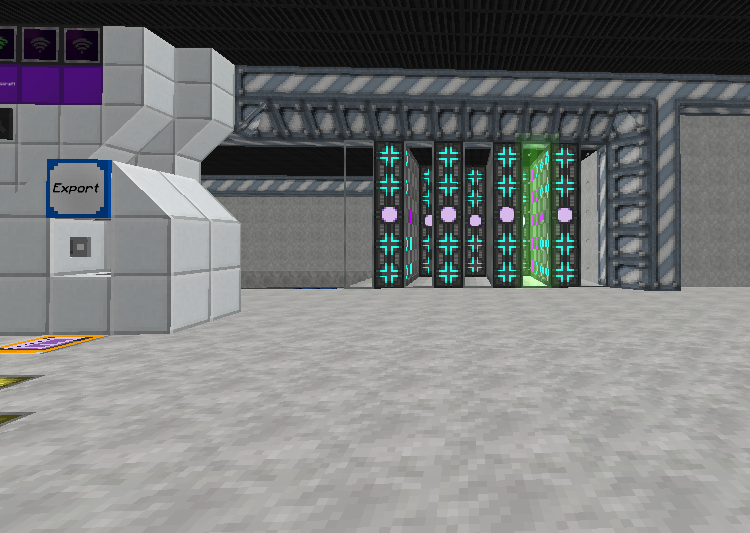
Here are two designs to auto-craft processors for AE2. What you'll need for design 1: 9 Advanced Inscribers (AE2 Stuff) 3 Interfaces (Applied Energistics 2) 1 Logic Press (Applied Energistics 2) 1 Calculation Press (Applied Energistics 2) 1 Engineering Press (Applied Energistics 2) 3 Silicon Presses (Applied Energistics 2) 7 Item Conduits (Ender IO) 3 ME Conduits (Ender IO) 9 Basic Item Filters (Ender IO) 3 Chests 1 Energy Acceptor (Applied Energistics 2) 3 Blank Patterns (Applied Energistics 2) Cables and an ME system with auto-crafting (You need a crafting CPU). What you'll need for design 2: 5 Advanced Inscribers (AE2 Stuff) 1 Interface (Applied Energistics 2) 1 Logic Press (Applied Energistics 2) 1 Calculation Press (Applied Energistics 2) 1 Engineering Press (Applied Energistics 2) 1 Silicon Presses (Applied Energistics 2) 5 Item Conduits (Ender IO) 3 ME Conduits (Ender IO) 5 Basic Item Filters (Ender IO) 1 Chest 1 Energy Acceptor (Applied Energistics 2) 3 Blank Patterns (Applied Energistics 2) Cables and an ME system with auto-crafting (You need a crafting CPU). Design 1: Place your 9 Advanced Inscribers in 3 rows as the image shows. Place 3 Item Conduits between the advanced inscribers. Disconnect the 3 conduits from each other by right clicking the gray bar between them with a wrench. Attached to the top and mid row, change the mode of the conduits to In/Out, set the mode of the bottom row to Insert. Place your Logic Press in the top left advanced inscriber. Place your Calculation Press in the top middle advanced inscriber. Place your Engineering Press in the top right advanced inscriber. If the black lock icon to the left has a red cross over it, left click it so that it looks as on the images. Add filters to the conduit connections attached to the top row of advanced inscribers, mode Insert. Add filters as in the images; Gold going to the top left advanced inscriber. Pure Certus going to the top middle advanced inscriber. Diamond going to the top right advanced inscriber. Add your 3 Silicon Presses to each of the advanced inscribers on the middle layer. Add filters to the conduit connections attached to the middle row of advanced inscribers, mode Insert. Add filters allowing silicon (both Ender IO and Galacticraft Core work, use the same as in the pattern you create later) to all 3 advanced inscribers on the middle row as in the image. Add filters to the conduit connections attached to the bottom row of advanced inscribers, mode Insert. Add filters as in the images; Redstone, Printed Logic Circuit and Printed Silicon going to the bottom left advanced inscriber. Redstone, Printed Calculation Circuit and Printed Silicon going to the bottom middle advanced inscriber. Redstone, Printed Engineering Circuit and Printed Silicon going to the bottom right advanced inscriber. Place your 3 chests in a row as in the image. These chests will act as a buffer for the items required for crafting. Diamond chests aren't required, but vanilla chests won't work as they'll connect to each other. Just don't use DirtChests or similar low volume ones. Place 3 Interfaces connecting to the chests. You can use the flat style interface as in the image as long as the middle is a normal interface, or you can just use the normal interface for all 3. (You get the flat style by placing a normal interface in a crafting grid). Flat ones look cooler. Place 3 Item Conduits on the bottom row of advanced inscribers as in the image, disconnect them from the chests. Switch the mode to Extract. Then use another Item Conduit to connect them to the middle interface. Switch the mode to Input. This will extract the finished processors from the advanced inscribers and input them into the ME system. Place a row of 3 ME Conduits between the advanced inscribers and chests where the item conduits are. Unlike the item conduits, the ME conduits should be connected with each other. Then place an Energy Acceptor on either the right or left side connecting to the ME conduits. Provide energy to the energy acceptor, Tesseracts (Thermal Expansion) or Quantum Entangloporter (Mekanism) are good ways, but ugly energy cables work as well. If you want you can disregard the energy acceptor and just attach it to your ME system with cables, but in my experience drawing less power from your ME system causes less potential issues. Attach your ME system to the inscriber. In your ME Pattern Terminal, create the 3 patterns the images show. If the icon to the right shows a crafting bench instead of a furnace, left click it. The crafting bench allows you to create patterns with existing recipes, the furnace allows you to create your own recipes by telling it the recipes and the end product. Place the pattern for the Logic Processor in the left interface. (This is shown in the image) Place the pattern for the Calculation Processor in the middle interface. Place the pattern for the Engineering Processor in the right interface. You're done. This is how the crafting components will flow. Accelerator cards work here as well to speed up the advanced inscribers. The faster it goes, the more server resources you demand. Please mind the lag. Make sure that all conduits that are extracting have redstone mode set to Always active. Design 2: Instead of placing 3 rows of 3 Advanced Interfaces place a top row with 3 advanced interfaces, then 1 advanced interface in the middle of the middle row and 1 advanced interface in the middle of the bottom row. Make sure that the Item Conduits are connected with one another for this design. Place the filters as in Design 1, with exception to the filter for the bottom advanced inscriber as it should have Silicon Press, Redstone dust, Logic Circuit, Calculation Circuit and Engineering Circuit all in one. The difference with this design is that the Silicon Presses for the 3 different Processors will be made in the same advanced inscriber and so will combining it all. This design will make you unable to craft Logic, Calculation and Engineering processors simultaneously (But do you really need that?). This design cost less resources to build, and as a bonus you'll place less stress on the server as you're using fewer machines at once. Place all 3 patterns in the same interface, as there only is 1. Don't forget the power. Hopefully this will be of some help to someone and not just look like a complete mess. If something doesn't work for you with this design, you've done it wrong. Good luck and don't make me lag!

-
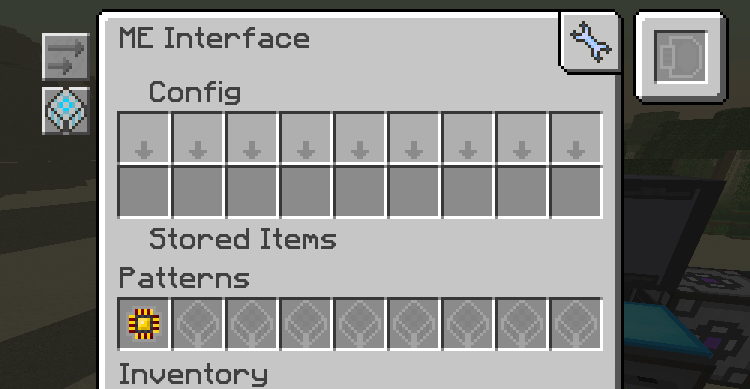
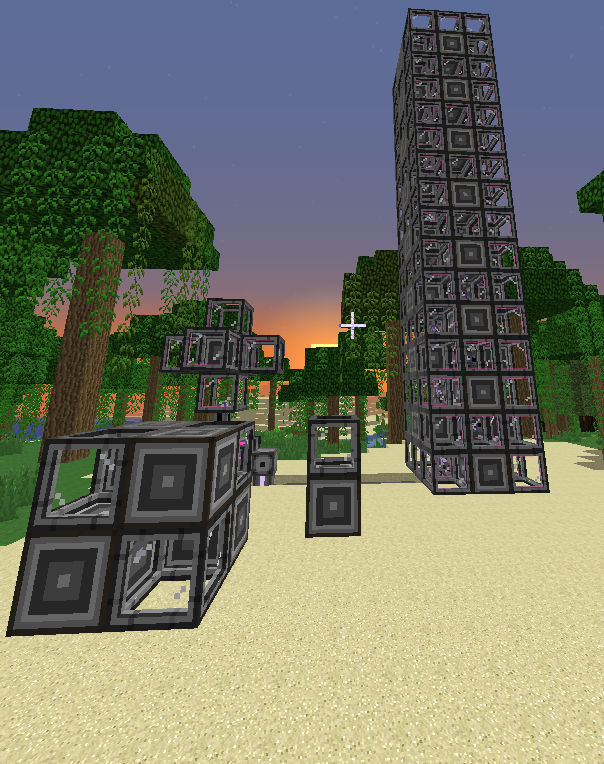
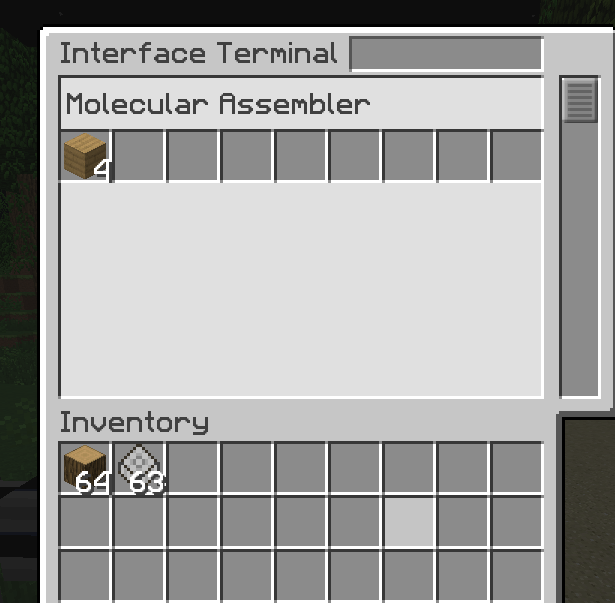
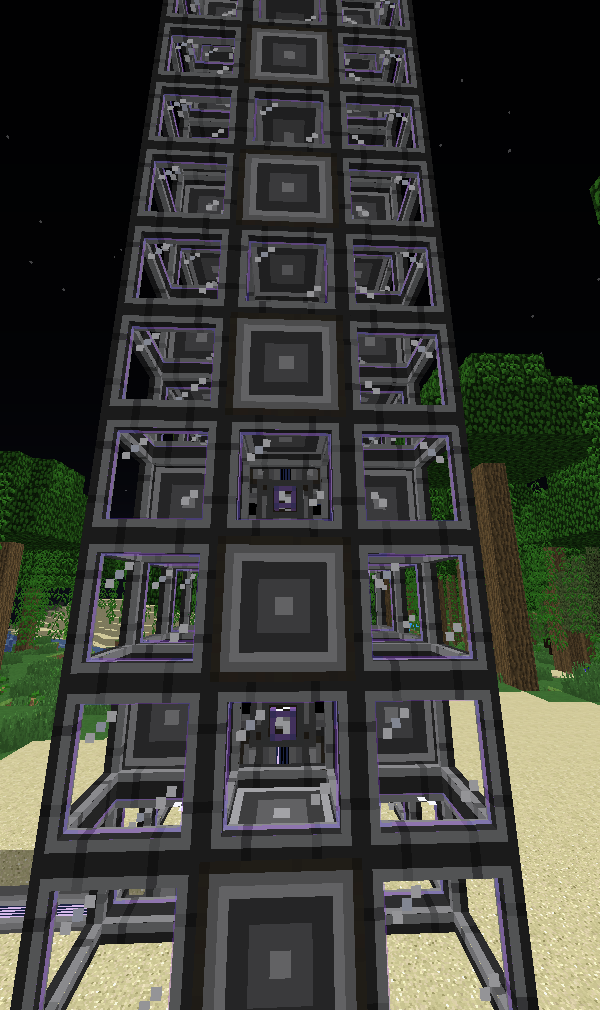
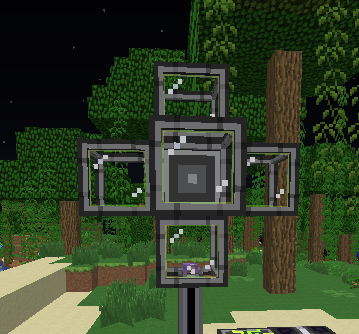
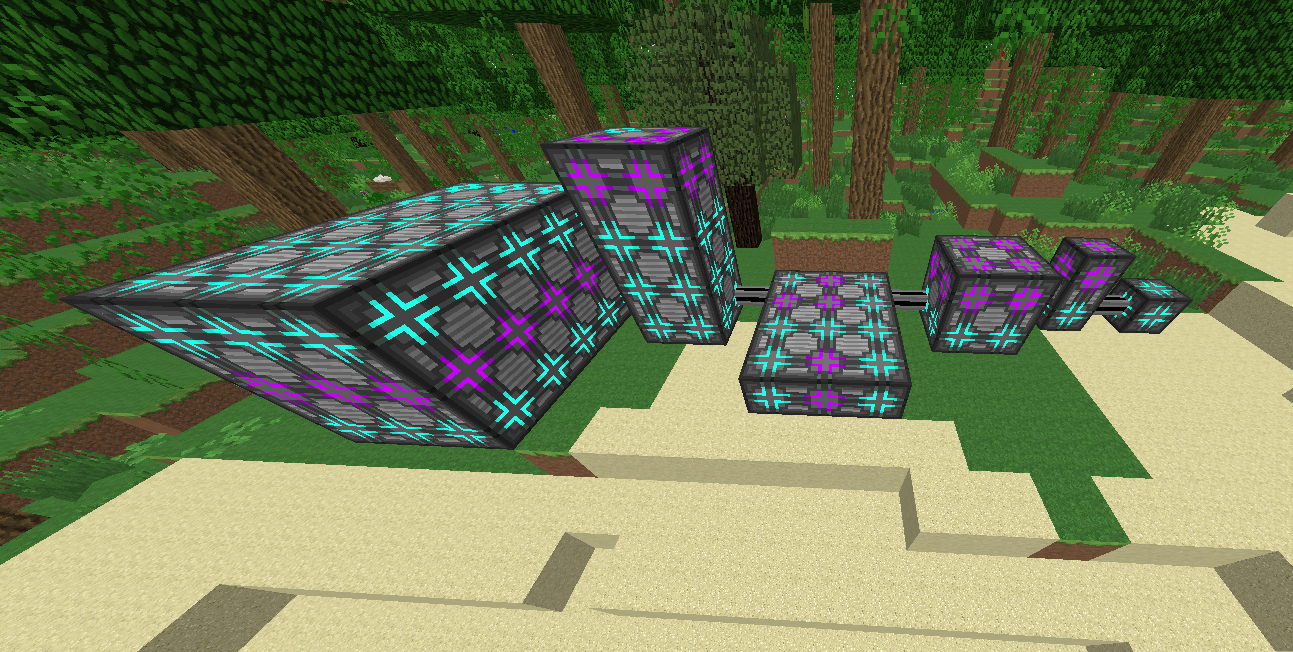
I thought I'd make a short post about features within the best mod Applied Energistics 2 (AE2). Having seen some people ask about how you automate the ME system I feel like giving a short post to help people new to the mod. What you'll need for this at start is a basic ME system. The items you are going to need for this is ME interfaces, Molecular assembler, cables, ME Pattern Terminal, an ME Interface Terminal will make it easier but is not necessary, Crafting Storage and Crafting Co-processing units, a crafting monitor is optional. Two basic structures are needed to be built for this, these are the CPU itself and the crafting chambers. Part of the CPU are Crafting Storage of chosen size and Crafting Co-processing units as well as a crafting monitor. Putting these blocks together in a solid cube will cause the CPU to form, the same is true by only using a single Crafting Storage. The crafting storage determines how big of a project the CPU can handle. More crafting storage means bigger crafting recipes. So if you're only able to make 10 sticks per time, adding more crafting units can increase it to for example 200, this doesn't change the speed of the process. By adding Co-Processing Units to your CPU you will be able to perform tasks simultaneously within the recipe. Say you're making sticks. You need to craft the logs to planks and the planks to sticks. By adding 1 Co-Processing Unit you can now craft sticks from planks before all logs have been turned into planks. Each Co-Processor unit allows for 1 additional task to be crafted within the recipe. They are also responsible for how many molecular assemblers you can utilize for a recipe. If you have multiple Molecular Assemblers attached to an interface with the recipe each Co-Processing Unit will increase how many Molecular Assemblers can be used at once. So then moving over to the Crafting Chambers. It's in your Crafting Chambers which all the crafting will take place. By attaching a Molecular Assembler to an Interface you will be able to start crafting stuff. Add the recipe you want into the interface and once requested to craft it will start crafting inside the Molecular Assembler. You can put up to 6 Molecular Assemblers on your interface, thereby enabling crafting to take place in more Molecular Assembler than 1. But as mentioned earlier, this will be dependant on how many Co-Processing Units you have available. In order to make patterns to put in your crafting chambers you need the Me Pattern Terminal. It's in here which you make recipes into patterns that are placed in interfaces. The ME Interface Terminal helps you out by showing you the content of all the interfaces. This makes it much easier to keep track of where every recipe is and you can put patterns into interfaces in this Terminal rather than running around finding the best choice. So how do you actually do it? First of all stick to the "no connections crosses chunks" rules. Do not connect AE2 stuff over chunk borders or you risk having items disappearing. You should probably also add an empty biometric card with build permission into your security station, as this can prevent the cross chunk bug. Be realistic when you think about how big you need to build things. Here are some examples of CPUs Here's how it looks like if you add the Crafting Monitor to the CPU multiblock. You could go really big with your CPUs, but the question sorta becomes "Why" pretty quickly. Having the capacity to craft 2'000'000'000 cobble into something else in one order is pretty meaningless. For cobble that should never be a thing anyhow, but for other stuff you often get by crafting lower volumes. You want to think about the balance between Crafting Storage (Cyan/blue in this image) and Co-Processing Units. The more Co-Processing Units, the faster you can craft. This is where the Crafting Chamber and CPU can bottleneck each other. Being able to craft 100 things simultaneously is not going to make anyone happy. Connect the CPU to your ME system with cables. These are some examples of Crafting Chambers: The middle one is most basic allowing each pattern in the inscriber to be crafting in 1 molecular assembler. The one on the left has 3 molecular assemblers connected to each interface allowing for a recipe to be crafted simultaneously in 3 places. This design however will share all the growth chambers between the interfaces, so if 1 interface has a pattern for stick and the interface down to the left has a pattern for planks the molecular assembler they share will only be able to chose one to craft. Behinds that you see an interface covered on all sides with molecular assemblers, leaving it with 6 of them. For the pattern recipe in the interface to be able to use all 6 you need to have 5 co-processing units in the CPU. This is very effective and therefore also better at creating lag. The last one to the right uses a dense cable in the middle, two interfaces on opposite sides, then the layer above has it rotated 90 degrees, molecular assemblers are then put on each side of the interfaces (you can exclude the side facing outwards for it to be more compact). This design combines size taken up by the Crafting Chamber with access to growth chambers. 1 interface uses up 1 channel, it doesn't matter how many Growth Chambers are attached. By adding Accelerator cards to the Molecular Chambers they will be able to craft much faster. Don't overdo it. Upgrading one Growth Chamber will only affect the speed inside that Growth Chamber. This is how the ME Pattern Terminal looks like: Put this where you want. Add Blank Patterns to the right slot, then when you've got the recipe you want to craft, simply press the arrow below the blank patterns and you'll have your pattern for that recipe. Next to the X by the crafting grid is what looks like an iron ingot, the way it looks now tells your ME system that for this recipe, matching ingredients can be used to replace what was initially in the recipe. Say I were to run out of oak wood here, the ME would then use similar wood. This is the ME Interface Terminal As stated, here you can keep your patterns organized. Once you've built all the structures, they all have to connect to your ME. If it does not connect, then it's not part of the network. The spirit of AE2. Avoid overbuilding and auto-crafting huge amounts of items with this. It will cause lag, the faster it crafts the more lag you generate. Hopefully I've covered everything. Automation of specific machine setups will be another thing, as with Extra Cells. To end it off I thought I'd show you my ME auto-crafting.
-
- 1
-

-
-
Thank you Sir!
-
Thank you very much Sir!
-
I'm quite sure I haven't written an intro before even though I've been a member for a bit. I want to start this by admitting that I'm not a medic, I started studying towards it but for personal reasons had to stop and never got around to change my Minecraft username. I am however Swedish. I started playing Minecraft around 8 years ago and joined the XI server around 3 years ago. I've been playing on and off, but Minecraft is probably the game I've been most consistent with. C&C Red Alert 2 is one of my favourite games along with Battlefield Vietnam, likely from nostalgia. Playing Call of Duty back when it was released gave me nightmares and therefore I never really got sold on it, however I did enjoy MW:RE on Wii. As of today Minecraft and CSGO are my games of choice. I personally cannot stand Battle Royales, I did however enjoy the movie. I've got a sarcasm fuse that light pretty easily, I would assume it's a way of coping with the world. Hopefully my sarcasm won't find it onto anyone's toes. I enjoy watching documentaries of different kinds and riding my bicycle. Thank you for reading, enjoy your day!
-
service Pharais Services: Insurance - w/ N2galaxy
Swedish_Medic replied to Pharais's topic in Minecraft's Minecraft Discussion
So you're offering a service which you haven't planned out completely and still take payment for it? Is this an item specific insurance or am I supposed to pay for what I've lost? If the former, am I supposed to update you every time I build something or every time I add something to my ME system? How would you investigate if something is a bug, has disappeared or not? What if I drop something when clear lag happens? Is my insurance based on you guessing whether something has disappeared or not? -
So you failed installing Optifine
Swedish_Medic replied to Swedish_Medic's topic in Minecraft's Minecraft Discussion
This looked better on the drawing board honestly. Make it clearer, concise, and straight forward. Anyhow I hope this can be to help to any person on the server wanting to add optifine to their pack -
suggestion Ghostwood Sapling in Admin shop
Swedish_Medic replied to Swedish_Medic's topic in Minecraft's Minecraft Discussion
To give some hope to this issue, I lost my ghostwood a time back, I once again went to look for a new one. It took me a few hours but I finally managed to find one. So if someone really want ghostwood it is obtainable just not easy to find, -
computercraft BigReactors Computer Monitor
Swedish_Medic replied to SparkyBearBomb's topic in Minecraft's Minecraft Discussion
I guess I'll have to check them both out and see which feels best. I've always used p4zeq7Ma since I started so I might need to step into the unknown. -
computercraft BigReactors Computer Monitor
Swedish_Medic replied to SparkyBearBomb's topic in Minecraft's Minecraft Discussion
Looks quite similar to p4zeq7Ma. What makes this one better? https://imgur.com/a/v6tez -
service Pharais Services: Insurance - w/ N2galaxy
Swedish_Medic replied to Pharais's topic in Minecraft's Minecraft Discussion
So how will you know whether something has been taken/bugged out, or simply you're being taken for a ride? At what cost is what replaced? You see I lost 10 full 16384k Storage Cells recently due to a bug with AE2, would you repay that? -
So you failed installing Optifine
Swedish_Medic replied to Swedish_Medic's topic in Minecraft's Minecraft Discussion
I'll try to remember to add that to my next post. I might have overlooked that part. -
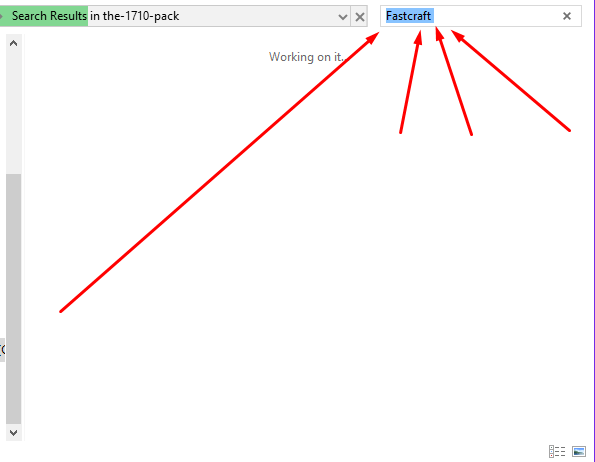
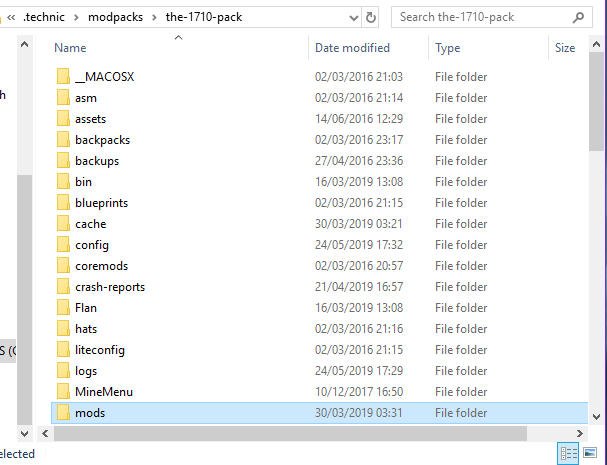
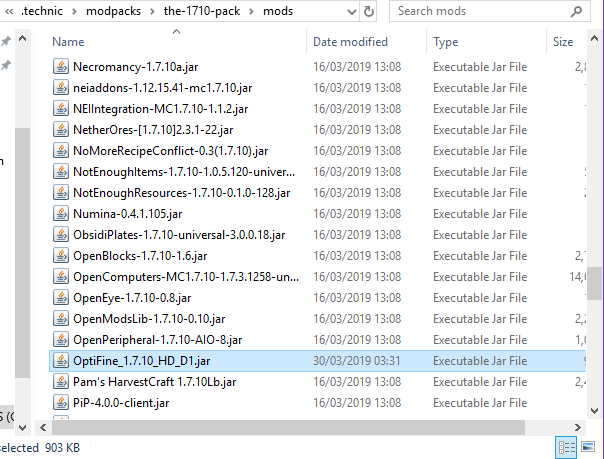
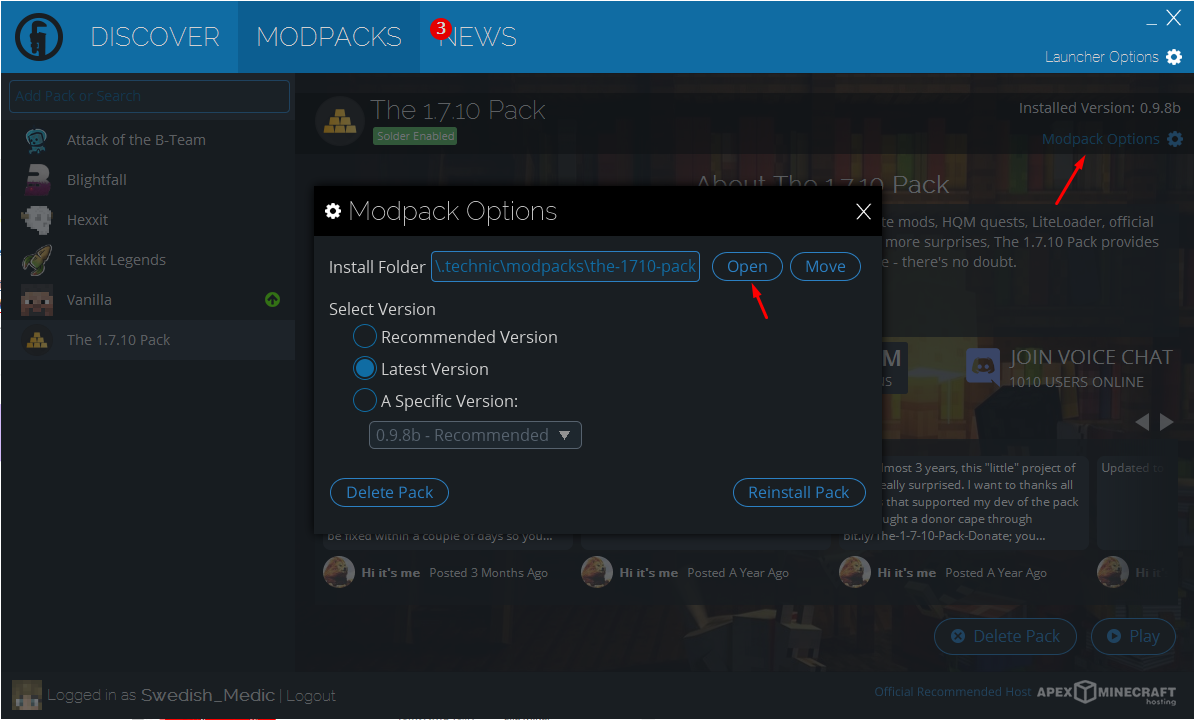
Installing Optifine can make your game unplayable on the server. That kind of sucks, especially since it's your fault. This happens for two reasons; 1. You didn't remove FastCraft., 2. You installed a version of Optifine which is too new. Here's some help to get Optifine working, if you're using something produced by Apple then please go away. Download Optifine D1 from here https://optifine.net/adloadx?f=OptiFine_1.7.10_HD_D1.jar (You can google yourself over there if you don't trust links. It's 2019, you shouldn't) Press your Windows key and type in %appdata% and then double click .technic . Then go to modpacks > the-1710-pack. If the previous step was too complicated you can simply open the launcher, press Modpack Options and then Open on the Install Folder line. Now find FastCraft by utilizing your search function and place it in a folder on your desktop or somewhere else, delete it if you think that's a good idea. You should find a .jar file and a .ini file. Take your OptiFine_1.7.10_HD_D1.jar file and add it to the folder mods. Now double click your Optifine file just for the fun of it. You're set. Go play with your zoom feature and not much else important. *Just to note. It is possible that other versions of Optifine below D5 work, I simply haven't tested them.
-
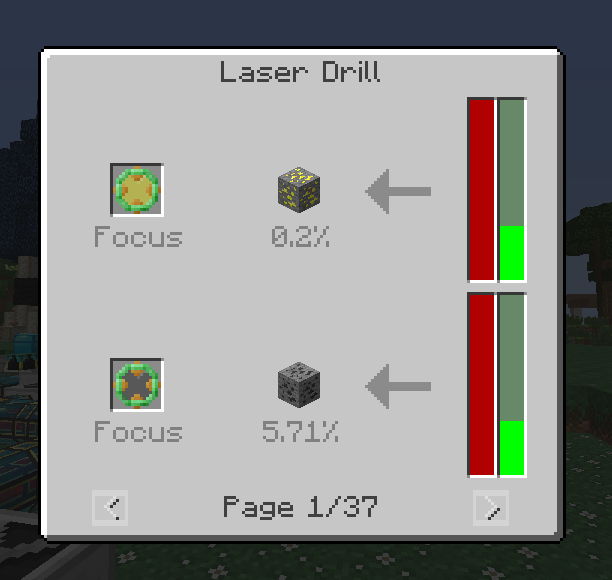
Laser Drill Focus Bonus revisited
Swedish_Medic replied to Swedish_Medic's topic in Minecraft's Minecraft Discussion
Having done all of this, I can give you all a hint on how to find the exact percentages of getting a certain ore by a certain focus. In the NEI, search for any of the ore listed. Left click the ore. Use the arrows at the top to get to the section for "Laser Drill". Click the big arrow pointing to the ore. Now you have all the percentages for all the ores. ?