Ruggerxi Posted October 24, 2011 Member ID: 6 Group: ++++ Senior Admin Followers: 191 Topic Count: 2840 Topics Per Day: 0.46 Content Count: 12675 Content Per Day: 2.07 Reputation: 14170 Achievement Points: 108781 Solved Content: 0 Days Won: 155 Joined: 09/01/09 Status: Offline Last Seen: 14 hours ago Birthday: 08/25/1976 Device: iPhone Posted October 24, 2011 Does anyone have that config for COD4 that helps lower ping and make your game play smoother Awards
chris4874 Posted October 24, 2011 Member ID: 2491 Group: **- Inactive Registered Users Followers: 0 Topic Count: 37 Topics Per Day: 0.01 Content Count: 354 Content Per Day: 0.06 Reputation: 0 Achievement Points: 2140 Solved Content: 0 Days Won: 0 Joined: 05/11/11 Status: Offline Last Seen: Never Birthday: 04/20/1961 Posted October 24, 2011 yes i have about 12, some are from different teams that i have picked about with some are a collection of yitch 2 and 3 with kallers config etc, it depends on how much "eye candy "you are willing to lose, most of them you cannot use outside of well, here really its a cvars thing
bobbarker Posted October 24, 2011 Member ID: 689 Group: ***- Inactive Clan Members Followers: 69 Topic Count: 100 Topics Per Day: 0.02 Content Count: 2030 Content Per Day: 0.33 Reputation: 1533 Achievement Points: 13317 Solved Content: 0 Days Won: 1 Joined: 11/04/09 Status: Offline Last Seen: November 15, 2025 Birthday: 07/22/1965 Device: iPhone Posted October 24, 2011 Whats a matter Roog, your "special" hacks dont work anymore? hhhhhhmmmmmmm, odd. Awards
Ruggerxi Posted October 24, 2011 Member ID: 6 Group: ++++ Senior Admin Followers: 191 Topic Count: 2840 Topics Per Day: 0.46 Content Count: 12675 Content Per Day: 2.07 Reputation: 14170 Achievement Points: 108781 Solved Content: 0 Days Won: 155 Joined: 09/01/09 Status: Offline Last Seen: 14 hours ago Birthday: 08/25/1976 Device: iPhone Author Posted October 24, 2011 not for me, its for someone else. My hacks are working just fine! google 1 Awards
Labob Posted October 24, 2011 Member ID: 42 Group: *** Clan Members Followers: 50 Topic Count: 338 Topics Per Day: 0.06 Content Count: 8394 Content Per Day: 1.37 Reputation: 6143 Achievement Points: 54511 Solved Content: 0 Days Won: 14 Joined: 09/01/09 Status: Offline Last Seen: May 28 Birthday: 01/30/1959 Device: Windows Posted October 24, 2011 I just moved it was easyer now my ping is under 30and you guys now really suck and Idon't even play this game nananana. ANd WTF Rugger how you get a medal more then me who you been blowing Awards
bobbarker Posted October 24, 2011 Member ID: 689 Group: ***- Inactive Clan Members Followers: 69 Topic Count: 100 Topics Per Day: 0.02 Content Count: 2030 Content Per Day: 0.33 Reputation: 1533 Achievement Points: 13317 Solved Content: 0 Days Won: 1 Joined: 11/04/09 Status: Offline Last Seen: November 15, 2025 Birthday: 07/22/1965 Device: iPhone Posted October 24, 2011 I found a link that shows you a setup config to lower ping Awards
RD Posted October 24, 2011 Member ID: 2520 Group: **- Inactive Registered Users Followers: 5 Topic Count: 50 Topics Per Day: 0.01 Content Count: 627 Content Per Day: 0.11 Reputation: 48 Achievement Points: 3748 Solved Content: 0 Days Won: 0 Joined: 05/23/11 Status: Offline Last Seen: January 16, 2018 Birthday: 08/18/1953 Posted October 24, 2011 bobbarker I found a link that shows you a setup config to lower ping Should have known better than to have clicked on a link you left ya fucker...LOL
RD Posted October 24, 2011 Member ID: 2520 Group: **- Inactive Registered Users Followers: 5 Topic Count: 50 Topics Per Day: 0.01 Content Count: 627 Content Per Day: 0.11 Reputation: 48 Achievement Points: 3748 Solved Content: 0 Days Won: 0 Joined: 05/23/11 Status: Offline Last Seen: January 16, 2018 Birthday: 08/18/1953 Posted October 24, 2011 Labob who you been blowing Ruggman dont pitch.......he catches. Thats why he is the boss
WiZiD Posted October 24, 2011 Member ID: 804 Group: ***- Inactive Clan Members Followers: 32 Topic Count: 446 Topics Per Day: 0.07 Content Count: 3600 Content Per Day: 0.60 Reputation: 1053 Achievement Points: 24386 Solved Content: 0 Days Won: 4 Joined: 11/28/09 Status: Offline Last Seen: June 3, 2025 Birthday: 04/25/1960 Posted October 24, 2011 Tweaks for improved game performance. Call of duty______________________________ Console Commands: *Enable Console first in options* then type in the followingthen hit enter. *First things first*: (back up your "normal" config) found here for*XP C:\Documents and Settings\<USERNAME>\Local Settings\Application Data\Activision\CoDWaW\players\profiles\<playername> Vista is in asimilar place 1) Punkbuster Sleep setting: /pb_sleep 500 (tells punkbuster client software towait longer before awakening and sending info to PB) Save PB setting to config: /pb_writecfg (makes the above setting permanent soyou don’t have to do it each time you log in) - The above changes the frequency that your PC reports to the server and thusreduced frequency of network spikes and the associated latency. 2) Packet transfer setting: /cl_maxpackets 100 - This setting helps smooth out data transfer and should help if you have acable or other high speed connection. This setting works in conjunction with the com_maxfps 125 setting. 3) Send duplicate packets: /cl_packetdup 0 or 1 - Manage whether or not extra or duplicate packets are sent to the server.(1 isdefault and this sends an extra packet of data in case the first one is lost. If you enable the lagometer (see tools below), then you can see if you arelosing any packets.If yes, then leave this at 1. If no, you can considerchanging to 0. 4) Snaps: /snaps This is possibly the most important setting for getting a goodconnection. Snaps setting determines how many updates you recieve from theserver. 20 to 30 for 56K connects in quake series 40 for high speed internet im sure thesame for cod. (30 is fine). 5) Enable higher Frames Per Second (FPS): /com_maxfps 125 (Default is 85 sothis may help overall FPS. Some say this should be set at or just above youraverage FPS to smooth things out) - This allows your game to go allow higher frame rates than the default. Set itto a value you want based on the capabilities of you machines… to unlock FPS completely and see what you machine is capable of set to 0, itcan go as high as 1000. 6) Field of View (FOV): /cg_fov 80 7)Shadows: /sm_enable 0 Turns off unique Shadows ingame 8)Depth of Field: /seta r_dof_enable "0" Gets rid of the"blur" around you gun and clears your perperipheral vision. - If you want to widen your FOV (field of view) from 65 degrees to 80 degrees,use this command. NOTE: This basically “backs you up” to give you a larger viewing area at thesides but it does make user/soldiers/enemies slightly smaller at the same time.This command does not affect machine performance and is merely a preference togive you the ability to see more. In game tools: ______________ 1) Show framerate on screen so you can see how your PC is performing:/cg_drawFPS 1 (choices are 1,2,or 3 where 0 = off / 1 = on) - At a minimum, you need to try to be above 60FPS so that you have no visualchoppiness. Reduce textures, shadows, lighting etc. 2) Show network connection quality: /cg_drawlagometer 1 (puts a graph justabove your grenades icon on screen) - Top meter on graph. GFX shown in Blue, (or blue with small amounts of yellow)then you system is in synch and your screen/system is refreshing in sync withthe server’s perspective of the game world. If Yellow, then you are having issues and your screen/system may not be insynch with what the server thinks is happeing.. noticable lag bad hit rego. The blue shows how well your graphics card is staying in sync with the serveras it relates to rendering the gaming environment. A few yellow items is OK but you want the vast majority to be blue. If you havea lot of yellow, this means that your graphics rendering and server renderingof the gameworld is out of sync.The smoother the flow on this meter, the better, thefaster the higher your FPS is. - Bottom meter should be all or mostly green. Lots of yellow or red means thereare issues. When you spawn or die, you can sometimes see lots of RED , thisseems to be OK. If you are all green, then you can consider changing your cl_packetdupto 0 and you can increase your cl_maxpackets _________________________________ Performance improvements summary: *Enable Console first in options* Punkbuster Sleep setting: /pb_sleep 500 Save PB setting to config: /pb_writecfg Packet transfer setting: /cl_maxpackets 100 Send duplicate packets: /cl_packetdup 0 or 1 Max FPS: /com_maxfps 125 Field of View (FOV): /cg_fov 80 Draw your FPS on screen: /cg_drawfps 1 Draw your Lagometer on screen: /cg_drawlagometer 1 Shell Casings: /cg_brass o gets rid of the shell casings being ejected Shadows: /sm_enable 0 Turns off unique Shadows ingame __________________________________________________ Notes:*CG FOV :: Field of view, where the value is the angle of the circulararc that is displayed on your screen. High values will make the game appear "fisheyed". *MAX FPS :: This command limits your maximum FPS. You may ask why you wouldwant to do this, and the answer is that it will help the server from having lag confusion whenyour frame rate has a sudden rise or fall. Run a timedemo, collect your average FPS and usethat as the limit for when you play on-line. *MAXPACKETS :: This setting puts a limit on the maximum amount of packets thatcan be sent to the server via the client. This setting is useful for people with slowermodems. Obviously we all have high speed connects so set to at least 100. Lower maxpacket settingsi.e 30 lowers ping on screen but at the cost of registration. */sm_enable 0: Turns off unique Shadows ingame, it boosts FPS more than mostcommands. That's about it for now if I think of anything to add to this I will update thethread with a new reply post. Enjoy, try it out and give some feedback if things are better. Check here to see if your machine is up to the task of CoDWaW > http://www.systemrequirementslab.com/referrer/activision2?registration_option_id=7974thankx, Introduction:For the last couple weeks, during beta, I have been digging deep under the hoodof Crysis. I thought it would be fitting that I share my findings andmove my guide to the community that I have waited with for Crysis for solong. I hope you enjoy it and that it helps you with basic and advancedtweaking in the days ahead. This will continue to be a work in progress.I will cover both some basic and advanced tweaking. I'll share thesettings that I have found to be the most performance hungry and what you cando to get performance back or increase quality without draining performance toomuch. Then we will dig deep into one of the most, if not themost, tweakable games on the planet. We will also surpass very highsettings with ultra for the uber machines as the guide fleshes out.BASIC TUNINGBasic computer performance:I don't want to recreate the wheel but their are many things to do to increaseperformance in games with your computer. Details on how to do thesethings can be found by doing a google search for any of the following.* Latest drivers for your video card, motherboard, sound card can improvethings greatly at times.* Defrag your hard drive. It's prefferable to defrag 'before' installingso that the files stay close together and contiguous.* If you only have 512MB or 1GB memory, 2GB is highly recommended.* Go into your driver control panel to make sure antialiasing(AA) oranisotropic filtering(AF) is not enabled unless you want them to be, theyeffect performance alot. Also you can change texture filtering quality toprovide more performance in the drivers.* If you are running Vista make sure to be using thecurrent hotfixes, some effect performance and memory usage tremendously. Nvidia has a great list of recommended ones here: Vista hotfixes* A video card like an 8800 GT for $250 will provide tremendous results if youhaven't upgraded in a long time.* Disabling any unneeded running process, especially antivirus, while playingis recommended.Resolution:Resolution has a large impact because the game has so much geometry that thefillrate demands of large resolutions is beyond what people are used to. If you can lower resolution this will help gain many fps and provide smootherplay. If you have an LCD you need to use what is called 1:1 pixelmapping, or otherwise known as disabling scaling. This allows the imageto shrink but the quality of the image stays incredibly good. Scaling onthe other hand, always looks bad if using anything other than your nativeresolution. Scaling can be disabled on some monitors. If yourmonitor doesn't support this feature some drivers support it. With nvidiayou can disable it like so, imageprovided. So shrinking the image while maintaining incredible qualityworks well for performance, you can always slide your monitor closer you thenwon't notice the image is smaller.Custom resolutions can be used by using 'r_width=x' and 'r_height=x'. See below on advanced tweaking on how to use variables.In-Game Settings:The settings that have the biggest effect on performance are firstlyshaders. This game is one of the most shader intensive games on themarket. Going from high to medium shader settings works real well ingiving an average of anywhere from 7-10 fps or more, depending on somevariables. Next are Shadows and Post Processing. Shadows from highto medium looks very good still and provide a good boost of performance. Post processing has a big effect as well. The thing that people noticemost about post processing is motion blur and depth of field. These canbe easily turned on/off individually if desired seperate from the post processdrop down box, as will be seen in the advanced tweaking section. Texturessetting affects video memory usage quite a bit which we will look at next.Video Memory:Using beyond the amount of memory that is locally on the video card willproduce performance problems like stuttering and hitching due to having tofetch data from system RAM over the much higher latency PCI express bus. Inother words, adjust settings/resolution in the game not to exceed your videoRAM, otherwise you will experience overall performance issues and the periodicflickering of geometry and LOD's as it streams in. The game is very videomemory intensive. Resolution and AA effect the amount of video memory thegame uses tremendously. Here is a breakdown of video memory acrossdifferent settings and resolutions.* Windows XP* Nvidia Driver 169.011280x1024 medium* NoAA 184MB* 2xAA 295MB* 4xAA 355MB* 8xAA 395MB1280x1024 high * NoAA 315MB* 2xAA 375MB* 4xAA 440MB* 8xAA 470MB-Texture medium-* NoAA 300MB* 2xAA 363MB* 4xAA 423MB* 8xAA 445MB1680x1050 medium* NoAA 223MB* 2xAA 375MB* 4xAA 455MB1680x1050 high* NoAA 368MB* 2xAA 456MB* 4xAA 535MB-Texture medium-* NoAA 340MB* 2xAA 428MB* 4xAA 505MB1920x1200 Medium* NoAA 240MB* 2xAA 430MB* 4xAA 535MB1920x1200 High* NoAA 400MB* 2xAA 515MB* 4xAA 615MB-Texture Medium-* NoAA 370MB* 2xAA 475MB* 4xAA 585MBAA clearly makes a large impact in video memory. Different game levelsmay change these numbers. Changing textures from medium to low makes noappreciable difference since it is still using the lowspec pak. Thedevs have made huge advances in optimizing this area since earlier builds ofthe game, either that or the textures are quite lower in quality, infact theseare the numbers medium textures used to give as if high textures aremissing. Final shipping game may reflect differences here, will updateaccordingly. The textures setting alone no longer makes the difference itdid in earlier builds regardless of high/medium/low setting, which again seemsto give some indication higher textures have been removed temporarily orentirely.Breakdown by video card memory:256MB Video - 1680x1050 medium without AA or 1280x1024 mediumwith AA.8800 GTS 320MB - Handles up 1680x1050 medium no aa, can go tohigh with some thrashing. Only AA at 1280x1024 looks to be viable with thatmemory limit.512MB Video - Comes into it's first wall at 1680x1050 4xAA onhigh. Performance and not memory will impact you here.8800 GTS 640MB - Handles up to 1920x1200 4x AA (AllHigh). performance makes that out of reach on todays HW.768MB and above - Memory will not be your limiting factorunless going to 2560x1600 with AA. Your GPU handling the raw processing of thegeometry and shaders at that high resolution will be out of reach. Idon't doubt that 1GB can be reached by tweaking Crysis and high resolutionswith max AA on tomorrows HW. I already have found ways to approach 650MBat only 1280x1024.Basic video memory tips:* Find your video memory ceiling with resolution and texture setting first.Then adjust other parts of the game that are affecting raw performance likeshaders or shadows until you get your acceptable performance. If you don'tproperly anticipate video memory usage, you won't realize why it is hitching onyou, regardless of other settings.* You don't have to turn everything to medium to conserve memory, textures havethe biggest effect by far.* Remember as more players enter the map this memory will climb a bit, as wellas larger out door levels. Also as you stay in the game for a while this numberwill rise a little. I cached all the outdoors, but not the indoors.* Adding any tweaks for higher quality, especially along the lines of LOD orview distance, has the potential to raise memory usage even further.* The higher you go over your limit, the worse performance, texture stuttering,hitching and popping of geometry will become.* If your resolution doesn't appear just use something close, like 1680x1050 isclose to 1600x1200.Benchmarking:Crysis came with two benchmarks to test and compare your performance. AGPU benchmark and a CPU benchmark stressing physics. They can be found inthe Bin32 or Bin64 folders. Just double click on them to start. Thegame will run through 4 loops of the benchmark. When it's done it willshow you the results, I suggest you ignore the first one since it was justcaching the level and assets on the first run. You can make your ownbenchmarks but for now these two work well as standard tests. See thebenchmarking tool mentioned in post 3 for an improved benchmarking experience.Antialiasing and Anisotropic filtering in CrysisFirst of all AA is a serious performance drain. More so than other gamesbecause of the incredible amount of triangles and polys in the scene. AAis only recommended for the highest end GPU's and keep in mind high resolutionswill be more intensive. So if you choose to use it then keep in mind thevideo memory that will be used (shown above). There is some interestinginformation starting to come out about AA. Apparently it ispreferred to use the in-game AA settings as the proper way to use AA. Inother words, don't use the driver control panel but control it from in game.Additionally, HardOCP in their recent 8800GT review had this quote. "This comes directly from NVIDIA’s James Wang on the use of TransparencyAntialiasing in Crysis: ” Crysis handles foliage very differently from normalengines so TRMS/SS won't work. Bit of a shame really. The game has somebuilt-in foliage AA, but it only kicks in in "Very high" qualitymode.”"I am actually pretty sure it can be enabled at high as well, not just veryhigh. High and very high shader settings are compatible with in game AA,while low and medium shaders are not. Regardless of in game shader settings ifAA is enabled, High shaders will also need to be enabled. If AA iscurrently enabled, but shaders is set to medium or low, AA will automaticallybe disabled by the game. So it will take a good medium to high end cardto use AA not only because AA is demanding on it's own but because you willneed to run atleast high shaders as well.As to Anisotropic Filtering, it can only be enabled in the driver settings. Unfortunatelythere is a bug with the nvidia drivers that makes a white halo around distantbushes and trees. I believe this bug only shows itself on aparticular. This apparently will be fixed with a future driver.VsyncVsynch can be enabled in the game with r_vsync = 1. It is off by default.ADVANCED TWEAKINGCustomizing the game:The in-game settings are like using a paint roller on a canvas, while tweakingis like the fine brush of the artist. The roller gets the job done butit's not going to be as fulfilling as it could be. You need a fine brushto make it the way you like. The developers didn't want to burden youwith 20 choices of drop down boxes so they instead made those broad strokes foryou. Unfortunately the difference in performance and quality betweenlow/medium/high/veryhigh can be staggering. Sometimes a move from high tomedium can change 20 variables, but it may not be necessary to change all 20when only a few really effect performance or quality. The fine strokes willallow you to get exactly what you want and Crytek has really given us theability to change just about everything in the game you would want. Youdo not have to sacrifice as much quality for performance as you maythink. Sometimes you can keep settings high or medium and change onevariable that is the big performance tanker or one setting that brings backsome good quality at little cost. Enough intro lets get busy.How to make an autoexec.cfgIn the early days of the beta people modified the cvar groups game filesbecause it was the best they knew, if you have heard about this I do notrecommend it. It changes the way your in-game settings work permanentlyand changing to medium or high won't have the desired effect anymore. Welater learned that you can make an autoexec.cfg file in the "Crysis SPDemo" folder. Tweaks are made up of Console Variables (cvars forshort), a list of the ones currently used by the game can be seen below. In this file you put in the tweaks you want one by one and the game will usethem when it starts up.View Performance In Game Place the line r_displayinfo=1in your autoexec.cfg. This will show you fps, system memory usage(notvideo), triangle count, etc. Also you can use fraps if you wish to show fps as well as takescreenshots and make movies of the game.Enable The Console:By default the devs have disabled the console unless you learn the trick toenable it. You can enable it by adding the line con_restricted=0to your autoexec.cfg and you can then use tweaks while in game in real time andwatch with your own eyes the quality and performance changes. Pull downthe console while in game by hitting the ~ (tilde) key. From there youcan type in a cvar, without a value, and the game will tell you the currentvalue. If you want to test a tweak, just type it in but instead of usingan equals sign to put in a value like in the autoexec.cfg, just use aspace. Example in console: r_displayinfo 1If you have the fps shown in game you will see the performance effect ofdifferent settings.Enhancing on DX9:It is a very tweakable game. Crytek have given us theability to tweak many many things to reach Very High equivalent settings andeven far far beyond. I will give you a break down of every exact VeryHigh setting(used in DX10) for reference. This is the real list of every setting and their values. So you can use this list and mimic exactly very high in DX9 to the fullestextent possible. Just add this list to an autoexec.cfg and you will havevery high for DX9. sys_spec_GameEffects = 3sys_spec_ObjectDetail = 3sys_spec_Particles = 3sys_spec_Physics = 3sys_spec_PostProcessing = 3sys_spec_Quality = 3sys_spec_Shading = 3sys_spec_Shadows = 3sys_spec_Texture = 3sys_spec_VolumetricEffects = 3sys_spec_Water = 3e_foliage_wind_activation_dist = 25e_max_entity_lights = 16e_obj_quality = 4e_particles_max_emitter_draw_screen = 32e_particles_quality = 4e_shadows_cast_view_dist_ratio = 0.8e_vegetation_sprites_distance_ratio = 1.5e_view_dist_ratio_detail = 30e_view_dist_ratio_vegetation = 45e_water_ocean_fft = 1e_water_tesselation_amount = 10es_DebrisLifetimeScale = 1g_battleDust_enable = 1g_breakage_particles_limit = 250g_ragdollDistance = 40g_ragdollMinTime = 15q_Renderer = 3q_ShaderFX = 3q_ShaderGeneral = 3q_ShaderGlass = 3q_ShaderHDR = 3q_ShaderIce = 3q_ShaderMetal = 3q_ShaderPostProcess = 3q_ShaderShadow = 3q_ShaderSky = 3q_ShaderTerrain = 3q_ShaderVegetation = 3q_ShaderWater = 3r_BeamsDistFactor = .05r_BeamsMaxSlices = 200r_ColorGrading = 1r_DepthOfField = 2r_DetailNumLayers = 2r_DynTexAtlasSpritesMaxSize = 32r_MotionBlur = 4r_ShadowJittering = 2.5r_SSAO_quality = 2r_SSAO_radius = 2r_sunshafts = 1r_TexAtlasSize = 2048r_Usepom = 1r_WaterReflectionsQuality = 3r_WaterUpdateDistance = 0.2In Game Settings:This chart shows the breakdown of "every" console variable that ischanged by the in-game settings. It color codes every different type ofin game menu(textures, game quality, shadows,etc) and shows you what variablesactually change, when you change a drop down menu in the game, and what valuesthey change to. To see more console variables that cannot be changed ingame and to see all the definitions of the settings, follow the links below theimage.See the full real size image with definitions and many more settings here. This list is a great starting point for your own tweaking adventure to mix andmatch settings as you like. Remember you can try most of them while ingame in realtime in the console and see the effect on quality andperformance. Get the original Excel spreadsheet for your own personal usehere. You can copy/paste right into the game console.How do I do start?: summaryYou can start by making an autoexec.cfg in the main game folder. Add twosettings to start.Just copy/paste them.r_displayinfo=1con_restricted=0Now you can open the console and start trying tweaks that look interesting oneby one. Use your autoexec.cfg and fill it with the tweaks you like. When you check your in game settings it will show 'custom' if you have tweaksin your autoexec affecting that menu section. I will detail some of theones I think are cool here next. Quality Comparisons: Some notable settings that effect quality.LIGHT AND WATER:r_sunshafts = 1 turns on the hidden featureof light shafts that dance through trees and past objects. Available in gamethrough Very High in-game setting.The bottom is default all High in-game settings, the top is r_sunshafts =1. Comparison pics...The following 3 settings work along with sun shafts...r_Beams - Toggles the volumetric lightbeams. Default is 3, it’s an optimized beam with glow support. 0 disablesbeams, 2 uses fake beams with probably beneficial performance (performanceuntested). 1 is the best and uses the real full resolution beams but it isslower.r_BeamsDistFactor - Distance between slices.Default is 0.01 in meters(likely reserved forUltra High) and is likely the best setting for beams making it through thedensest vegetation. You can try it and see what you like best (currently mediumand high use 0.5, low uses 1).r_BeamsMaxSlices - Number of volumetric slicesallowed per light beam. Default is 200 (reserved for very high specs). The maxhere is 300, so go ultra if you think you can really handle the performancehit.e_water_ocean_fft - Activates fft basedocean algorithm. Produces realistic wave undulation for the best qualityand most realistic water. Everything is the same with water exceptundulation. This algorithm was used in movies like Titanic and Waterworldso it's very realistic. Screenshots wouldn't really show the differencebut I have a short movie, it hardly does it justice, but atleast you can seethe wave difference.FFAWater movie comparison 4MBTEXTURES & LOD: Distant LOD (level of detail) of textures and vegetation is probably myfavorite section because it’s most noticeable as you look across the map andwalk about.e_detail_materials_view_dist_xy - Max viewdistance of terrain XY materials. This is things like certain cliffs andother materials horizontal LOD in game.e_detail_materials_view_dist_z - Max viewdistance of terrain Z material. This is things like certain cliffs andother materials vertical LOD in game. This one doesn't need to be raisedhigh, 256 or 512 max. (In the GPU benchmark when coming in from the skythis setting will show itself on vertical LOD).A picture is worth a thousand words on how these two work...Note: For the mountains to appear crisp like this you will also needr_TexturesStreaming set to 0.r_usepom - Enables Parallax OcclusionMapping. A type of relief map that gives raised appearance totextures. Very cool but costs about 2 fps and can sometimes cause afairly insignificant minor blurring of terrain textures in distance. Comparisons...VEGETATION & SPRITES: e_cull_veg_activation - Vegetationactivation distance limit, 70 is a good step up from high(50). This is treessetting how far the farthest out can be seen.e_vegetation_sprites_distance_ratio - Allowschanging distance on what vegetation switch into sprite. Raising thisfrom 1 to 1.5 cost me about 1 fps in that view. Adds medium tree distanceas well as certain near shrubs. Comparisons...e_view_dist_ratio_vegetation - View distanceratio for vegetation. Includes grass and shrubs like ferns and broadleafs, etc. 50 just about eliminates any popping effect with grass andshrubs, costs 1 fps in this scene. Comparisons...Controlling Antialiasing with TweaksSee above section on antialiasing and how it changes shader settings. These are the cvar settings for AA that you can use in your autoexec.cfgfile. Only for XP.r_FSAA = 1 - turns on AA2xAA = r_FSAA_samples = 2, r_FSAA_quality = 04xAA = r_FSAA_samples = 4, r_FSAA_quality = 08xAA = r_FSAA_samples = 4, r_FSAA_quality = 28xAAQ = r_FSAA_samples = 8, r_FSAA_quality = 016xAA = r_FSAA_samples = 4, r_FSAA_quality = 416xAAQ = r_FSAA_samples = 8, r_FSAA_quality = 2Additional Background And Things To KnowI just want to share on how these work in the game and some more backgroundinfo to clear up anything hazy. *Make sure you take a look at the full sizepicture or the spreadsheet for the settings chart, the links are below thechart. They expose many more tweaks, their definitions, and the valuesthat they accept.Know your in game settings. Play with that first to get a comfortablefeel of what you like and what is available through the advanced settings menuoptions. The way the autoexec.cfg variables work is they build on thein-game settings. The in game settings are first loaded, which are storedin the game.cfg in your profile. As the game starts it loads the game.cfgthen the autoexec.cfg overrides are loaded with what ever settings youchose. So for instance, you have in game shaders set to medium down fromhigh. But medium changes over 20 settings, well maybe you want theperfomance benefit of most of those but you want Ambient Occlusion back on theterrain (it's a global lighting system to provide realistic lighting). You keep the in game setting at medium but turn on e_terrain_ao= 1 along with r_SSAO=1 which willoverride the 0 settings in the game. Or maybe you want better bettershaders on terrain back to high(3) so q_ShaderTerrain= 3. Whether you like water, sky, terrain, vegetation, viewdistances....it's all at your finger tips for your preferences. Usuallythere is only a couple settings that really affect performance alot, the restcan add quality at little cost, the developers just didn't know your videomemory, vid card, processor, ram, etc. so they made broader stroke settingsthan most people needed in certain cases. The tip to remember is thatyour configs will override and work on top of what is already set in the gamemenu last time you ran the game. If you prefer there is also way tochange the drop down boxes from your autoexec. The sys_spec... settings will change low/medium/high andit will change all the broad stroke settings I color coded in my chart if youchange those broad stoke settings. You will know when your autoexec isworking because if you look at the game settings it will show custom instead oflow/medium/high.Basically, many cvar values are often just a on/off setting for features [0/1]0 is off, 1 is on. Others may have values that are based on differentranges, the definitions will tell you what most of the limits and rangesare. Some ranges maybe in meters, where others are clearly larger orsmaller units of measure. If you see a pattern of numbers like 512/1024then extrapolate that it's best to stick with the pattern, like those justmentioned for texture sizes and shadow maps. Sometimes you have ratios(as seen in some cvar names), which seem to affect more than one thing and theyare likely multiplied internally in the game against some value so they aremore broad sweeping. I expose some of the cool cvars with pics above butdon't let that keep you from trying new things.Performance of these settings depends on your resolution, your video card, andthe complexity of the scene you are looking at. If you are tweakingvegetation find the densist vegetation to see what the hugest impact willbe. Same with terrain view distances and textures. In certainscenarios things combine where you are looking through the dense jungle up atthe mountain this is good to test combined foliage/texture/view distance tweaksas it will show worst case scenarios. That is the balancing act, but mostof the time you in buildings, in water, in vegetation, so you can pretty muchraise them irrespective of each other to a degree. This is the point I amat in my configs in perfecting that balance of taking quality to the farthestpoint where it can mix well with the others. I also like long viewdistances on objects, I like seeing vehicles, enemies and buildings afar off soyou can trade something else for that if you prefer.It's great to use the console and see the settings changed in real time. Just be aware that not all settings can be changed in real time. Eitherthe value will not change and that will be clearly shown in the console, or itappears to change the value in the console but nothing in the game actuallychanges. In those cases it will be necessary to put the setting in theautoexec.cfg so that the renderer will be able to properly utilize that settingduring startup when rendering the scene. There are a couple featuresrestricted to DX10 but mostly they are time of day and geometry shaderfunctions (GS in the cvar), not many at all. Enjoy the playground. More soon...Crysis Performance Reviews: See how different hardware andsettings perform.Crysis (DemoPerformance)- LegionHardwareCrysisDemo Performance Analysis- TweaktownCrysis demoperformance in-depth - TechSpotDirectX9 performance with the Crysis demo on 10 different cards - AMDZoneTo be Continued... Last edited by MadBoris (17-11-2007 23:54:33) Offline THIS GUIDE WAS CREATED BY Sven2157 Thought this guide may be useful for some ofus here. You can also visit that link to see this same guide. http://www.techsupportforum.com/gaming-forum/pc-gaming-support/349169-optimising-your-system-games.html How to Properly Configure Your Computer forGAMES/PROGRAMS Hello everyone, I am constantly seeing people, all over the internet, with problems runningtheir programs/games on their computers. They ALL are experiencing slow boottimes, in game lag, freezing, OOM Errors (Out of Memory), low FPS and numerousother "issues". They are also, consuming A LOT of database spaceasking the same questions. I will try and consolidate those questions andanswers here. So I am writing this "CHECK LIST GUIDE" of common problems andsolutions. It contains basic/mandatory system configurations, as well asadvanced techniques; thus improving your game play, softwaredevelopment/designing and overall computer performance. All while maintainingthe best possible visual experience. ***PLEASE REMEMBER THATTHIS IS A GUIDE! NOT A MUST! ANY CHANGES YOU MAKE TO YOUR SYSTEM, ARE SOLELYYOUR CHOICE AND RESPONSIBILITY! I, NOR THE MODERATORS OF THESE FORUMS, CAN, ANDWILL NOT, BE HELD LIABLE FOR YOUR OWN ACTIONS!*** So let's begin... First and Foremost! Please update your Motherboard, BIOS, SMBus/USB/Memory/Video/Audio/StorageControllers (<--System), Video, Sound, Human Interface Device (HID)Controllers (<--Your Joystick/Gamepad), Mouse and other such drivers. Alsorun a system Defrag, to defragment your hard drive. This should be done at leastmonthly; as all of the afore mentioned will resolve 99.9% of the issuesexperienced by users! Also clear your Temporary files 1. - Click Start..>.."Run.." (Vista Users may not have thisenabled <by default>, so the shortcut is "Windows Key+'R') 2. - In the "Run" Box type: %Temp% Your Temporary File Folder willcome up. Select ALL, and delete them. Don't worry, they are TEMPORARY FILES.Some programs do not clear these when they are finished, so you have to gomanually delete them. This then makes it easier for other programs to storetemporary files needed for execution. Getting rid of the stuff you didn't even know was there... O.O(<--BTW Iam writing this in notepad and transferring it to the forums; so my smilies mynot show up -.-) When you download and install commercial products - Adobe Flash, AdobeReader, Google Earth, etc, etc - , you have to be mindful what the installer isasking you... This is a common mistake by users. They want the program, but either don'trealize that there are other programs "Piggy Backing" in, or don'tcare. This is where problems begin. "Well, what's wrong with the Google Toolbar?" 8-/The answer to that is simple: EVERYTHING! These programs seem harmless, and have a very small file size: .4 - 2.5MB.But that is not where the problem lies. Programs like this, and Toolbarsespecially, are constantly TRANSMITTING data to their prospective authors. Thisincludes where you surf, what you buy, where you live, what time you access theinternet, who is logged into the Operating System (<-- BETTER BELIEVE IT!>:-{ ), your ISP, etc, etc. Consequently, this is not only eating up theprocessing power and RAM of your computer, but now you are losing crucialbandwidth. Ever wonder how "that guy" can come around the corner and justkill you, in FPS games? Because he has a CLEAR connection to the server, andsaw you LONG before you knew he was there! "But I like my Toolbar (Google, or other)!" Why?IE7 and FireFox has a Google Search built right into them. They have Pop-UpBlockers, and Auto Complete, as well. Why have redundant software running? So let's get rid of ALL that crap, and free up some drive space! 1. - Click start..>..Control Panel..>..Add/RemovePrograms(XP)/Programs and Features(Vista). 2. - Go through the list, when it populates, and remove ANY"extra" programs that you do not use. If you accidently removesomething you need, you can certainly get it back. What you are looking for: (not in any particularorder) Adobe.comAdobe Updater *Nothing like losing bandwidth, then getting kick out of gamebecause Abode thinks it's more important!Apple UpdaterGoogle Chrome *Transmits data continuoslyGoogle Desktop *I would love to slap the guy who invented this! ;-)Google Updater *Big process eater! Transmits data constantly!Google ToolbarMY SEARCH - ANYTHING! *Big process eater! Also Installs Viruses and Malwareautomatically!Java UpdaterYahoo SearchYahoo MailYahoo ToolbarWindows Live InstallerWindows Live SkyDriveWindows Live PhotosMyWeb - ANYTHING! *Big process eater! Continuosly running.HP/Lexmark/Cannon/Kodak - Anything you don't use. As long as you don't deletethe driver, your printer/camera/scanner will still function!Dell/Acer/HP/Gateway/eMachines, etc, etc Pre-Installed Manufacturer Programs*These programs are "extra" and cause your system to run slow. Mostof them duplicate Windows built in features! Also, look for anything that you don't use or that looks suspicious. Onceagain, if you remove it, and find you need it, you can get it back! So don't beafraid; Don't be overzealous, either! Now for the real stuff! Processes and Services! These are the real KILLERS! When programs install, they generally writetheir own rules; as most users don't really know how to respond even whenasked! The problem with this is they ALL FIGHT to be NUMERO UNO! They ALL thinkthey are the greatest thing since crawling out of the sea, and growing lungsand legs! :-D So we have to go tell them ALL who the real boss is! YOU, the user! 1. - Click Start..>.."Run..." (Vista Users may not have thisenabled <by default>, so the shortcut is "Windows Key+'R') 2. - When the "Run..." Box opens, type: MSCONFIG (<--not casesensative) 3. - When the "System Configuration" windowappears, click "Selective startup". 4. - Click the "Services Tab". 5. - ***THIS IS ANIMPORTANT STEP! PAY ATTENTION TO WHAT YOU ARE DOING HERE!*** Click ONLY the "Hide all MicrosoftServices" box! 6. - Now the window will only show you 3rdparty services that start when Windows starts. However you NEED some of these!Like your Norton/McAffee/AVG Anti-Virus and Internet Security services. DisplayDrivers/Software, Storage Drivers (i.e. RAID), etc, etc. Trial an errormay be the best approach on this tab. Turn a couple off, see where that getsyou, then try a couple more. 7. - Now click the "Startup" Tab.You can turn ALL of these off if you want. Once again, READ what you are doing!In the picture below, I leave my RAID, VIDEO and Sidebar on, because I use thatto monitor my system. (Vista Users - In the picture below, the 2 "Microsoft®Windows® Operating System" items you see, are for the Sidebar; they arenot crucial!) 8. - When you have finished, click"Apply", then "Ok". ***IF YOU DONOT WANT THE CHANGES TO TAKE AFFECT OR HAVE MADE A MISTAKE, CLICK"CANCEL"!*** The configuaration utility will then prompt youwith the following image: 9. - Press "Restart" (Pressing"Exit without Restart" will not reboot your computer. However, whenyou manually reboot the system changes will take affect!), when thesystem starts back up, YOU WILL RECIEVE A "SYSTEM CONFIGURATIONMESSAGE". Just Check the, "Don't show this again" box and click"Ok". ***IF YOU ARE EXPERIENCINGPROBLEMS, REPEAT STEPS 1 AND 2. THIS TIME SELECTING "NORMALSTARTUP"*** Then click"Apply", "Ok", "Restart". This will return allServices and Startup options back to the original settings! OK... Almost there... O.o Now let's get some memory back.... 1. - Right-click My Computer(XP)/Computer(Vista)..>..Chooseproperties. VISTA USERS ONLY: The "System Properties"Window appears. Click "Advanced system settings". XP USERS: Click "Advanced" Tab. 2. - Click the "Settings" button in the Performance row, to openthe "Performance Options" Window. 3. - Select the "Advanced" tab, then click the"Change..." button in the Virtual memory row. 4. - Uncheck the box for "Automaticallymanage paging file size for all drives" if it is checked. ***The next step requires a judgment on your part. In theabove image, I have my "Intial Size" set to 4096MB (<--That's 4GigaBytes!), and my Maximum size is set to 6114 (<--That's 6 GigaBytes!).HOWEVER! I have a 400GB in RAID 0 "C:\" drive! In other words, I HAVEROOM TO SPARE! Most of you will want to set this to approximately 2048Init/3072MB Max; ROUGHLY! ***NOTE: XP Users can only set a MAXIMUM of4096MB for their Paging Files!*** 5. - Now click "Set". You will beprompted, after clicking "Ok", that you have to reboot, so... Reboot. What did I just do!?!? O.O Good question! You are very smart! ;-) In simple terms... This is going to expand your "Paging File". Windows uses the"Paging File" as "secondary memory", by writing"chunks" of data to the Hard Drive. This way it can recall informationfaster than searching the rest of the drive. This data is not permanent and isconstantly changing. Ever wonder why your hard drive light flashes, even when Windows is idle?Windows allocates (or reserves) RAM and Virtual Memory (<--Paging File) forit's own greedy use; whether or not it actually needs it. This reserve is forsystem processes and what not. When the size of this is SET by the user, youfree up the constant size changing, increasing or reducing, that windows canand will do to make more or less available; consequently allowing more room towrite to the drive = freeing up valuable processing threads and RAM. In turnincreasing performance. ...and, Lastly... Is the DREADED OOM!!!! This next tweak will prevent the Out Of Memory (OOM) Error. This isEXTREMELY effective when working with Adobe CS Series, AutoDesk Products andGames (Microsoft Flight Simulator Pilots, I am looking in your direction!) thatare both Graphic and Processor/RAM intensive. Before I begin, let me briefly descibe what happens here: Windows thinks its the greatest thing since fire! So, on your PC it willblock ALL programs from accessing what it thinks, is it's! I.E MEMORY; both RAMand Virtual! Once again, you need to go into the OS and tell it who's BOSS, and only giveit what it NEEDS; NOT WHAT IT WANTS! XP needs roughly 512MB, while Vistaneeds about 1GB to function flawlessly with RAM! About 256MB - 512MB of Virtualfor BOTH. It has a "Safe Guard" that will flag programs that try touse more than 2GB of either. When this happens, it sends an error message,"Out of Memory...". To prevent this from happening, and crashing your programs, you need to setthis limiter to a higher value. Here is how you do it: On VISTA: (You have to run the command prompt with elevatedprivlages) 1. Click the Start..>..All Programs..>..Accessories..>..Right-Clickthe "Command Prompt" and choose "Run as Administrator". 2. At the command line type the following: BCDEDIT(SPACE)/Set(SPACE)IncreaseUserVA(SPACE)nnnn (nnnn = the amount youwant to increases by! I have mine set for 4096MB) 3. Hit enter, and get the confirmation. 4. REBOOT 5. Confirm that it worked by running the command prompt, typing: BCDEDIT,hit enter and you will see the /userva switch now.... It will be under the"Windows Boot Loader" as increaseuserva = {value you set} On XP: 1. Right-Click the My Computer..>..Choose "Properties". 2. Click the "Advanced Tab". 3. Click the "Settings" button in the "Startup and Recoveryrow. 4. click the "Edit" button in the "System startup" row.Now you'll see the boot config. At the very end type /3GB so it looks likethis: *** Do Not Copy as your own Boot file [boot loader]timeout=3default=multi(0)disk(0)rdisk(0)partition(2)\WINDOWS[operating systems]multi(0)disk(0)rdisk(0)partition(2)\WINDOWS="Microsoft Windows XP HomeEdition" /fastdetect /NoExecute=OptIn /3GB 5. - Reboot Well Folks, there you go! It will take most of you longer to read this thanit will to actually complete these tasks! O.O I hope that this helps! ***IF YOU ARE UNSURE ABOUT ANY OF THE ABOVE, THEN DONOT PREFORM THESE ACTIONS! ASK HERE FIRST! I, AND THE MODERATORS OF THIS FORUM,ASSUME NO RESPONSIBILITY FOR ANY DAMAGE, LOSS OF DATA/SOFTWARE/HARDWARE, OROTHER LOSS FOR THE ACTIONS YOU PERSONALLY TAKE!*** Please feel free to ask questions here, if I was not clear on something... Happy Gaming/Programming Sven2157 ADMINS WILL YOU PLEASE STICKY THIS ive had numourous people asking mepast few weeks about where my config post went and no one can find it.... Thanks........ ... NOW... on to the config.... FIRST.. COPY everything i pastebelow the line and open up NOTEPAD on your computer.... PASTE IT INTO NOTEPADAND SAVE AS CONFIG_MP.CFG .... YOU HAVE TO USE THAT FILE NAME!!!!! Saveto your desktop..... now.... make a COPY of your current config.... put in asafe place.... replace the old config with your new one in your cod4 profilesfolder........ OPEN GAME...... now i have weird controls... SO SET THE CONTROLSTO WHAT YOU WANT TO USE!!! AND CHANGE THE NAME!!! thats all you have todo.... your ping will drop 10-30 .. your fps will increase by 30-50... and youwill move faster.... hit more accurate.... .... -------------------------------------------------------------------------------------------------------------------------------------------------- // generated by Call of Duty, do not modifyunbindallbind TAB "+scores"bind ESCAPE "togglemenu"bind SPACE "+gostand"bind 3 "openscriptmenu quickpromod 2"bind 4 "+smoke"bind 5 "+actionslot 3"bind 6 "+actionslot 4"bind 7 "+actionslot 2"bind 8 "openscriptmenu quickpromod 5"bind ` "toggleconsole"bind A "+moveleft"bind B "mp_QuickMessage"bind C "gocrouch"bind D "+moveright"bind E "+leanright"bind F "+activate"bind G "+frag"bind H "ufo"bind K "ufo"bind N "+actionslot 1"bind Q "+leanleft"bind R "+reload"bind S "+back"bind T "chatmodepublic"bind U "noclip"bind V "+melee"bind W "+forward"bind Y "chatmodeteam"bind Z "+talk"bind ~ "toggleconsole"bind PAUSE "toggle cl_paused"bind CTRL "goprone"bind SHIFT "+breath_sprint"bind F1 "vote yes"bind F2 "vote no"bind F4 "+scores"bind F12 "screenshotJPEG"bind KP_HOME "toggle cg_thirdpersonangle 340 320 300 280 260 240 220 200180 160 140 120 100 80 60 40 20 0"bind KP_UPARROW "timescale 5.0"bind KP_PGUP "toggle cg_draw2D"bind KP_LEFTARROW "timescale 0.5"bind KP_5 "timescale 1"bind KP_RIGHTARROW "timescale 2.0"bind KP_END "toggle cg_thirdpersonangle 0 20 40 60 80 100 120 140 160 180200 220 240 260 280 300 320 340 "bind KP_DOWNARROW "timescale 0.3"bind KP_PGDN "toggle cg_thirdperson"bind KP_ENTER "toggle g_compassShowEnemies"bind KP_INS "toggle cl_freezedemo"bind KP_DEL "toggle developer"bind KP_SLASH "quit"bind KP_MINUS "toggle cg_thirdpersonrange 1024 800 600 350 120"bind KP_PLUS "toggle cg_thirdpersonrange 120 350 600 800 1024"bind MOUSE1 "+attack"bind MOUSE2 "+toggleads_throw"bind MOUSE3 "+frag"bind MWHEELDOWN "weapnext"bind MWHEELUP "weapnext"seta ai_badPathSpam "0"seta ai_corpseCount "0"seta ai_debugAccuracy "0"seta ai_debugCoverSelection "0"seta ai_debugMeleeAttackSpots "0"seta ai_debugThreatSelection "0"seta ai_ShowCanshootChecks "0"seta ai_showClaimedNode "0"seta ai_showRegion "0"seta airlift_min_spec "0"seta animated_trees_enabled "1"seta bog_b_min_spec "0"seta ai_corpseCount "10"seta cg_blood "0"seta cg_bloodLimit "0"seta cg_bloodLimitMsec "330"seta cg_brass "0"seta cg_centerPrintY "-60"seta cg_chatHeight "8"seta cg_chatTime "12000"seta cg_connectionIconSize "0"seta cg_crosshairAlpha "1"seta cg_crosshairAlphaMin "0.5"seta cg_crosshairDynamic "0"seta cg_crosshairEnemyColor "0"seta cg_cursorHints "4"seta cg_debugInfoCornerOffset "0 0"seta cg_descriptiveText "1"seta cg_drawBreathHint "1"seta cg_drawCrosshair "1"seta cg_drawCrosshairNames "0"seta cg_drawFPS "Simple"seta cg_drawFPSLabels "0"seta cg_drawFriendlyFireCrosshair "1"seta cg_drawFriendlyNames "1"seta cg_drawLagometer "1"seta cg_drawMantleHint "0"seta cg_drawSnapshot "0"seta cg_drawTurretCrosshair "1"seta cg_enemyNameFadeIn "250"seta cg_enemyNameFadeOut "250"seta cg_footsteps "1"seta cg_fov "80"seta cg_friendlyNameFadeIn "0"seta cg_friendlyNameFadeOut "1500"seta cg_gameBoldMessageWidth "390"seta cg_gameMessageWidth "455"seta cg_headIconMinScreenRadius "0.015"seta cg_hintFadeTime "100"seta cg_hudChatIntermissionPosition "5 110"seta cg_hudChatPosition "5 204"seta cg_hudDamageIconHeight "64"seta cg_hudDamageIconInScope "0"seta cg_hudDamageIconOffset "128"seta cg_hudDamageIconTime "2000"seta cg_hudDamageIconWidth "128"seta cg_hudGrenadeIconEnabledFlash "1"seta cg_hudGrenadeIconMaxRangeFlash "500"seta cg_hudGrenadeIconHeight "25"seta cg_hudGrenadeIconInScope "1"seta cg_hudGrenadeIconMaxHeight "104"seta cg_hudGrenadeIconOffset "50"seta cg_hudGrenadeIconWidth "25"seta cg_hudGrenadePointerHeight "12"seta cg_hudGrenadePointerPivot "12 27"seta cg_hudGrenadePointerWidth "25"seta cg_hudMapBorderWidth "2"seta cg_hudMapFriendlyHeight "15"seta cg_hudMapFriendlyWidth "15"seta cg_hudMapPlayerHeight "20"seta cg_hudMapPlayerWidth "20"seta cg_hudMapRadarLineThickness "0.15"seta cg_hudProneY "-160"seta cg_hudSayPosition "5 180"seta cg_hudStanceHintPrints "1"seta cg_hudVotePosition "5 220"seta cg_invalidCmdHintBlinkInterval "600"seta cg_invalidCmdHintDuration "1800"seta cg_laserLight "0"seta cg_mapLocationSelectionCursorSpeed "0.6"seta cg_marks_ents_player_only "0"seta cg_nopredict "0"seta cg_overheadIconSize "0.7"seta cg_overheadNamesGlow "0 0 0 1"seta cg_overheadNamesMaxDist "10000"seta cg_overheadNamesSize "0.5"seta cg_overheadRankSize "0.5"seta cg_predictItems "1"seta cg_scoreboardBannerHeight "35"seta cg_scoreboardHeaderFontScale "0.3"seta cg_scoreboardHeight "435"seta cg_scoreboardItemHeight "18"seta cg_scoreboardPingHeight "0.7"seta cg_scoreboardPingWidth "0.036"seta cg_scoreboardRankFontScale "0.25"seta cg_scoreboardScrollStep "3"seta cg_scoreboardWidth "400"seta cg_ScoresPing_BgColor "0.25098 0.25098 0.25098 0.501961"seta cg_ScoresPing_HighColor "0.8 0 0 1"seta cg_ScoresPing_Interval "100"seta cg_ScoresPing_LowColor "0 0.74902 0 1"seta cg_ScoresPing_MaxBars "4"seta cg_ScoresPing_MedColor "0.8 0.8 0 1"seta cg_scriptIconSize "0"seta cg_sprintMeterDisabledColor "0.8 0.1 0.1 0.2"seta cg_sprintMeterEmptyColor "0.7 0.5 0.2 0.8"seta cg_sprintMeterFullColor "0.8 0.8 0.8 0.8"seta cg_subtitleMinTime "3"seta cg_subtitles "1"seta cg_subtitleWidthStandard "520"seta cg_subtitleWidthWidescreen "520"seta cg_teamChatsOnly "0"seta cg_viewZSmoothingMax "16"seta cg_viewZSmoothingMin "1"seta cg_viewZSmoothingTime "0.1"seta cg_voiceIconSize "0"seta cg_weaponCycleDelay "0"seta cg_weaponHintsCoD1Style "1"seta cg_youInKillCamSize "6"seta cl_allowDownload "1"seta cl_anglespeedkey "0"seta cl_anonymous "0"seta cl_connectionAttempts "20"seta cl_freelook "1"seta cl_maxpackets "42"seta cl_maxPing "800"seta cl_maxppf "5"seta cl_mouseAccel "0"seta cl_packetdup "1"seta cl_pitchspeed "140"seta cl_punkbuster "1"seta cl_voice "1"seta cl_wwwDownload "1"seta cl_yawspeed "140"seta com_introPlayed "1"seta com_maxfps "125"seta com_recommendedSet "1"seta compassClampIcons "1"seta compassCoords "740 3590 400"seta compassECoordCutoff "37"seta compassFriendlyHeight "18.75"seta compassFriendlyWidth "18.75"seta compassMaxRange "2500"seta compassMinRadius "0.0001"seta compassMinRange "0.0001"seta compassObjectiveArrowHeight "20"seta compassObjectiveArrowOffset "2"seta compassObjectiveArrowRotateDist "5"seta compassObjectiveArrowWidth "20"seta compassObjectiveDrawLines "1"seta compassObjectiveHeight "20"seta compassObjectiveIconHeight "16"seta compassObjectiveIconWidth "16"seta compassObjectiveMaxHeight "70"seta compassObjectiveMaxRange "2048"seta compassObjectiveMinAlpha "1"seta compassObjectiveMinHeight "-70"seta compassObjectiveNumRings "10"seta compassObjectiveRingSize "80"seta compassObjectiveRingTime "10000"seta compassObjectiveTextHeight "18"seta compassObjectiveTextScale "0.3"seta compassObjectiveWidth "20"seta compassPlayerHeight "15"seta compassPlayerWidth "15"seta compassRadarLineThickness "0.4"seta compassRadarPingFadeTime "4"seta compassRadarUpdateTime "4"seta compassRotation "1"seta compassSize "1"seta compassSoundPingFadeTime "2"seta compassTickertapeStretch "0.5"seta con_errormessagetime "8"seta con_gameMsgWindow0FadeInTime "0.25"seta con_gameMsgWindow0FadeOutTime "0.5"seta con_gameMsgWindow0Filter "gamenotify obituary"seta con_gameMsgWindow0LineCount "4"seta con_gameMsgWindow0MsgTime "5"seta con_gameMsgWindow0ScrollTime "0.25"seta con_gameMsgWindow0SplitscreenScale "1.5"seta con_gameMsgWindow1FadeInTime "0.25"seta con_gameMsgWindow1FadeOutTime "0.01"seta con_gameMsgWindow1Filter "boldgame"seta con_gameMsgWindow1LineCount "5"seta con_gameMsgWindow1MsgTime "8"seta con_gameMsgWindow1ScrollTime "0.25"seta con_gameMsgWindow1SplitscreenScale "1.5"seta con_gameMsgWindow2FadeInTime "0.75"seta con_gameMsgWindow2FadeOutTime "0.5"seta con_gameMsgWindow2Filter "subtitle"seta con_gameMsgWindow2LineCount "7"seta con_gameMsgWindow2MsgTime "5"seta con_gameMsgWindow2ScrollTime "0.25"seta con_gameMsgWindow2SplitscreenScale "1.5"seta con_gameMsgWindow3FadeInTime "0.25"seta con_gameMsgWindow3FadeOutTime "0.5"seta con_gameMsgWindow3Filter ""seta con_gameMsgWindow3LineCount "5"seta con_gameMsgWindow3MsgTime "5"seta con_gameMsgWindow3ScrollTime "0.25"seta con_gameMsgWindow3SplitscreenScale "1.5"seta con_inputBoxColor "0.25 0.25 0.2 1"seta con_inputHintBoxColor "0.4 0.4 0.35 1"seta con_matchPrefixOnly "1"seta con_minicon "0"seta con_miniconlines "5"seta con_minicontime "4"seta con_outputBarColor "1 1 0.95 0.6"seta con_outputSliderColor "0.15 0.15 0.1 0.6"seta con_outputWindowColor "0.35 0.35 0.3 0.75"seta con_typewriterColorGlowCheckpoint "0.6 0.5 0.6 1"seta con_typewriterColorGlowCompleted "0 0.3 0.8 1"seta con_typewriterColorGlowFailed "0.8 0 0 1"seta con_typewriterColorGlowUpdated "0 0.6 0.18 1"seta con_typewriterDecayDuration "700"seta con_typewriterDecayStartTime "6000"seta con_typewriterPrintSpeed "50"seta customclass1 "Custom Slot 1"seta customclass2 "Custom Slot 2"seta customclass3 "Custom Slot 3"seta customclass4 "Custom Slot 4"seta customclass5 "Custom Slot 5"seta drew_notes "5"seta dynEnt_active "0"seta fx_draw "1"seta fx_drawClouds "1"seta fx_marks "0"seta fx_marks_ents "0"seta fx_marks_smodels "0"seta g_allowvote "1"seta g_banIPs ""seta g_clonePlayerMaxVelocity "80"seta g_deadChat "1"seta g_dropForwardSpeed "10"seta g_dropHorzSpeedRand "100"seta g_dropUpSpeedBase "10"seta g_dropUpSpeedRand "5"seta g_log "games_mp.log"seta g_logSync "1"seta g_oldVoting "1"seta g_playerCollisionEjectSpeed "25"seta g_redCrosshairs "1"seta g_useGear "1"seta g_useholdspawndelay "500"seta g_voiceChatTalkingDuration "500"seta g_voteAbstainWeight "0.5"seta hud_deathQuoteFadeTime "1000"seta hud_enable "1"seta hud_fade_ammodisplay "1.7"seta hud_fade_compass "0"seta hud_fade_healthbar "0"seta hud_fade_offhand "1.7"seta hud_fade_sprint "1.7"seta hud_fade_stance "1.7"seta hud_fadeout_speed "0.1"seta hud_flash_period_offhand "0.5"seta hud_flash_time_offhand "2"seta hud_health_pulserate_critical "0.5"seta hud_health_pulserate_injured "1"seta hud_health_startpulse_critical "0.33"seta hud_health_startpulse_injured "1"seta in_mouse "1"seta loc_forceEnglish "0"seta loc_language "0"seta m_filter "0"seta m_forward "0.25"seta m_pitch "0.022"seta m_side "0.25"seta m_yaw "0.022"seta monkeytoy "0"seta name "Morphic Jackzor"seta net_noipx "0"seta net_noudp "0"seta net_socksEnabled "0"seta net_socksPassword ""seta net_socksPort "1080"seta net_socksServer ""seta net_socksUsername ""seta r_aaAlpha "dither (fast)"seta r_aaSamples "1"seta r_altModelLightingUpdate "1"seta r_aspectRatio "auto"seta r_autopriority "0"seta r_customMode ""seta r_debugLineWidth "1"seta r_depthPrepass "0"seta r_displayRefresh "120 Hz"seta r_distortion "0"seta r_dlightLimit "0"seta r_dof_enable "0"seta r_drawDecals "1"seta r_drawSun "1"seta r_drawWater "1"seta r_fastSkin "0"seta r_fullscreen "1"seta r_gamma "2.11458"seta r_glow_allowed "0"seta r_ignorehwgamma "0"seta r_inGameVideo "1"seta r_lodBiasRigid "0"seta r_lodBiasSkinned "0"seta r_lodScaleRigid "1"seta r_lodScaleSkinned "1"seta r_mode "1024x768"seta r_monitor "0"seta r_multiGpu "1"seta r_picmip "0"seta r_picmip_bump "0"seta r_picmip_manual "0"seta r_picmip_spec "0"seta r_picmip_water "0"seta r_polygonOffsetBias "-1"seta r_polygonOffsetScale "-1"seta r_portalBevels "0.7"seta r_preloadShaders "0"seta r_rendererPreference "Default"seta r_specular "0"seta r_texFilterAnisoMax "4"seta r_texFilterAnisoMin "1"seta r_texFilterMipMode "Unchanged"seta r_vsync "0"seta r_zFeather "0"seta ragdoll_enable "0"seta ragdoll_max_simulating "16"seta rate "25000"seta sensitivity "5"seta server1 ""seta server10 ""seta server11 ""seta server12 ""seta server13 ""seta server14 ""seta server15 ""seta server16 ""seta server2 ""seta server3 ""seta server4 ""seta server5 ""seta server6 ""seta server7 ""seta server8 ""seta server9 ""seta sm_enable "0"seta sm_maxLights "4"seta snaps "30"seta snd_cinematicVolumeScale "0.85"seta snd_enableEq "1"seta snd_errorOnMissing "0"seta snd_khz "44"seta snd_levelFadeTime "250"seta snd_outputConfiguration "5.1 speakers"seta snd_slaveFadeTime "500"seta snd_touchStreamFilesOnLoad "0"seta snd_volume "0.8"seta sv_allowDownload "1"seta sv_floodprotect "4"seta sv_hostname "CoD4Host"seta sv_maxclients "24"seta sv_maxPing "0"seta sv_maxRate "25000"seta sv_minPing "0"seta sv_punkbuster "1"seta sv_reconnectlimit "3"seta sv_voice "1"seta sv_wwwBaseURL ""seta sv_wwwDlDisconnected "0"seta sv_wwwDownload "0"seta sys_configSum "4379996"seta sys_configureGHz "8.6759"seta sys_gpu "NVIDIA GeForce 9800 GTX "seta sys_sysMB "2048"seta ui_bigFont "0.4"seta ui_browserFriendlyfire "-1"seta ui_browserHardcore "-1"seta ui_browserKillcam "-1"seta ui_browserMod "0"seta ui_browserOldSchool "-1"seta ui_browserShowDedicated "0"seta ui_browserShowEmpty "1"seta ui_browserShowFull "1"seta ui_browserShowPassword "-1"seta ui_browserShowPunkBuster "-1"seta ui_browserShowPure "1"seta ui_currentMap "0"seta ui_currentNetMap "0"seta ui_dedicated "0"seta ui_drawCrosshair "1"seta ui_extraBigFont "0.55"seta ui_gametype "0"seta ui_joinGametype "0"seta ui_maxclients "32"seta ui_netGametype "0"seta ui_netGametypeName "dm"seta ui_netSource "1"seta ui_serverStatusTimeOut "7000"seta ui_smallFont "0.25"seta vehDriverViewHeightMax "50"seta vehDriverViewHeightMin "-15"seta vid_xpos "3"seta vid_ypos "22"seta voice_deadChat "0"seta voice_global "0"seta voice_localEcho "0"seta winvoice_mic_mute "1"seta winvoice_mic_reclevel "65535"seta winvoice_mic_scaler "1"seta winvoice_save_voice "0"con_hidechannel *; con_showchannel dontfilter error gamenotify boldgame subtitleobituary logfile_only console_only gfx sound files devgui profile ui clientserver system playerweap ai anim physics fx leaderboards parserscript script Awards
bobbarker Posted October 24, 2011 Member ID: 689 Group: ***- Inactive Clan Members Followers: 69 Topic Count: 100 Topics Per Day: 0.02 Content Count: 2030 Content Per Day: 0.33 Reputation: 1533 Achievement Points: 13317 Solved Content: 0 Days Won: 1 Joined: 11/04/09 Status: Offline Last Seen: November 15, 2025 Birthday: 07/22/1965 Device: iPhone Posted October 24, 2011 WiZiD Tweaks for improved game performance. Call of duty ______________________________ Console Commands: *Enable Console first in options* then type in the following then hit enter. *First things first*: (back up your "normal" config) found here for *XP C:\Documents and Settings\<USERNAME>\Local Settings\Application Data\Activision\CoDWaW\players\profiles\<playername> Vista is in a similar place 1) Punkbuster Sleep setting: /pb_sleep 500 (tells punkbuster client software to wait longer before awakening and sending info to PB) Save PB setting to config: /pb_writecfg (makes the above setting permanent so you don’t have to do it each time you log in) - The above changes the frequency that your PC reports to the server and thus reduced frequency of network spikes and the associated latency. 2) Packet transfer setting: /cl_maxpackets 100 - This setting helps smooth out data transfer and should help if you have a cable or other high speed connection. This setting works in conjunction with the com_maxfps 125 setting. 3) Send duplicate packets: /cl_packetdup 0 or 1 - Manage whether or not extra or duplicate packets are sent to the server.(1 is default and this sends an extra packet of data in case the first one is lost. If you enable the lagometer (see tools below), then you can see if you are losing any packets.If yes, then leave this at 1. If no, you can consider changing to 0. 4) Snaps: /snaps This is possibly the most important setting for getting a good connection. Snaps setting determines how many updates you recieve from the server. 20 to 30 for 56K connects in quake series 40 for high speed internet im sure the same for cod. (30 is fine). 5) Enable higher Frames Per Second (FPS): /com_maxfps 125 (Default is 85 so this may help overall FPS. Some say this should be set at or just above your average FPS to smooth things out) - This allows your game to go allow higher frame rates than the default. Set it to a value you want based on the capabilities of you machines… to unlock FPS completely and see what you machine is capable of set to 0, it can go as high as 1000. 6) Field of View (FOV): /cg_fov 80 7)Shadows: /sm_enable 0 Turns off unique Shadows ingame 8)Depth of Field: /seta r_dof_enable "0" Gets rid of the "blur" around you gun and clears your perperipheral vision. - If you want to widen your FOV (field of view) from 65 degrees to 80 degrees, use this command. NOTE: This basically “backs you up” to give you a larger viewing area at the sides but it does make user/soldiers/enemies slightly smaller at the same time. This command does not affect machine performance and is merely a preference to give you the ability to see more. In game tools: ______________ 1) Show framerate on screen so you can see how your PC is performing: /cg_drawFPS 1 (choices are 1,2,or 3 where 0 = off / 1 = on) - At a minimum, you need to try to be above 60FPS so that you have no visual choppiness. Reduce textures, shadows, lighting etc. 2) Show network connection quality: /cg_drawlagometer 1 (puts a graph just above your grenades icon on screen) - Top meter on graph. GFX shown in Blue, (or blue with small amounts of yellow) then you system is in synch and your screen/system is refreshing in sync with the server’s perspective of the game world. If Yellow, then you are having issues and your screen/system may not be in synch with what the server thinks is happeing.. noticable lag bad hit rego. The blue shows how well your graphics card is staying in sync with the server as it relates to rendering the gaming environment. A few yellow items is OK but you want the vast majority to be blue. If you have a lot of yellow, this means that your graphics rendering and server rendering of the gameworld is out of sync.The smoother the flow on this meter, the better, the faster the higher your FPS is. - Bottom meter should be all or mostly green. Lots of yellow or red means there are issues. When you spawn or die, you can sometimes see lots of RED , this seems to be OK. If you are all green, then you can consider changing your cl_packetdup to 0 and you can increase your cl_maxpackets _________________________________ Performance improvements summary: *Enable Console first in options* Punkbuster Sleep setting: /pb_sleep 500 Save PB setting to config: /pb_writecfg Packet transfer setting: /cl_maxpackets 100 Send duplicate packets: /cl_packetdup 0 or 1 Max FPS: /com_maxfps 125 Field of View (FOV): /cg_fov 80 Draw your FPS on screen: /cg_drawfps 1 Draw your Lagometer on screen: /cg_drawlagometer 1 Shell Casings: /cg_brass o gets rid of the shell casings being ejected Shadows: /sm_enable 0 Turns off unique Shadows ingame __________________________________________________ Notes:*CG FOV :: Field of view, where the value is the angle of the circular arc that is displayed on your screen. High values will make the game appear "fisheyed". *MAX FPS :: This command limits your maximum FPS. You may ask why you would want to do this, and the answer is that it will help the server from having lag confusion when your frame rate has a sudden rise or fall. Run a timedemo, collect your average FPS and use that as the limit for when you play on-line. *MAXPACKETS :: This setting puts a limit on the maximum amount of packets that can be sent to the server via the client. This setting is useful for people with slower modems. Obviously we all have high speed connects so set to at least 100. Lower maxpacket settings i.e 30 lowers ping on screen but at the cost of registration. */sm_enable 0: Turns off unique Shadows ingame, it boosts FPS more than most commands. That's about it for now if I think of anything to add to this I will update the thread with a new reply post. Enjoy, try it out and give some feedback if things are better. Check here to see if your machine is up to the task of CoDWaW > http://www.systemrequirementslab.com/referrer/activision2?registration_option_id=7974 thankx, Introduction: For the last couple weeks, during beta, I have been digging deep under the hood of Crysis. I thought it would be fitting that I share my findings and move my guide to the community that I have waited with for Crysis for so long. I hope you enjoy it and that it helps you with basic and advanced tweaking in the days ahead. This will continue to be a work in progress. I will cover both some basic and advanced tweaking. I'll share the settings that I have found to be the most performance hungry and what you can do to get performance back or increase quality without draining performance too much. Then we will dig deep into one of the most, if not the most, tweakable games on the planet. We will also surpass very high settings with ultra for the uber machines as the guide fleshes out. BASIC TUNING Basic computer performance: I don't want to recreate the wheel but their are many things to do to increase performance in games with your computer. Details on how to do these things can be found by doing a google search for any of the following. * Latest drivers for your video card, motherboard, sound card can improve things greatly at times. * Defrag your hard drive. It's prefferable to defrag 'before' installing so that the files stay close together and contiguous. * If you only have 512MB or 1GB memory, 2GB is highly recommended. * Go into your driver control panel to make sure antialiasing(AA) or anisotropic filtering(AF) is not enabled unless you want them to be, they effect performance alot. Also you can change texture filtering quality to provide more performance in the drivers. * If you are running Vista make sure to be using the current hotfixes, some effect performance and memory usage tremendously. Nvidia has a great list of recommended ones here: Vista hotfixes * A video card like an 8800 GT for $250 will provide tremendous results if you haven't upgraded in a long time. * Disabling any unneeded running process, especially antivirus, while playing is recommended. Resolution: Resolution has a large impact because the game has so much geometry that the fillrate demands of large resolutions is beyond what people are used to. If you can lower resolution this will help gain many fps and provide smoother play. If you have an LCD you need to use what is called 1:1 pixel mapping, or otherwise known as disabling scaling. This allows the image to shrink but the quality of the image stays incredibly good. Scaling on the other hand, always looks bad if using anything other than your native resolution. Scaling can be disabled on some monitors. If your monitor doesn't support this feature some drivers support it. With nvidia you can disable it like so, image provided. So shrinking the image while maintaining incredible quality works well for performance, you can always slide your monitor closer you then won't notice the image is smaller. Custom resolutions can be used by using 'r_width=x' and 'r_height=x'. See below on advanced tweaking on how to use variables. In-Game Settings: The settings that have the biggest effect on performance are firstly shaders. This game is one of the most shader intensive games on the market. Going from high to medium shader settings works real well in giving an average of anywhere from 7-10 fps or more, depending on some variables. Next are Shadows and Post Processing. Shadows from high to medium looks very good still and provide a good boost of performance. Post processing has a big effect as well. The thing that people notice most about post processing is motion blur and depth of field. These can be easily turned on/off individually if desired seperate from the post process drop down box, as will be seen in the advanced tweaking section. Textures setting affects video memory usage quite a bit which we will look at next. Video Memory: Using beyond the amount of memory that is locally on the video card will produce performance problems like stuttering and hitching due to having to fetch data from system RAM over the much higher latency PCI express bus. In other words, adjust settings/resolution in the game not to exceed your video RAM, otherwise you will experience overall performance issues and the periodic flickering of geometry and LOD's as it streams in. The game is very video memory intensive. Resolution and AA effect the amount of video memory the game uses tremendously. Here is a breakdown of video memory across different settings and resolutions. * Windows XP * Nvidia Driver 169.01 1280x1024 medium * NoAA 184MB * 2xAA 295MB * 4xAA 355MB * 8xAA 395MB 1280x1024 high * NoAA 315MB * 2xAA 375MB * 4xAA 440MB * 8xAA 470MB -Texture medium- * NoAA 300MB * 2xAA 363MB * 4xAA 423MB * 8xAA 445MB 1680x1050 medium * NoAA 223MB * 2xAA 375MB * 4xAA 455MB 1680x1050 high * NoAA 368MB * 2xAA 456MB * 4xAA 535MB -Texture medium- * NoAA 340MB * 2xAA 428MB * 4xAA 505MB 1920x1200 Medium * NoAA 240MB * 2xAA 430MB * 4xAA 535MB 1920x1200 High * NoAA 400MB * 2xAA 515MB * 4xAA 615MB -Texture Medium- * NoAA 370MB * 2xAA 475MB * 4xAA 585MB AA clearly makes a large impact in video memory. Different game levels may change these numbers. Changing textures from medium to low makes no appreciable difference since it is still using the lowspec pak. The devs have made huge advances in optimizing this area since earlier builds of the game, either that or the textures are quite lower in quality, infact these are the numbers medium textures used to give as if high textures are missing. Final shipping game may reflect differences here, will update accordingly. The textures setting alone no longer makes the difference it did in earlier builds regardless of high/medium/low setting, which again seems to give some indication higher textures have been removed temporarily or entirely. Breakdown by video card memory: 256MB Video - 1680x1050 medium without AA or 1280x1024 medium with AA. 8800 GTS 320MB - Handles up 1680x1050 medium no aa, can go to high with some thrashing. Only AA at 1280x1024 looks to be viable with that memory limit. 512MB Video - Comes into it's first wall at 1680x1050 4xAA on high. Performance and not memory will impact you here. 8800 GTS 640MB - Handles up to 1920x1200 4x AA (All High). performance makes that out of reach on todays HW. 768MB and above - Memory will not be your limiting factor unless going to 2560x1600 with AA. Your GPU handling the raw processing of the geometry and shaders at that high resolution will be out of reach. I don't doubt that 1GB can be reached by tweaking Crysis and high resolutions with max AA on tomorrows HW. I already have found ways to approach 650MB at only 1280x1024. Basic video memory tips: * Find your video memory ceiling with resolution and texture setting first. Then adjust other parts of the game that are affecting raw performance like shaders or shadows until you get your acceptable performance. If you don't properly anticipate video memory usage, you won't realize why it is hitching on you, regardless of other settings. * You don't have to turn everything to medium to conserve memory, textures have the biggest effect by far. * Remember as more players enter the map this memory will climb a bit, as well as larger out door levels. Also as you stay in the game for a while this number will rise a little. I cached all the outdoors, but not the indoors. * Adding any tweaks for higher quality, especially along the lines of LOD or view distance, has the potential to raise memory usage even further. * The higher you go over your limit, the worse performance, texture stuttering, hitching and popping of geometry will become. * If your resolution doesn't appear just use something close, like 1680x1050 is close to 1600x1200. Benchmarking: Crysis came with two benchmarks to test and compare your performance. A GPU benchmark and a CPU benchmark stressing physics. They can be found in the Bin32 or Bin64 folders. Just double click on them to start. The game will run through 4 loops of the benchmark. When it's done it will show you the results, I suggest you ignore the first one since it was just caching the level and assets on the first run. You can make your own benchmarks but for now these two work well as standard tests. See the benchmarking tool mentioned in post 3 for an improved benchmarking experience. Antialiasing and Anisotropic filtering in Crysis First of all AA is a serious performance drain. More so than other games because of the incredible amount of triangles and polys in the scene. AA is only recommended for the highest end GPU's and keep in mind high resolutions will be more intensive. So if you choose to use it then keep in mind the video memory that will be used (shown above). There is some interesting information starting to come out about AA. Apparently it is preferred to use the in-game AA settings as the proper way to use AA. In other words, don't use the driver control panel but control it from in game. Additionally, HardOCP in their recent 8800GT review had this quote. "This comes directly from NVIDIA’s James Wang on the use of Transparency Antialiasing in Crysis: ” Crysis handles foliage very differently from normal engines so TRMS/SS won't work. Bit of a shame really. The game has some built-in foliage AA, but it only kicks in in "Very high" quality mode.”" I am actually pretty sure it can be enabled at high as well, not just very high. High and very high shader settings are compatible with in game AA, while low and medium shaders are not. Regardless of in game shader settings if AA is enabled, High shaders will also need to be enabled. If AA is currently enabled, but shaders is set to medium or low, AA will automatically be disabled by the game. So it will take a good medium to high end card to use AA not only because AA is demanding on it's own but because you will need to run atleast high shaders as well. As to Anisotropic Filtering, it can only be enabled in the driver settings. Unfortunately there is a bug with the nvidia drivers that makes a white halo around distant bushes and trees. I believe this bug only shows itself on a particular. This apparently will be fixed with a future driver. Vsync Vsynch can be enabled in the game with r_vsync = 1. It is off by default. ADVANCED TWEAKING Customizing the game: The in-game settings are like using a paint roller on a canvas, while tweaking is like the fine brush of the artist. The roller gets the job done but it's not going to be as fulfilling as it could be. You need a fine brush to make it the way you like. The developers didn't want to burden you with 20 choices of drop down boxes so they instead made those broad strokes for you. Unfortunately the difference in performance and quality between low/medium/high/veryhigh can be staggering. Sometimes a move from high to medium can change 20 variables, but it may not be necessary to change all 20 when only a few really effect performance or quality. The fine strokes will allow you to get exactly what you want and Crytek has really given us the ability to change just about everything in the game you would want. You do not have to sacrifice as much quality for performance as you may think. Sometimes you can keep settings high or medium and change one variable that is the big performance tanker or one setting that brings back some good quality at little cost. Enough intro lets get busy. How to make an autoexec.cfg In the early days of the beta people modified the cvar groups game files because it was the best they knew, if you have heard about this I do not recommend it. It changes the way your in-game settings work permanently and changing to medium or high won't have the desired effect anymore. We later learned that you can make an autoexec.cfg file in the "Crysis SP Demo" folder. Tweaks are made up of Console Variables (cvars for short), a list of the ones currently used by the game can be seen below. In this file you put in the tweaks you want one by one and the game will use them when it starts up. View Performance In Game Place the line r_displayinfo=1 in your autoexec.cfg. This will show you fps, system memory usage(not video), triangle count, etc. Also you can use fraps if you wish to show fps as well as take screenshots and make movies of the game. Enable The Console: By default the devs have disabled the console unless you learn the trick to enable it. You can enable it by adding the line con_restricted=0 to your autoexec.cfg and you can then use tweaks while in game in real time and watch with your own eyes the quality and performance changes. Pull down the console while in game by hitting the ~ (tilde) key. From there you can type in a cvar, without a value, and the game will tell you the current value. If you want to test a tweak, just type it in but instead of using an equals sign to put in a value like in the autoexec.cfg, just use a space. Example in console: r_displayinfo 1 If you have the fps shown in game you will see the performance effect of different settings. Enhancing on DX9: It is a very tweakable game. Crytek have given us the ability to tweak many many things to reach Very High equivalent settings and even far far beyond. I will give you a break down of every exact Very High setting(used in DX10) for reference. This is the real list of every setting and their values. So you can use this list and mimic exactly very high in DX9 to the fullest extent possible. Just add this list to an autoexec.cfg and you will have very high for DX9. sys_spec_GameEffects = 3 sys_spec_ObjectDetail = 3 sys_spec_Particles = 3 sys_spec_Physics = 3 sys_spec_PostProcessing = 3 sys_spec_Quality = 3 sys_spec_Shading = 3 sys_spec_Shadows = 3 sys_spec_Texture = 3 sys_spec_VolumetricEffects = 3 sys_spec_Water = 3 e_foliage_wind_activation_dist = 25 e_max_entity_lights = 16 e_obj_quality = 4 e_particles_max_emitter_draw_screen = 32 e_particles_quality = 4 e_shadows_cast_view_dist_ratio = 0.8 e_vegetation_sprites_distance_ratio = 1.5 e_view_dist_ratio_detail = 30 e_view_dist_ratio_vegetation = 45 e_water_ocean_fft = 1 e_water_tesselation_amount = 10 es_DebrisLifetimeScale = 1 g_battleDust_enable = 1 g_breakage_particles_limit = 250 g_ragdollDistance = 40 g_ragdollMinTime = 15 q_Renderer = 3 q_ShaderFX = 3 q_ShaderGeneral = 3 q_ShaderGlass = 3 q_ShaderHDR = 3 q_ShaderIce = 3 q_ShaderMetal = 3 q_ShaderPostProcess = 3 q_ShaderShadow = 3 q_ShaderSky = 3 q_ShaderTerrain = 3 q_ShaderVegetation = 3 q_ShaderWater = 3 r_BeamsDistFactor = .05 r_BeamsMaxSlices = 200 r_ColorGrading = 1 r_DepthOfField = 2 r_DetailNumLayers = 2 r_DynTexAtlasSpritesMaxSize = 32 r_MotionBlur = 4 r_ShadowJittering = 2.5 r_SSAO_quality = 2 r_SSAO_radius = 2 r_sunshafts = 1 r_TexAtlasSize = 2048 r_Usepom = 1 r_WaterReflectionsQuality = 3 r_WaterUpdateDistance = 0.2 In Game Settings: This chart shows the breakdown of "every" console variable that is changed by the in-game settings. It color codes every different type of in game menu(textures, game quality, shadows,etc) and shows you what variables actually change, when you change a drop down menu in the game, and what values they change to. To see more console variables that cannot be changed in game and to see all the definitions of the settings, follow the links below the image. See the full real size image with definitions and many more settings here. This list is a great starting point for your own tweaking adventure to mix and match settings as you like. Remember you can try most of them while in game in realtime in the console and see the effect on quality and performance. Get the original Excel spreadsheet for your own personal use here. You can copy/paste right into the game console. How do I do start?: summary You can start by making an autoexec.cfg in the main game folder. Add two settings to start. Just copy/paste them. r_displayinfo=1 con_restricted=0 Now you can open the console and start trying tweaks that look interesting one by one. Use your autoexec.cfg and fill it with the tweaks you like. When you check your in game settings it will show 'custom' if you have tweaks in your autoexec affecting that menu section. I will detail some of the ones I think are cool here next. Quality Comparisons: Some notable settings that effect quality. LIGHT AND WATER: r_sunshafts = 1 turns on the hidden feature of light shafts that dance through trees and past objects. Available in game through Very High in-game setting. The bottom is default all High in-game settings, the top is r_sunshafts = 1. Comparison pics... The following 3 settings work along with sun shafts... r_Beams - Toggles the volumetric light beams. Default is 3, it’s an optimized beam with glow support. 0 disables beams, 2 uses fake beams with probably beneficial performance (performance untested). 1 is the best and uses the real full resolution beams but it is slower. r_BeamsDistFactor - Distance between slices. Default is 0.01 in meters(likely reserved for Ultra High) and is likely the best setting for beams making it through the densest vegetation. You can try it and see what you like best (currently medium and high use 0.5, low uses 1). r_BeamsMaxSlices - Number of volumetric slices allowed per light beam. Default is 200 (reserved for very high specs). The max here is 300, so go ultra if you think you can really handle the performance hit. e_water_ocean_fft - Activates fft based ocean algorithm. Produces realistic wave undulation for the best quality and most realistic water. Everything is the same with water except undulation. This algorithm was used in movies like Titanic and Waterworld so it's very realistic. Screenshots wouldn't really show the difference but I have a short movie, it hardly does it justice, but atleast you can see the wave difference. FFA Water movie comparison 4MB TEXTURES & LOD: Distant LOD (level of detail) of textures and vegetation is probably my favorite section because it’s most noticeable as you look across the map and walk about. e_detail_materials_view_dist_xy - Max view distance of terrain XY materials. This is things like certain cliffs and other materials horizontal LOD in game. e_detail_materials_view_dist_z - Max view distance of terrain Z material. This is things like certain cliffs and other materials vertical LOD in game. This one doesn't need to be raised high, 256 or 512 max. (In the GPU benchmark when coming in from the sky this setting will show itself on vertical LOD). A picture is worth a thousand words on how these two work... Note: For the mountains to appear crisp like this you will also need r_TexturesStreaming set to 0. r_usepom - Enables Parallax Occlusion Mapping. A type of relief map that gives raised appearance to textures. Very cool but costs about 2 fps and can sometimes cause a fairly insignificant minor blurring of terrain textures in distance. Comparisons... VEGETATION & SPRITES: e_cull_veg_activation - Vegetation activation distance limit, 70 is a good step up from high(50). This is trees setting how far the farthest out can be seen. e_vegetation_sprites_distance_ratio - Allows changing distance on what vegetation switch into sprite. Raising this from 1 to 1.5 cost me about 1 fps in that view. Adds medium tree distance as well as certain near shrubs. Comparisons... e_view_dist_ratio_vegetation - View distance ratio for vegetation. Includes grass and shrubs like ferns and broad leafs, etc. 50 just about eliminates any popping effect with grass and shrubs, costs 1 fps in this scene. Comparisons... Controlling Antialiasing with Tweaks See above section on antialiasing and how it changes shader settings. These are the cvar settings for AA that you can use in your autoexec.cfg file. Only for XP. r_FSAA = 1 - turns on AA 2xAA = r_FSAA_samples = 2, r_FSAA_quality = 0 4xAA = r_FSAA_samples = 4, r_FSAA_quality = 0 8xAA = r_FSAA_samples = 4, r_FSAA_quality = 2 8xAAQ = r_FSAA_samples = 8, r_FSAA_quality = 0 16xAA = r_FSAA_samples = 4, r_FSAA_quality = 4 16xAAQ = r_FSAA_samples = 8, r_FSAA_quality = 2 Additional Background And Things To Know I just want to share on how these work in the game and some more background info to clear up anything hazy. *Make sure you take a look at the full size picture or the spreadsheet for the settings chart, the links are below the chart. They expose many more tweaks, their definitions, and the values that they accept. Know your in game settings. Play with that first to get a comfortable feel of what you like and what is available through the advanced settings menu options. The way the autoexec.cfg variables work is they build on the in-game settings. The in game settings are first loaded, which are stored in the game.cfg in your profile. As the game starts it loads the game.cfg then the autoexec.cfg overrides are loaded with what ever settings you chose. So for instance, you have in game shaders set to medium down from high. But medium changes over 20 settings, well maybe you want the perfomance benefit of most of those but you want Ambient Occlusion back on the terrain (it's a global lighting system to provide realistic lighting). You keep the in game setting at medium but turn on e_terrain_ao = 1 along with r_SSAO=1 which will override the 0 settings in the game. Or maybe you want better better shaders on terrain back to high(3) so q_ShaderTerrain = 3. Whether you like water, sky, terrain, vegetation, view distances....it's all at your finger tips for your preferences. Usually there is only a couple settings that really affect performance alot, the rest can add quality at little cost, the developers just didn't know your video memory, vid card, processor, ram, etc. so they made broader stroke settings than most people needed in certain cases. The tip to remember is that your configs will override and work on top of what is already set in the game menu last time you ran the game. If you prefer there is also way to change the drop down boxes from your autoexec. The sys_spec... settings will change low/medium/high and it will change all the broad stroke settings I color coded in my chart if you change those broad stoke settings. You will know when your autoexec is working because if you look at the game settings it will show custom instead of low/medium/high. Basically, many cvar values are often just a on/off setting for features [0/1] 0 is off, 1 is on. Others may have values that are based on different ranges, the definitions will tell you what most of the limits and ranges are. Some ranges maybe in meters, where others are clearly larger or smaller units of measure. If you see a pattern of numbers like 512/1024 then extrapolate that it's best to stick with the pattern, like those just mentioned for texture sizes and shadow maps. Sometimes you have ratios (as seen in some cvar names), which seem to affect more than one thing and they are likely multiplied internally in the game against some value so they are more broad sweeping. I expose some of the cool cvars with pics above but don't let that keep you from trying new things. Performance of these settings depends on your resolution, your video card, and the complexity of the scene you are looking at. If you are tweaking vegetation find the densist vegetation to see what the hugest impact will be. Same with terrain view distances and textures. In certain scenarios things combine where you are looking through the dense jungle up at the mountain this is good to test combined foliage/texture/view distance tweaks as it will show worst case scenarios. That is the balancing act, but most of the time you in buildings, in water, in vegetation, so you can pretty much raise them irrespective of each other to a degree. This is the point I am at in my configs in perfecting that balance of taking quality to the farthest point where it can mix well with the others. I also like long view distances on objects, I like seeing vehicles, enemies and buildings afar off so you can trade something else for that if you prefer. It's great to use the console and see the settings changed in real time. Just be aware that not all settings can be changed in real time. Either the value will not change and that will be clearly shown in the console, or it appears to change the value in the console but nothing in the game actually changes. In those cases it will be necessary to put the setting in the autoexec.cfg so that the renderer will be able to properly utilize that setting during startup when rendering the scene. There are a couple features restricted to DX10 but mostly they are time of day and geometry shader functions (GS in the cvar), not many at all. Enjoy the playground. More soon... Crysis Performance Reviews: See how different hardware and settings perform. Crysis (Demo Performance)- LegionHardware Crysis Demo Performance Analysis- Tweaktown Crysis demo performance in-depth - TechSpot DirectX 9 performance with the Crysis demo on 10 different cards - AMDZone To be Continued... Last edited by MadBoris (17-11-2007 23:54:33) Offline THIS GUIDE WAS CREATED BY Sven2157 Thought this guide may be useful for some of us here. You can also visit that link to see this same guide. http://www.techsupportforum.com/gaming-forum/pc-gaming-support/349169-optimising-your-system-games.html How to Properly Configure Your Computer for GAMES/PROGRAMS Hello everyone, I am constantly seeing people, all over the internet, with problems running their programs/games on their computers. They ALL are experiencing slow boot times, in game lag, freezing, OOM Errors (Out of Memory), low FPS and numerous other "issues". They are also, consuming A LOT of database space asking the same questions. I will try and consolidate those questions and answers here. So I am writing this "CHECK LIST GUIDE" of common problems and solutions. It contains basic/mandatory system configurations, as well as advanced techniques; thus improving your game play, software development/designing and overall computer performance. All while maintaining the best possible visual experience. ***PLEASE REMEMBER THAT THIS IS A GUIDE! NOT A MUST! ANY CHANGES YOU MAKE TO YOUR SYSTEM, ARE SOLELY YOUR CHOICE AND RESPONSIBILITY! I, NOR THE MODERATORS OF THESE FORUMS, CAN, AND WILL NOT, BE HELD LIABLE FOR YOUR OWN ACTIONS!*** So let's begin... First and Foremost! Please update your Motherboard, BIOS, SMBus/USB/Memory/Video/Audio/Storage Controllers (<--System), Video, Sound, Human Interface Device (HID) Controllers (<--Your Joystick/Gamepad), Mouse and other such drivers. Also run a system Defrag, to defragment your hard drive. This should be done at least monthly; as all of the afore mentioned will resolve 99.9% of the issues experienced by users! Also clear your Temporary files 1. - Click Start..>.."Run.." (Vista Users may not have this enabled <by default>, so the shortcut is "Windows Key+'R') 2. - In the "Run" Box type: %Temp% Your Temporary File Folder will come up. Select ALL, and delete them. Don't worry, they are TEMPORARY FILES. Some programs do not clear these when they are finished, so you have to go manually delete them. This then makes it easier for other programs to store temporary files needed for execution. Getting rid of the stuff you didn't even know was there... O.O(<--BTW I am writing this in notepad and transferring it to the forums; so my smilies my not show up -.-) When you download and install commercial products - Adobe Flash, Adobe Reader, Google Earth, etc, etc - , you have to be mindful what the installer is asking you... This is a common mistake by users. They want the program, but either don't realize that there are other programs "Piggy Backing" in, or don't care. This is where problems begin. "Well, what's wrong with the Google Toolbar?" 8-/ The answer to that is simple: EVERYTHING! These programs seem harmless, and have a very small file size: .4 - 2.5MB. But that is not where the problem lies. Programs like this, and Toolbars especially, are constantly TRANSMITTING data to their prospective authors. This includes where you surf, what you buy, where you live, what time you access the internet, who is logged into the Operating System (<-- BETTER BELIEVE IT! >:-{ ), your ISP, etc, etc. Consequently, this is not only eating up the processing power and RAM of your computer, but now you are losing crucial bandwidth. Ever wonder how "that guy" can come around the corner and just kill you, in FPS games? Because he has a CLEAR connection to the server, and saw you LONG before you knew he was there! "But I like my Toolbar (Google, or other)!" Why? IE7 and FireFox has a Google Search built right into them. They have Pop-Up Blockers, and Auto Complete, as well. Why have redundant software running? So let's get rid of ALL that crap, and free up some drive space! 1. - Click start..>..Control Panel..>..Add/Remove Programs(XP)/Programs and Features(Vista). 2. - Go through the list, when it populates, and remove ANY "extra" programs that you do not use. If you accidently remove something you need, you can certainly get it back. What you are looking for: (not in any particular order) Adobe.com Adobe Updater *Nothing like losing bandwidth, then getting kick out of game because Abode thinks it's more important! Apple Updater Google Chrome *Transmits data continuosly Google Desktop *I would love to slap the guy who invented this! ;-) Google Updater *Big process eater! Transmits data constantly! Google Toolbar MY SEARCH - ANYTHING! *Big process eater! Also Installs Viruses and Malware automatically! Java Updater Yahoo Search Yahoo Mail Yahoo Toolbar Windows Live Installer Windows Live SkyDrive Windows Live Photos MyWeb - ANYTHING! *Big process eater! Continuosly running. HP/Lexmark/Cannon/Kodak - Anything you don't use. As long as you don't delete the driver, your printer/camera/scanner will still function! Dell/Acer/HP/Gateway/eMachines, etc, etc Pre-Installed Manufacturer Programs *These programs are "extra" and cause your system to run slow. Most of them duplicate Windows built in features! Also, look for anything that you don't use or that looks suspicious. Once again, if you remove it, and find you need it, you can get it back! So don't be afraid; Don't be overzealous, either! Now for the real stuff! Processes and Services! These are the real KILLERS! When programs install, they generally write their own rules; as most users don't really know how to respond even when asked! The problem with this is they ALL FIGHT to be NUMERO UNO! They ALL think they are the greatest thing since crawling out of the sea, and growing lungs and legs! :-D So we have to go tell them ALL who the real boss is! YOU, the user! 1. - Click Start..>.."Run..." (Vista Users may not have this enabled <by default>, so the shortcut is "Windows Key+'R') 2. - When the "Run..." Box opens, type: MSCONFIG (<--not case sensative) 3. - When the "System Configuration" window appears, click "Selective startup". 4. - Click the "Services Tab". 5. - ***THIS IS AN IMPORTANT STEP! PAY ATTENTION TO WHAT YOU ARE DOING HERE!*** Click ONLY the "Hide all Microsoft Services" box! 6. - Now the window will only show you 3rd party services that start when Windows starts. However you NEED some of these! Like your Norton/McAffee/AVG Anti-Virus and Internet Security services. Display Drivers/Software, Storage Drivers (i.e. RAID), etc, etc. Trial an error may be the best approach on this tab. Turn a couple off, see where that gets you, then try a couple more. 7. - Now click the "Startup" Tab. You can turn ALL of these off if you want. Once again, READ what you are doing! In the picture below, I leave my RAID, VIDEO and Sidebar on, because I use that to monitor my system. (Vista Users - In the picture below, the 2 "Microsoft® Windows® Operating System" items you see, are for the Sidebar; they are not crucial!) 8. - When you have finished, click "Apply", then "Ok". ***IF YOU DO NOT WANT THE CHANGES TO TAKE AFFECT OR HAVE MADE A MISTAKE, CLICK "CANCEL"!*** The configuaration utility will then prompt you with the following image: 9. - Press "Restart" (Pressing "Exit without Restart" will not reboot your computer. However, when you manually reboot the system changes will take affect!), when the system starts back up, YOU WILL RECIEVE A "SYSTEM CONFIGURATION MESSAGE". Just Check the, "Don't show this again" box and click "Ok". ***IF YOU ARE EXPERIENCING PROBLEMS, REPEAT STEPS 1 AND 2. THIS TIME SELECTING "NORMAL STARTUP"*** Then click "Apply", "Ok", "Restart". This will return all Services and Startup options back to the original settings! OK... Almost there... O.o Now let's get some memory back.... 1. - Right-click My Computer(XP)/Computer(Vista)..>..Choose properties. VISTA USERS ONLY: The "System Properties" Window appears. Click "Advanced system settings". XP USERS: Click "Advanced" Tab. 2. - Click the "Settings" button in the Performance row, to open the "Performance Options" Window. 3. - Select the "Advanced" tab, then click the "Change..." button in the Virtual memory row. 4. - Uncheck the box for "Automatically manage paging file size for all drives" if it is checked. ***The next step requires a judgment on your part. In the above image, I have my "Intial Size" set to 4096MB (<--That's 4 GigaBytes!), and my Maximum size is set to 6114 (<--That's 6 GigaBytes!). HOWEVER! I have a 400GB in RAID 0 "C:\" drive! In other words, I HAVE ROOM TO SPARE! Most of you will want to set this to approximately 2048 Init/3072MB Max; ROUGHLY! ***NOTE: XP Users can only set a MAXIMUM of 4096MB for their Paging Files!*** 5. - Now click "Set". You will be prompted, after clicking "Ok", that you have to reboot, so... Reboot. What did I just do!?!? O.O Good question! You are very smart! ;-) In simple terms... This is going to expand your "Paging File". Windows uses the "Paging File" as "secondary memory", by writing "chunks" of data to the Hard Drive. This way it can recall information faster than searching the rest of the drive. This data is not permanent and is constantly changing. Ever wonder why your hard drive light flashes, even when Windows is idle? Windows allocates (or reserves) RAM and Virtual Memory (<--Paging File) for it's own greedy use; whether or not it actually needs it. This reserve is for system processes and what not. When the size of this is SET by the user, you free up the constant size changing, increasing or reducing, that windows can and will do to make more or less available; consequently allowing more room to write to the drive = freeing up valuable processing threads and RAM. In turn increasing performance. ...and, Lastly... Is the DREADED OOM!!!! This next tweak will prevent the Out Of Memory (OOM) Error. This is EXTREMELY effective when working with Adobe CS Series, AutoDesk Products and Games (Microsoft Flight Simulator Pilots, I am looking in your direction!) that are both Graphic and Processor/RAM intensive. Before I begin, let me briefly descibe what happens here: Windows thinks its the greatest thing since fire! So, on your PC it will block ALL programs from accessing what it thinks, is it's! I.E MEMORY; both RAM and Virtual! Once again, you need to go into the OS and tell it who's BOSS, and only give it what it NEEDS; NOT WHAT IT WANTS! XP needs roughly 512MB, while Vista needs about 1GB to function flawlessly with RAM! About 256MB - 512MB of Virtual for BOTH. It has a "Safe Guard" that will flag programs that try to use more than 2GB of either. When this happens, it sends an error message, "Out of Memory...". To prevent this from happening, and crashing your programs, you need to set this limiter to a higher value. Here is how you do it: On VISTA: (You have to run the command prompt with elevated privlages) 1. Click the Start..>..All Programs..>..Accessories..>..Right-Click the "Command Prompt" and choose "Run as Administrator". 2. At the command line type the following: BCDEDIT(SPACE)/Set(SPACE)IncreaseUserVA(SPACE)nnnn (nnnn = the amount you want to increases by! I have mine set for 4096MB) 3. Hit enter, and get the confirmation. 4. REBOOT 5. Confirm that it worked by running the command prompt, typing: BCDEDIT, hit enter and you will see the /userva switch now.... It will be under the "Windows Boot Loader" as increaseuserva = {value you set} On XP: 1. Right-Click the My Computer..>..Choose "Properties". 2. Click the "Advanced Tab". 3. Click the "Settings" button in the "Startup and Recovery row. 4. click the "Edit" button in the "System startup" row. Now you'll see the boot config. At the very end type /3GB so it looks like this: *** Do Not Copy as your own Boot file [boot loader] timeout=3 default=multi(0)disk(0)rdisk(0)partition(2)\WINDOWS [operating systems] multi(0)disk(0)rdisk(0)partition(2)\WINDOWS="Microsoft Windows XP Home Edition" /fastdetect /NoExecute=OptIn /3GB 5. - Reboot Well Folks, there you go! It will take most of you longer to read this than it will to actually complete these tasks! O.O I hope that this helps! ***IF YOU ARE UNSURE ABOUT ANY OF THE ABOVE, THEN DO NOT PREFORM THESE ACTIONS! ASK HERE FIRST! I, AND THE MODERATORS OF THIS FORUM, ASSUME NO RESPONSIBILITY FOR ANY DAMAGE, LOSS OF DATA/SOFTWARE/HARDWARE, OR OTHER LOSS FOR THE ACTIONS YOU PERSONALLY TAKE!*** Please feel free to ask questions here, if I was not clear on something... Happy Gaming/Programming Sven2157 ADMINS WILL YOU PLEASE STICKY THIS ive had numourous people asking me past few weeks about where my config post went and no one can find it.... Thanks........ ... NOW... on to the config.... FIRST.. COPY everything i paste below the line and open up NOTEPAD on your computer.... PASTE IT INTO NOTEPAD AND SAVE AS CONFIG_MP.CFG .... YOU HAVE TO USE THAT FILE NAME!!!!! Save to your desktop..... now.... make a COPY of your current config.... put in a safe place.... replace the old config with your new one in your cod4 profiles folder........ OPEN GAME...... now i have weird controls... SO SET THE CONTROLS TO WHAT YOU WANT TO USE!!! AND CHANGE THE NAME!!! thats all you have to do.... your ping will drop 10-30 .. your fps will increase by 30-50... and you will move faster.... hit more accurate.... .... -------------------------------------------------------------------------------------------------------------------------------------------------- // generated by Call of Duty, do not modify unbindall bind TAB "+scores" bind ESCAPE "togglemenu" bind SPACE "+gostand" bind 3 "openscriptmenu quickpromod 2" bind 4 "+smoke" bind 5 "+actionslot 3" bind 6 "+actionslot 4" bind 7 "+actionslot 2" bind 8 "openscriptmenu quickpromod 5" bind ` "toggleconsole" bind A "+moveleft" bind B "mp_QuickMessage" bind C "gocrouch" bind D "+moveright" bind E "+leanright" bind F "+activate" bind G "+frag" bind H "ufo" bind K "ufo" bind N "+actionslot 1" bind Q "+leanleft" bind R "+reload" bind S "+back" bind T "chatmodepublic" bind U "noclip" bind V "+melee" bind W "+forward" bind Y "chatmodeteam" bind Z "+talk" bind ~ "toggleconsole" bind PAUSE "toggle cl_paused" bind CTRL "goprone" bind SHIFT "+breath_sprint" bind F1 "vote yes" bind F2 "vote no" bind F4 "+scores" bind F12 "screenshotJPEG" bind KP_HOME "toggle cg_thirdpersonangle 340 320 300 280 260 240 220 200 180 160 140 120 100 80 60 40 20 0" bind KP_UPARROW "timescale 5.0" bind KP_PGUP "toggle cg_draw2D" bind KP_LEFTARROW "timescale 0.5" bind KP_5 "timescale 1" bind KP_RIGHTARROW "timescale 2.0" bind KP_END "toggle cg_thirdpersonangle 0 20 40 60 80 100 120 140 160 180 200 220 240 260 280 300 320 340 " bind KP_DOWNARROW "timescale 0.3" bind KP_PGDN "toggle cg_thirdperson" bind KP_ENTER "toggle g_compassShowEnemies" bind KP_INS "toggle cl_freezedemo" bind KP_DEL "toggle developer" bind KP_SLASH "quit" bind KP_MINUS "toggle cg_thirdpersonrange 1024 800 600 350 120" bind KP_PLUS "toggle cg_thirdpersonrange 120 350 600 800 1024" bind MOUSE1 "+attack" bind MOUSE2 "+toggleads_throw" bind MOUSE3 "+frag" bind MWHEELDOWN "weapnext" bind MWHEELUP "weapnext" seta ai_badPathSpam "0" seta ai_corpseCount "0" seta ai_debugAccuracy "0" seta ai_debugCoverSelection "0" seta ai_debugMeleeAttackSpots "0" seta ai_debugThreatSelection "0" seta ai_ShowCanshootChecks "0" seta ai_showClaimedNode "0" seta ai_showRegion "0" seta airlift_min_spec "0" seta animated_trees_enabled "1" seta bog_b_min_spec "0" seta ai_corpseCount "10" seta cg_blood "0" seta cg_bloodLimit "0" seta cg_bloodLimitMsec "330" seta cg_brass "0" seta cg_centerPrintY "-60" seta cg_chatHeight "8" seta cg_chatTime "12000" seta cg_connectionIconSize "0" seta cg_crosshairAlpha "1" seta cg_crosshairAlphaMin "0.5" seta cg_crosshairDynamic "0" seta cg_crosshairEnemyColor "0" seta cg_cursorHints "4" seta cg_debugInfoCornerOffset "0 0" seta cg_descriptiveText "1" seta cg_drawBreathHint "1" seta cg_drawCrosshair "1" seta cg_drawCrosshairNames "0" seta cg_drawFPS "Simple" seta cg_drawFPSLabels "0" seta cg_drawFriendlyFireCrosshair "1" seta cg_drawFriendlyNames "1" seta cg_drawLagometer "1" seta cg_drawMantleHint "0" seta cg_drawSnapshot "0" seta cg_drawTurretCrosshair "1" seta cg_enemyNameFadeIn "250" seta cg_enemyNameFadeOut "250" seta cg_footsteps "1" seta cg_fov "80" seta cg_friendlyNameFadeIn "0" seta cg_friendlyNameFadeOut "1500" seta cg_gameBoldMessageWidth "390" seta cg_gameMessageWidth "455" seta cg_headIconMinScreenRadius "0.015" seta cg_hintFadeTime "100" seta cg_hudChatIntermissionPosition "5 110" seta cg_hudChatPosition "5 204" seta cg_hudDamageIconHeight "64" seta cg_hudDamageIconInScope "0" seta cg_hudDamageIconOffset "128" seta cg_hudDamageIconTime "2000" seta cg_hudDamageIconWidth "128" seta cg_hudGrenadeIconEnabledFlash "1" seta cg_hudGrenadeIconMaxRangeFlash "500" seta cg_hudGrenadeIconHeight "25" seta cg_hudGrenadeIconInScope "1" seta cg_hudGrenadeIconMaxHeight "104" seta cg_hudGrenadeIconOffset "50" seta cg_hudGrenadeIconWidth "25" seta cg_hudGrenadePointerHeight "12" seta cg_hudGrenadePointerPivot "12 27" seta cg_hudGrenadePointerWidth "25" seta cg_hudMapBorderWidth "2" seta cg_hudMapFriendlyHeight "15" seta cg_hudMapFriendlyWidth "15" seta cg_hudMapPlayerHeight "20" seta cg_hudMapPlayerWidth "20" seta cg_hudMapRadarLineThickness "0.15" seta cg_hudProneY "-160" seta cg_hudSayPosition "5 180" seta cg_hudStanceHintPrints "1" seta cg_hudVotePosition "5 220" seta cg_invalidCmdHintBlinkInterval "600" seta cg_invalidCmdHintDuration "1800" seta cg_laserLight "0" seta cg_mapLocationSelectionCursorSpeed "0.6" seta cg_marks_ents_player_only "0" seta cg_nopredict "0" seta cg_overheadIconSize "0.7" seta cg_overheadNamesGlow "0 0 0 1" seta cg_overheadNamesMaxDist "10000" seta cg_overheadNamesSize "0.5" seta cg_overheadRankSize "0.5" seta cg_predictItems "1" seta cg_scoreboardBannerHeight "35" seta cg_scoreboardHeaderFontScale "0.3" seta cg_scoreboardHeight "435" seta cg_scoreboardItemHeight "18" seta cg_scoreboardPingHeight "0.7" seta cg_scoreboardPingWidth "0.036" seta cg_scoreboardRankFontScale "0.25" seta cg_scoreboardScrollStep "3" seta cg_scoreboardWidth "400" seta cg_ScoresPing_BgColor "0.25098 0.25098 0.25098 0.501961" seta cg_ScoresPing_HighColor "0.8 0 0 1" seta cg_ScoresPing_Interval "100" seta cg_ScoresPing_LowColor "0 0.74902 0 1" seta cg_ScoresPing_MaxBars "4" seta cg_ScoresPing_MedColor "0.8 0.8 0 1" seta cg_scriptIconSize "0" seta cg_sprintMeterDisabledColor "0.8 0.1 0.1 0.2" seta cg_sprintMeterEmptyColor "0.7 0.5 0.2 0.8" seta cg_sprintMeterFullColor "0.8 0.8 0.8 0.8" seta cg_subtitleMinTime "3" seta cg_subtitles "1" seta cg_subtitleWidthStandard "520" seta cg_subtitleWidthWidescreen "520" seta cg_teamChatsOnly "0" seta cg_viewZSmoothingMax "16" seta cg_viewZSmoothingMin "1" seta cg_viewZSmoothingTime "0.1" seta cg_voiceIconSize "0" seta cg_weaponCycleDelay "0" seta cg_weaponHintsCoD1Style "1" seta cg_youInKillCamSize "6" seta cl_allowDownload "1" seta cl_anglespeedkey "0" seta cl_anonymous "0" seta cl_connectionAttempts "20" seta cl_freelook "1" seta cl_maxpackets "42" seta cl_maxPing "800" seta cl_maxppf "5" seta cl_mouseAccel "0" seta cl_packetdup "1" seta cl_pitchspeed "140" seta cl_punkbuster "1" seta cl_voice "1" seta cl_wwwDownload "1" seta cl_yawspeed "140" seta com_introPlayed "1" seta com_maxfps "125" seta com_recommendedSet "1" seta compassClampIcons "1" seta compassCoords "740 3590 400" seta compassECoordCutoff "37" seta compassFriendlyHeight "18.75" seta compassFriendlyWidth "18.75" seta compassMaxRange "2500" seta compassMinRadius "0.0001" seta compassMinRange "0.0001" seta compassObjectiveArrowHeight "20" seta compassObjectiveArrowOffset "2" seta compassObjectiveArrowRotateDist "5" seta compassObjectiveArrowWidth "20" seta compassObjectiveDrawLines "1" seta compassObjectiveHeight "20" seta compassObjectiveIconHeight "16" seta compassObjectiveIconWidth "16" seta compassObjectiveMaxHeight "70" seta compassObjectiveMaxRange "2048" seta compassObjectiveMinAlpha "1" seta compassObjectiveMinHeight "-70" seta compassObjectiveNumRings "10" seta compassObjectiveRingSize "80" seta compassObjectiveRingTime "10000" seta compassObjectiveTextHeight "18" seta compassObjectiveTextScale "0.3" seta compassObjectiveWidth "20" seta compassPlayerHeight "15" seta compassPlayerWidth "15" seta compassRadarLineThickness "0.4" seta compassRadarPingFadeTime "4" seta compassRadarUpdateTime "4" seta compassRotation "1" seta compassSize "1" seta compassSoundPingFadeTime "2" seta compassTickertapeStretch "0.5" seta con_errormessagetime "8" seta con_gameMsgWindow0FadeInTime "0.25" seta con_gameMsgWindow0FadeOutTime "0.5" seta con_gameMsgWindow0Filter "gamenotify obituary" seta con_gameMsgWindow0LineCount "4" seta con_gameMsgWindow0MsgTime "5" seta con_gameMsgWindow0ScrollTime "0.25" seta con_gameMsgWindow0SplitscreenScale "1.5" seta con_gameMsgWindow1FadeInTime "0.25" seta con_gameMsgWindow1FadeOutTime "0.01" seta con_gameMsgWindow1Filter "boldgame" seta con_gameMsgWindow1LineCount "5" seta con_gameMsgWindow1MsgTime "8" seta con_gameMsgWindow1ScrollTime "0.25" seta con_gameMsgWindow1SplitscreenScale "1.5" seta con_gameMsgWindow2FadeInTime "0.75" seta con_gameMsgWindow2FadeOutTime "0.5" seta con_gameMsgWindow2Filter "subtitle" seta con_gameMsgWindow2LineCount "7" seta con_gameMsgWindow2MsgTime "5" seta con_gameMsgWindow2ScrollTime "0.25" seta con_gameMsgWindow2SplitscreenScale "1.5" seta con_gameMsgWindow3FadeInTime "0.25" seta con_gameMsgWindow3FadeOutTime "0.5" seta con_gameMsgWindow3Filter "" seta con_gameMsgWindow3LineCount "5" seta con_gameMsgWindow3MsgTime "5" seta con_gameMsgWindow3ScrollTime "0.25" seta con_gameMsgWindow3SplitscreenScale "1.5" seta con_inputBoxColor "0.25 0.25 0.2 1" seta con_inputHintBoxColor "0.4 0.4 0.35 1" seta con_matchPrefixOnly "1" seta con_minicon "0" seta con_miniconlines "5" seta con_minicontime "4" seta con_outputBarColor "1 1 0.95 0.6" seta con_outputSliderColor "0.15 0.15 0.1 0.6" seta con_outputWindowColor "0.35 0.35 0.3 0.75" seta con_typewriterColorGlowCheckpoint "0.6 0.5 0.6 1" seta con_typewriterColorGlowCompleted "0 0.3 0.8 1" seta con_typewriterColorGlowFailed "0.8 0 0 1" seta con_typewriterColorGlowUpdated "0 0.6 0.18 1" seta con_typewriterDecayDuration "700" seta con_typewriterDecayStartTime "6000" seta con_typewriterPrintSpeed "50" seta customclass1 "Custom Slot 1" seta customclass2 "Custom Slot 2" seta customclass3 "Custom Slot 3" seta customclass4 "Custom Slot 4" seta customclass5 "Custom Slot 5" seta drew_notes "5" seta dynEnt_active "0" seta fx_draw "1" seta fx_drawClouds "1" seta fx_marks "0" seta fx_marks_ents "0" seta fx_marks_smodels "0" seta g_allowvote "1" seta g_banIPs "" seta g_clonePlayerMaxVelocity "80" seta g_deadChat "1" seta g_dropForwardSpeed "10" seta g_dropHorzSpeedRand "100" seta g_dropUpSpeedBase "10" seta g_dropUpSpeedRand "5" seta g_log "games_mp.log" seta g_logSync "1" seta g_oldVoting "1" seta g_playerCollisionEjectSpeed "25" seta g_redCrosshairs "1" seta g_useGear "1" seta g_useholdspawndelay "500" seta g_voiceChatTalkingDuration "500" seta g_voteAbstainWeight "0.5" seta hud_deathQuoteFadeTime "1000" seta hud_enable "1" seta hud_fade_ammodisplay "1.7" seta hud_fade_compass "0" seta hud_fade_healthbar "0" seta hud_fade_offhand "1.7" seta hud_fade_sprint "1.7" seta hud_fade_stance "1.7" seta hud_fadeout_speed "0.1" seta hud_flash_period_offhand "0.5" seta hud_flash_time_offhand "2" seta hud_health_pulserate_critical "0.5" seta hud_health_pulserate_injured "1" seta hud_health_startpulse_critical "0.33" seta hud_health_startpulse_injured "1" seta in_mouse "1" seta loc_forceEnglish "0" seta loc_language "0" seta m_filter "0" seta m_forward "0.25" seta m_pitch "0.022" seta m_side "0.25" seta m_yaw "0.022" seta monkeytoy "0" seta name "Morphic Jackzor" seta net_noipx "0" seta net_noudp "0" seta net_socksEnabled "0" seta net_socksPassword "" seta net_socksPort "1080" seta net_socksServer "" seta net_socksUsername "" seta r_aaAlpha "dither (fast)" seta r_aaSamples "1" seta r_altModelLightingUpdate "1" seta r_aspectRatio "auto" seta r_autopriority "0" seta r_customMode "" seta r_debugLineWidth "1" seta r_depthPrepass "0" seta r_displayRefresh "120 Hz" seta r_distortion "0" seta r_dlightLimit "0" seta r_dof_enable "0" seta r_drawDecals "1" seta r_drawSun "1" seta r_drawWater "1" seta r_fastSkin "0" seta r_fullscreen "1" seta r_gamma "2.11458" seta r_glow_allowed "0" seta r_ignorehwgamma "0" seta r_inGameVideo "1" seta r_lodBiasRigid "0" seta r_lodBiasSkinned "0" seta r_lodScaleRigid "1" seta r_lodScaleSkinned "1" seta r_mode "1024x768" seta r_monitor "0" seta r_multiGpu "1" seta r_picmip "0" seta r_picmip_bump "0" seta r_picmip_manual "0" seta r_picmip_spec "0" seta r_picmip_water "0" seta r_polygonOffsetBias "-1" seta r_polygonOffsetScale "-1" seta r_portalBevels "0.7" seta r_preloadShaders "0" seta r_rendererPreference "Default" seta r_specular "0" seta r_texFilterAnisoMax "4" seta r_texFilterAnisoMin "1" seta r_texFilterMipMode "Unchanged" seta r_vsync "0" seta r_zFeather "0" seta ragdoll_enable "0" seta ragdoll_max_simulating "16" seta rate "25000" seta sensitivity "5" seta server1 "" seta server10 "" seta server11 "" seta server12 "" seta server13 "" seta server14 "" seta server15 "" seta server16 "" seta server2 "" seta server3 "" seta server4 "" seta server5 "" seta server6 "" seta server7 "" seta server8 "" seta server9 "" seta sm_enable "0" seta sm_maxLights "4" seta snaps "30" seta snd_cinematicVolumeScale "0.85" seta snd_enableEq "1" seta snd_errorOnMissing "0" seta snd_khz "44" seta snd_levelFadeTime "250" seta snd_outputConfiguration "5.1 speakers" seta snd_slaveFadeTime "500" seta snd_touchStreamFilesOnLoad "0" seta snd_volume "0.8" seta sv_allowDownload "1" seta sv_floodprotect "4" seta sv_hostname "CoD4Host" seta sv_maxclients "24" seta sv_maxPing "0" seta sv_maxRate "25000" seta sv_minPing "0" seta sv_punkbuster "1" seta sv_reconnectlimit "3" seta sv_voice "1" seta sv_wwwBaseURL "" seta sv_wwwDlDisconnected "0" seta sv_wwwDownload "0" seta sys_configSum "4379996" seta sys_configureGHz "8.6759" seta sys_gpu "NVIDIA GeForce 9800 GTX " seta sys_sysMB "2048" seta ui_bigFont "0.4" seta ui_browserFriendlyfire "-1" seta ui_browserHardcore "-1" seta ui_browserKillcam "-1" seta ui_browserMod "0" seta ui_browserOldSchool "-1" seta ui_browserShowDedicated "0" seta ui_browserShowEmpty "1" seta ui_browserShowFull "1" seta ui_browserShowPassword "-1" seta ui_browserShowPunkBuster "-1" seta ui_browserShowPure "1" seta ui_currentMap "0" seta ui_currentNetMap "0" seta ui_dedicated "0" seta ui_drawCrosshair "1" seta ui_extraBigFont "0.55" seta ui_gametype "0" seta ui_joinGametype "0" seta ui_maxclients "32" seta ui_netGametype "0" seta ui_netGametypeName "dm" seta ui_netSource "1" seta ui_serverStatusTimeOut "7000" seta ui_smallFont "0.25" seta vehDriverViewHeightMax "50" seta vehDriverViewHeightMin "-15" seta vid_xpos "3" seta vid_ypos "22" seta voice_deadChat "0" seta voice_global "0" seta voice_localEcho "0" seta winvoice_mic_mute "1" seta winvoice_mic_reclevel "65535" seta winvoice_mic_scaler "1" seta winvoice_save_voice "0" con_hidechannel *; con_showchannel dontfilter error gamenotify boldgame subtitle obituary logfile_only console_only gfx sound files devgui profile ui client server system playerweap ai anim physics fx leaderboards parserscript script Holy shit Wizid, you need a hobby. Spend some more time in your new bar. Awards
WiZiD Posted October 24, 2011 Member ID: 804 Group: ***- Inactive Clan Members Followers: 32 Topic Count: 446 Topics Per Day: 0.07 Content Count: 3600 Content Per Day: 0.60 Reputation: 1053 Achievement Points: 24386 Solved Content: 0 Days Won: 4 Joined: 11/28/09 Status: Offline Last Seen: June 3, 2025 Birthday: 04/25/1960 Posted October 24, 2011 bobbarker WiZiD Tweaks for improved game performance. Call of duty ______________________________ Console Commands: *Enable Console first in options* then type in the following then hit enter. *First things first*: (back up your "normal" config) found here for *XP C:\Documents and Settings\<USERNAME>\Local Settings\Application Data\Activision\CoDWaW\players\profiles\<playername> Vista is in a similar place 1) Punkbuster Sleep setting: /pb_sleep 500 (tells punkbuster client software to wait longer before awakening and sending info to PB) Save PB setting to config: /pb_writecfg (makes the above setting permanent so you don’t have to do it each time you log in) - The above changes the frequency that your PC reports to the server and thus reduced frequency of network spikes and the associated latency. 2) Packet transfer setting: /cl_maxpackets 100 - This setting helps smooth out data transfer and should help if you have a cable or other high speed connection. This setting works in conjunction with the com_maxfps 125 setting. 3) Send duplicate packets: /cl_packetdup 0 or 1 - Manage whether or not extra or duplicate packets are sent to the server.(1 is default and this sends an extra packet of data in case the first one is lost. If you enable the lagometer (see tools below), then you can see if you are losing any packets.If yes, then leave this at 1. If no, you can consider changing to 0. 4) Snaps: /snaps This is possibly the most important setting for getting a good connection. Snaps setting determines how many updates you recieve from the server. 20 to 30 for 56K connects in quake series 40 for high speed internet im sure the same for cod. (30 is fine). 5) Enable higher Frames Per Second (FPS): /com_maxfps 125 (Default is 85 so this may help overall FPS. Some say this should be set at or just above your average FPS to smooth things out) - This allows your game to go allow higher frame rates than the default. Set it to a value you want based on the capabilities of you machines… to unlock FPS completely and see what you machine is capable of set to 0, it can go as high as 1000. 6) Field of View (FOV): /cg_fov 80 7)Shadows: /sm_enable 0 Turns off unique Shadows ingame 8)Depth of Field: /seta r_dof_enable "0" Gets rid of the "blur" around you gun and clears your perperipheral vision. - If you want to widen your FOV (field of view) from 65 degrees to 80 degrees, use this command. NOTE: This basically “backs you up” to give you a larger viewing area at the sides but it does make user/soldiers/enemies slightly smaller at the same time. This command does not affect machine performance and is merely a preference to give you the ability to see more. In game tools: ______________ 1) Show framerate on screen so you can see how your PC is performing: /cg_drawFPS 1 (choices are 1,2,or 3 where 0 = off / 1 = on) - At a minimum, you need to try to be above 60FPS so that you have no visual choppiness. Reduce textures, shadows, lighting etc. 2) Show network connection quality: /cg_drawlagometer 1 (puts a graph just above your grenades icon on screen) - Top meter on graph. GFX shown in Blue, (or blue with small amounts of yellow) then you system is in synch and your screen/system is refreshing in sync with the server’s perspective of the game world. If Yellow, then you are having issues and your screen/system may not be in synch with what the server thinks is happeing.. noticable lag bad hit rego. The blue shows how well your graphics card is staying in sync with the server as it relates to rendering the gaming environment. A few yellow items is OK but you want the vast majority to be blue. If you have a lot of yellow, this means that your graphics rendering and server rendering of the gameworld is out of sync.The smoother the flow on this meter, the better, the faster the higher your FPS is. - Bottom meter should be all or mostly green. Lots of yellow or red means there are issues. When you spawn or die, you can sometimes see lots of RED , this seems to be OK. If you are all green, then you can consider changing your cl_packetdup to 0 and you can increase your cl_maxpackets _________________________________ Performance improvements summary: *Enable Console first in options* Punkbuster Sleep setting: /pb_sleep 500 Save PB setting to config: /pb_writecfg Packet transfer setting: /cl_maxpackets 100 Send duplicate packets: /cl_packetdup 0 or 1 Max FPS: /com_maxfps 125 Field of View (FOV): /cg_fov 80 Draw your FPS on screen: /cg_drawfps 1 Draw your Lagometer on screen: /cg_drawlagometer 1 Shell Casings: /cg_brass o gets rid of the shell casings being ejected Shadows: /sm_enable 0 Turns off unique Shadows ingame __________________________________________________ Notes:*CG FOV :: Field of view, where the value is the angle of the circular arc that is displayed on your screen. High values will make the game appear "fisheyed". *MAX FPS :: This command limits your maximum FPS. You may ask why you would want to do this, and the answer is that it will help the server from having lag confusion when your frame rate has a sudden rise or fall. Run a timedemo, collect your average FPS and use that as the limit for when you play on-line. *MAXPACKETS :: This setting puts a limit on the maximum amount of packets that can be sent to the server via the client. This setting is useful for people with slower modems. Obviously we all have high speed connects so set to at least 100. Lower maxpacket settings i.e 30 lowers ping on screen but at the cost of registration. */sm_enable 0: Turns off unique Shadows ingame, it boosts FPS more than most commands. That's about it for now if I think of anything to add to this I will update the thread with a new reply post. Enjoy, try it out and give some feedback if things are better. Check here to see if your machine is up to the task of CoDWaW > http://www.systemrequirementslab.com/referrer/activision2?registration_option_id=7974 thankx, Introduction: For the last couple weeks, during beta, I have been digging deep under the hood of Crysis. I thought it would be fitting that I share my findings and move my guide to the community that I have waited with for Crysis for so long. I hope you enjoy it and that it helps you with basic and advanced tweaking in the days ahead. This will continue to be a work in progress. I will cover both some basic and advanced tweaking. I'll share the settings that I have found to be the most performance hungry and what you can do to get performance back or increase quality without draining performance too much. Then we will dig deep into one of the most, if not the most, tweakable games on the planet. We will also surpass very high settings with ultra for the uber machines as the guide fleshes out. BASIC TUNING Basic computer performance: I don't want to recreate the wheel but their are many things to do to increase performance in games with your computer. Details on how to do these things can be found by doing a google search for any of the following. * Latest drivers for your video card, motherboard, sound card can improve things greatly at times. * Defrag your hard drive. It's prefferable to defrag 'before' installing so that the files stay close together and contiguous. * If you only have 512MB or 1GB memory, 2GB is highly recommended. * Go into your driver control panel to make sure antialiasing(AA) or anisotropic filtering(AF) is not enabled unless you want them to be, they effect performance alot. Also you can change texture filtering quality to provide more performance in the drivers. * If you are running Vista make sure to be using the current hotfixes, some effect performance and memory usage tremendously. Nvidia has a great list of recommended ones here: Vista hotfixes * A video card like an 8800 GT for $250 will provide tremendous results if you haven't upgraded in a long time. * Disabling any unneeded running process, especially antivirus, while playing is recommended. Resolution: Resolution has a large impact because the game has so much geometry that the fillrate demands of large resolutions is beyond what people are used to. If you can lower resolution this will help gain many fps and provide smoother play. If you have an LCD you need to use what is called 1:1 pixel mapping, or otherwise known as disabling scaling. This allows the image to shrink but the quality of the image stays incredibly good. Scaling on the other hand, always looks bad if using anything other than your native resolution. Scaling can be disabled on some monitors. If your monitor doesn't support this feature some drivers support it. With nvidia you can disable it like so, image provided. So shrinking the image while maintaining incredible quality works well for performance, you can always slide your monitor closer you then won't notice the image is smaller. Custom resolutions can be used by using 'r_width=x' and 'r_height=x'. See below on advanced tweaking on how to use variables. In-Game Settings: The settings that have the biggest effect on performance are firstly shaders. This game is one of the most shader intensive games on the market. Going from high to medium shader settings works real well in giving an average of anywhere from 7-10 fps or more, depending on some variables. Next are Shadows and Post Processing. Shadows from high to medium looks very good still and provide a good boost of performance. Post processing has a big effect as well. The thing that people notice most about post processing is motion blur and depth of field. These can be easily turned on/off individually if desired seperate from the post process drop down box, as will be seen in the advanced tweaking section. Textures setting affects video memory usage quite a bit which we will look at next. Video Memory: Using beyond the amount of memory that is locally on the video card will produce performance problems like stuttering and hitching due to having to fetch data from system RAM over the much higher latency PCI express bus. In other words, adjust settings/resolution in the game not to exceed your video RAM, otherwise you will experience overall performance issues and the periodic flickering of geometry and LOD's as it streams in. The game is very video memory intensive. Resolution and AA effect the amount of video memory the game uses tremendously. Here is a breakdown of video memory across different settings and resolutions. * Windows XP * Nvidia Driver 169.01 1280x1024 medium * NoAA 184MB * 2xAA 295MB * 4xAA 355MB * 8xAA 395MB 1280x1024 high * NoAA 315MB * 2xAA 375MB * 4xAA 440MB * 8xAA 470MB -Texture medium- * NoAA 300MB * 2xAA 363MB * 4xAA 423MB * 8xAA 445MB 1680x1050 medium * NoAA 223MB * 2xAA 375MB * 4xAA 455MB 1680x1050 high * NoAA 368MB * 2xAA 456MB * 4xAA 535MB -Texture medium- * NoAA 340MB * 2xAA 428MB * 4xAA 505MB 1920x1200 Medium * NoAA 240MB * 2xAA 430MB * 4xAA 535MB 1920x1200 High * NoAA 400MB * 2xAA 515MB * 4xAA 615MB -Texture Medium- * NoAA 370MB * 2xAA 475MB * 4xAA 585MB AA clearly makes a large impact in video memory. Different game levels may change these numbers. Changing textures from medium to low makes no appreciable difference since it is still using the lowspec pak. The devs have made huge advances in optimizing this area since earlier builds of the game, either that or the textures are quite lower in quality, infact these are the numbers medium textures used to give as if high textures are missing. Final shipping game may reflect differences here, will update accordingly. The textures setting alone no longer makes the difference it did in earlier builds regardless of high/medium/low setting, which again seems to give some indication higher textures have been removed temporarily or entirely. Breakdown by video card memory: 256MB Video - 1680x1050 medium without AA or 1280x1024 medium with AA. 8800 GTS 320MB - Handles up 1680x1050 medium no aa, can go to high with some thrashing. Only AA at 1280x1024 looks to be viable with that memory limit. 512MB Video - Comes into it's first wall at 1680x1050 4xAA on high. Performance and not memory will impact you here. 8800 GTS 640MB - Handles up to 1920x1200 4x AA (All High). performance makes that out of reach on todays HW. 768MB and above - Memory will not be your limiting factor unless going to 2560x1600 with AA. Your GPU handling the raw processing of the geometry and shaders at that high resolution will be out of reach. I don't doubt that 1GB can be reached by tweaking Crysis and high resolutions with max AA on tomorrows HW. I already have found ways to approach 650MB at only 1280x1024. Basic video memory tips: * Find your video memory ceiling with resolution and texture setting first. Then adjust other parts of the game that are affecting raw performance like shaders or shadows until you get your acceptable performance. If you don't properly anticipate video memory usage, you won't realize why it is hitching on you, regardless of other settings. * You don't have to turn everything to medium to conserve memory, textures have the biggest effect by far. * Remember as more players enter the map this memory will climb a bit, as well as larger out door levels. Also as you stay in the game for a while this number will rise a little. I cached all the outdoors, but not the indoors. * Adding any tweaks for higher quality, especially along the lines of LOD or view distance, has the potential to raise memory usage even further. * The higher you go over your limit, the worse performance, texture stuttering, hitching and popping of geometry will become. * If your resolution doesn't appear just use something close, like 1680x1050 is close to 1600x1200. Benchmarking: Crysis came with two benchmarks to test and compare your performance. A GPU benchmark and a CPU benchmark stressing physics. They can be found in the Bin32 or Bin64 folders. Just double click on them to start. The game will run through 4 loops of the benchmark. When it's done it will show you the results, I suggest you ignore the first one since it was just caching the level and assets on the first run. You can make your own benchmarks but for now these two work well as standard tests. See the benchmarking tool mentioned in post 3 for an improved benchmarking experience. Antialiasing and Anisotropic filtering in Crysis First of all AA is a serious performance drain. More so than other games because of the incredible amount of triangles and polys in the scene. AA is only recommended for the highest end GPU's and keep in mind high resolutions will be more intensive. So if you choose to use it then keep in mind the video memory that will be used (shown above). There is some interesting information starting to come out about AA. Apparently it is preferred to use the in-game AA settings as the proper way to use AA. In other words, don't use the driver control panel but control it from in game. Additionally, HardOCP in their recent 8800GT review had this quote. "This comes directly from NVIDIA’s James Wang on the use of Transparency Antialiasing in Crysis: ” Crysis handles foliage very differently from normal engines so TRMS/SS won't work. Bit of a shame really. The game has some built-in foliage AA, but it only kicks in in "Very high" quality mode.”" I am actually pretty sure it can be enabled at high as well, not just very high. High and very high shader settings are compatible with in game AA, while low and medium shaders are not. Regardless of in game shader settings if AA is enabled, High shaders will also need to be enabled. If AA is currently enabled, but shaders is set to medium or low, AA will automatically be disabled by the game. So it will take a good medium to high end card to use AA not only because AA is demanding on it's own but because you will need to run atleast high shaders as well. As to Anisotropic Filtering, it can only be enabled in the driver settings. Unfortunately there is a bug with the nvidia drivers that makes a white halo around distant bushes and trees. I believe this bug only shows itself on a particular. This apparently will be fixed with a future driver. Vsync Vsynch can be enabled in the game with r_vsync = 1. It is off by default. ADVANCED TWEAKING Customizing the game: The in-game settings are like using a paint roller on a canvas, while tweaking is like the fine brush of the artist. The roller gets the job done but it's not going to be as fulfilling as it could be. You need a fine brush to make it the way you like. The developers didn't want to burden you with 20 choices of drop down boxes so they instead made those broad strokes for you. Unfortunately the difference in performance and quality between low/medium/high/veryhigh can be staggering. Sometimes a move from high to medium can change 20 variables, but it may not be necessary to change all 20 when only a few really effect performance or quality. The fine strokes will allow you to get exactly what you want and Crytek has really given us the ability to change just about everything in the game you would want. You do not have to sacrifice as much quality for performance as you may think. Sometimes you can keep settings high or medium and change one variable that is the big performance tanker or one setting that brings back some good quality at little cost. Enough intro lets get busy. How to make an autoexec.cfg In the early days of the beta people modified the cvar groups game files because it was the best they knew, if you have heard about this I do not recommend it. It changes the way your in-game settings work permanently and changing to medium or high won't have the desired effect anymore. We later learned that you can make an autoexec.cfg file in the "Crysis SP Demo" folder. Tweaks are made up of Console Variables (cvars for short), a list of the ones currently used by the game can be seen below. In this file you put in the tweaks you want one by one and the game will use them when it starts up. View Performance In Game Place the line r_displayinfo=1 in your autoexec.cfg. This will show you fps, system memory usage(not video), triangle count, etc. Also you can use fraps if you wish to show fps as well as take screenshots and make movies of the game. Enable The Console: By default the devs have disabled the console unless you learn the trick to enable it. You can enable it by adding the line con_restricted=0 to your autoexec.cfg and you can then use tweaks while in game in real time and watch with your own eyes the quality and performance changes. Pull down the console while in game by hitting the ~ (tilde) key. From there you can type in a cvar, without a value, and the game will tell you the current value. If you want to test a tweak, just type it in but instead of using an equals sign to put in a value like in the autoexec.cfg, just use a space. Example in console: r_displayinfo 1 If you have the fps shown in game you will see the performance effect of different settings. Enhancing on DX9: It is a very tweakable game. Crytek have given us the ability to tweak many many things to reach Very High equivalent settings and even far far beyond. I will give you a break down of every exact Very High setting(used in DX10) for reference. This is the real list of every setting and their values. So you can use this list and mimic exactly very high in DX9 to the fullest extent possible. Just add this list to an autoexec.cfg and you will have very high for DX9. sys_spec_GameEffects = 3 sys_spec_ObjectDetail = 3 sys_spec_Particles = 3 sys_spec_Physics = 3 sys_spec_PostProcessing = 3 sys_spec_Quality = 3 sys_spec_Shading = 3 sys_spec_Shadows = 3 sys_spec_Texture = 3 sys_spec_VolumetricEffects = 3 sys_spec_Water = 3 e_foliage_wind_activation_dist = 25 e_max_entity_lights = 16 e_obj_quality = 4 e_particles_max_emitter_draw_screen = 32 e_particles_quality = 4 e_shadows_cast_view_dist_ratio = 0.8 e_vegetation_sprites_distance_ratio = 1.5 e_view_dist_ratio_detail = 30 e_view_dist_ratio_vegetation = 45 e_water_ocean_fft = 1 e_water_tesselation_amount = 10 es_DebrisLifetimeScale = 1 g_battleDust_enable = 1 g_breakage_particles_limit = 250 g_ragdollDistance = 40 g_ragdollMinTime = 15 q_Renderer = 3 q_ShaderFX = 3 q_ShaderGeneral = 3 q_ShaderGlass = 3 q_ShaderHDR = 3 q_ShaderIce = 3 q_ShaderMetal = 3 q_ShaderPostProcess = 3 q_ShaderShadow = 3 q_ShaderSky = 3 q_ShaderTerrain = 3 q_ShaderVegetation = 3 q_ShaderWater = 3 r_BeamsDistFactor = .05 r_BeamsMaxSlices = 200 r_ColorGrading = 1 r_DepthOfField = 2 r_DetailNumLayers = 2 r_DynTexAtlasSpritesMaxSize = 32 r_MotionBlur = 4 r_ShadowJittering = 2.5 r_SSAO_quality = 2 r_SSAO_radius = 2 r_sunshafts = 1 r_TexAtlasSize = 2048 r_Usepom = 1 r_WaterReflectionsQuality = 3 r_WaterUpdateDistance = 0.2 In Game Settings: This chart shows the breakdown of "every" console variable that is changed by the in-game settings. It color codes every different type of in game menu(textures, game quality, shadows,etc) and shows you what variables actually change, when you change a drop down menu in the game, and what values they change to. To see more console variables that cannot be changed in game and to see all the definitions of the settings, follow the links below the image. See the full real size image with definitions and many more settings here. This list is a great starting point for your own tweaking adventure to mix and match settings as you like. Remember you can try most of them while in game in realtime in the console and see the effect on quality and performance. Get the original Excel spreadsheet for your own personal use here. You can copy/paste right into the game console. How do I do start?: summary You can start by making an autoexec.cfg in the main game folder. Add two settings to start. Just copy/paste them. r_displayinfo=1 con_restricted=0 Now you can open the console and start trying tweaks that look interesting one by one. Use your autoexec.cfg and fill it with the tweaks you like. When you check your in game settings it will show 'custom' if you have tweaks in your autoexec affecting that menu section. I will detail some of the ones I think are cool here next. Quality Comparisons: Some notable settings that effect quality. LIGHT AND WATER: r_sunshafts = 1 turns on the hidden feature of light shafts that dance through trees and past objects. Available in game through Very High in-game setting. The bottom is default all High in-game settings, the top is r_sunshafts = 1. Comparison pics... The following 3 settings work along with sun shafts... r_Beams - Toggles the volumetric light beams. Default is 3, it’s an optimized beam with glow support. 0 disables beams, 2 uses fake beams with probably beneficial performance (performance untested). 1 is the best and uses the real full resolution beams but it is slower. r_BeamsDistFactor - Distance between slices. Default is 0.01 in meters(likely reserved for Ultra High) and is likely the best setting for beams making it through the densest vegetation. You can try it and see what you like best (currently medium and high use 0.5, low uses 1). r_BeamsMaxSlices - Number of volumetric slices allowed per light beam. Default is 200 (reserved for very high specs). The max here is 300, so go ultra if you think you can really handle the performance hit. e_water_ocean_fft - Activates fft based ocean algorithm. Produces realistic wave undulation for the best quality and most realistic water. Everything is the same with water except undulation. This algorithm was used in movies like Titanic and Waterworld so it's very realistic. Screenshots wouldn't really show the difference but I have a short movie, it hardly does it justice, but atleast you can see the wave difference. FFA Water movie comparison 4MB TEXTURES & LOD: Distant LOD (level of detail) of textures and vegetation is probably my favorite section because it’s most noticeable as you look across the map and walk about. e_detail_materials_view_dist_xy - Max view distance of terrain XY materials. This is things like certain cliffs and other materials horizontal LOD in game. e_detail_materials_view_dist_z - Max view distance of terrain Z material. This is things like certain cliffs and other materials vertical LOD in game. This one doesn't need to be raised high, 256 or 512 max. (In the GPU benchmark when coming in from the sky this setting will show itself on vertical LOD). A picture is worth a thousand words on how these two work... Note: For the mountains to appear crisp like this you will also need r_TexturesStreaming set to 0. r_usepom - Enables Parallax Occlusion Mapping. A type of relief map that gives raised appearance to textures. Very cool but costs about 2 fps and can sometimes cause a fairly insignificant minor blurring of terrain textures in distance. Comparisons... VEGETATION & SPRITES: e_cull_veg_activation - Vegetation activation distance limit, 70 is a good step up from high(50). This is trees setting how far the farthest out can be seen. e_vegetation_sprites_distance_ratio - Allows changing distance on what vegetation switch into sprite. Raising this from 1 to 1.5 cost me about 1 fps in that view. Adds medium tree distance as well as certain near shrubs. Comparisons... e_view_dist_ratio_vegetation - View distance ratio for vegetation. Includes grass and shrubs like ferns and broad leafs, etc. 50 just about eliminates any popping effect with grass and shrubs, costs 1 fps in this scene. Comparisons... Controlling Antialiasing with Tweaks See above section on antialiasing and how it changes shader settings. These are the cvar settings for AA that you can use in your autoexec.cfg file. Only for XP. r_FSAA = 1 - turns on AA 2xAA = r_FSAA_samples = 2, r_FSAA_quality = 0 4xAA = r_FSAA_samples = 4, r_FSAA_quality = 0 8xAA = r_FSAA_samples = 4, r_FSAA_quality = 2 8xAAQ = r_FSAA_samples = 8, r_FSAA_quality = 0 16xAA = r_FSAA_samples = 4, r_FSAA_quality = 4 16xAAQ = r_FSAA_samples = 8, r_FSAA_quality = 2 Additional Background And Things To Know I just want to share on how these work in the game and some more background info to clear up anything hazy. *Make sure you take a look at the full size picture or the spreadsheet for the settings chart, the links are below the chart. They expose many more tweaks, their definitions, and the values that they accept. Know your in game settings. Play with that first to get a comfortable feel of what you like and what is available through the advanced settings menu options. The way the autoexec.cfg variables work is they build on the in-game settings. The in game settings are first loaded, which are stored in the game.cfg in your profile. As the game starts it loads the game.cfg then the autoexec.cfg overrides are loaded with what ever settings you chose. So for instance, you have in game shaders set to medium down from high. But medium changes over 20 settings, well maybe you want the perfomance benefit of most of those but you want Ambient Occlusion back on the terrain (it's a global lighting system to provide realistic lighting). You keep the in game setting at medium but turn on e_terrain_ao = 1 along with r_SSAO=1 which will override the 0 settings in the game. Or maybe you want better better shaders on terrain back to high(3) so q_ShaderTerrain = 3. Whether you like water, sky, terrain, vegetation, view distances....it's all at your finger tips for your preferences. Usually there is only a couple settings that really affect performance alot, the rest can add quality at little cost, the developers just didn't know your video memory, vid card, processor, ram, etc. so they made broader stroke settings than most people needed in certain cases. The tip to remember is that your configs will override and work on top of what is already set in the game menu last time you ran the game. If you prefer there is also way to change the drop down boxes from your autoexec. The sys_spec... settings will change low/medium/high and it will change all the broad stroke settings I color coded in my chart if you change those broad stoke settings. You will know when your autoexec is working because if you look at the game settings it will show custom instead of low/medium/high. Basically, many cvar values are often just a on/off setting for features [0/1] 0 is off, 1 is on. Others may have values that are based on different ranges, the definitions will tell you what most of the limits and ranges are. Some ranges maybe in meters, where others are clearly larger or smaller units of measure. If you see a pattern of numbers like 512/1024 then extrapolate that it's best to stick with the pattern, like those just mentioned for texture sizes and shadow maps. Sometimes you have ratios (as seen in some cvar names), which seem to affect more than one thing and they are likely multiplied internally in the game against some value so they are more broad sweeping. I expose some of the cool cvars with pics above but don't let that keep you from trying new things. Performance of these settings depends on your resolution, your video card, and the complexity of the scene you are looking at. If you are tweaking vegetation find the densist vegetation to see what the hugest impact will be. Same with terrain view distances and textures. In certain scenarios things combine where you are looking through the dense jungle up at the mountain this is good to test combined foliage/texture/view distance tweaks as it will show worst case scenarios. That is the balancing act, but most of the time you in buildings, in water, in vegetation, so you can pretty much raise them irrespective of each other to a degree. This is the point I am at in my configs in perfecting that balance of taking quality to the farthest point where it can mix well with the others. I also like long view distances on objects, I like seeing vehicles, enemies and buildings afar off so you can trade something else for that if you prefer. It's great to use the console and see the settings changed in real time. Just be aware that not all settings can be changed in real time. Either the value will not change and that will be clearly shown in the console, or it appears to change the value in the console but nothing in the game actually changes. In those cases it will be necessary to put the setting in the autoexec.cfg so that the renderer will be able to properly utilize that setting during startup when rendering the scene. There are a couple features restricted to DX10 but mostly they are time of day and geometry shader functions (GS in the cvar), not many at all. Enjoy the playground. More soon... Crysis Performance Reviews: See how different hardware and settings perform. Crysis (Demo Performance)- LegionHardware Crysis Demo Performance Analysis- Tweaktown Crysis demo performance in-depth - TechSpot DirectX 9 performance with the Crysis demo on 10 different cards - AMDZone To be Continued... Last edited by MadBoris (17-11-2007 23:54:33) Offline THIS GUIDE WAS CREATED BY Sven2157 Thought this guide may be useful for some of us here. You can also visit that link to see this same guide. http://www.techsupportforum.com/gaming-forum/pc-gaming-support/349169-optimising-your-system-games.html How to Properly Configure Your Computer for GAMES/PROGRAMS Hello everyone, I am constantly seeing people, all over the internet, with problems running their programs/games on their computers. They ALL are experiencing slow boot times, in game lag, freezing, OOM Errors (Out of Memory), low FPS and numerous other "issues". They are also, consuming A LOT of database space asking the same questions. I will try and consolidate those questions and answers here. So I am writing this "CHECK LIST GUIDE" of common problems and solutions. It contains basic/mandatory system configurations, as well as advanced techniques; thus improving your game play, software development/designing and overall computer performance. All while maintaining the best possible visual experience. ***PLEASE REMEMBER THAT THIS IS A GUIDE! NOT A MUST! ANY CHANGES YOU MAKE TO YOUR SYSTEM, ARE SOLELY YOUR CHOICE AND RESPONSIBILITY! I, NOR THE MODERATORS OF THESE FORUMS, CAN, AND WILL NOT, BE HELD LIABLE FOR YOUR OWN ACTIONS!*** So let's begin... First and Foremost! Please update your Motherboard, BIOS, SMBus/USB/Memory/Video/Audio/Storage Controllers (<--System), Video, Sound, Human Interface Device (HID) Controllers (<--Your Joystick/Gamepad), Mouse and other such drivers. Also run a system Defrag, to defragment your hard drive. This should be done at least monthly; as all of the afore mentioned will resolve 99.9% of the issues experienced by users! Also clear your Temporary files 1. - Click Start..>.."Run.." (Vista Users may not have this enabled <by default>, so the shortcut is "Windows Key+'R') 2. - In the "Run" Box type: %Temp% Your Temporary File Folder will come up. Select ALL, and delete them. Don't worry, they are TEMPORARY FILES. Some programs do not clear these when they are finished, so you have to go manually delete them. This then makes it easier for other programs to store temporary files needed for execution. Getting rid of the stuff you didn't even know was there... O.O(<--BTW I am writing this in notepad and transferring it to the forums; so my smilies my not show up -.-) When you download and install commercial products - Adobe Flash, Adobe Reader, Google Earth, etc, etc - , you have to be mindful what the installer is asking you... This is a common mistake by users. They want the program, but either don't realize that there are other programs "Piggy Backing" in, or don't care. This is where problems begin. "Well, what's wrong with the Google Toolbar?" 8-/ The answer to that is simple: EVERYTHING! These programs seem harmless, and have a very small file size: .4 - 2.5MB. But that is not where the problem lies. Programs like this, and Toolbars especially, are constantly TRANSMITTING data to their prospective authors. This includes where you surf, what you buy, where you live, what time you access the internet, who is logged into the Operating System (<-- BETTER BELIEVE IT! >:-{ ), your ISP, etc, etc. Consequently, this is not only eating up the processing power and RAM of your computer, but now you are losing crucial bandwidth. Ever wonder how "that guy" can come around the corner and just kill you, in FPS games? Because he has a CLEAR connection to the server, and saw you LONG before you knew he was there! "But I like my Toolbar (Google, or other)!" Why? IE7 and FireFox has a Google Search built right into them. They have Pop-Up Blockers, and Auto Complete, as well. Why have redundant software running? So let's get rid of ALL that crap, and free up some drive space! 1. - Click start..>..Control Panel..>..Add/Remove Programs(XP)/Programs and Features(Vista). 2. - Go through the list, when it populates, and remove ANY "extra" programs that you do not use. If you accidently remove something you need, you can certainly get it back. What you are looking for: (not in any particular order) Adobe.com Adobe Updater *Nothing like losing bandwidth, then getting kick out of game because Abode thinks it's more important! Apple Updater Google Chrome *Transmits data continuosly Google Desktop *I would love to slap the guy who invented this! ;-) Google Updater *Big process eater! Transmits data constantly! Google Toolbar MY SEARCH - ANYTHING! *Big process eater! Also Installs Viruses and Malware automatically! Java Updater Yahoo Search Yahoo Mail Yahoo Toolbar Windows Live Installer Windows Live SkyDrive Windows Live Photos MyWeb - ANYTHING! *Big process eater! Continuosly running. HP/Lexmark/Cannon/Kodak - Anything you don't use. As long as you don't delete the driver, your printer/camera/scanner will still function! Dell/Acer/HP/Gateway/eMachines, etc, etc Pre-Installed Manufacturer Programs *These programs are "extra" and cause your system to run slow. Most of them duplicate Windows built in features! Also, look for anything that you don't use or that looks suspicious. Once again, if you remove it, and find you need it, you can get it back! So don't be afraid; Don't be overzealous, either! Now for the real stuff! Processes and Services! These are the real KILLERS! When programs install, they generally write their own rules; as most users don't really know how to respond even when asked! The problem with this is they ALL FIGHT to be NUMERO UNO! They ALL think they are the greatest thing since crawling out of the sea, and growing lungs and legs! :-D So we have to go tell them ALL who the real boss is! YOU, the user! 1. - Click Start..>.."Run..." (Vista Users may not have this enabled <by default>, so the shortcut is "Windows Key+'R') 2. - When the "Run..." Box opens, type: MSCONFIG (<--not case sensative) 3. - When the "System Configuration" window appears, click "Selective startup". 4. - Click the "Services Tab". 5. - ***THIS IS AN IMPORTANT STEP! PAY ATTENTION TO WHAT YOU ARE DOING HERE!*** Click ONLY the "Hide all Microsoft Services" box! 6. - Now the window will only show you 3rd party services that start when Windows starts. However you NEED some of these! Like your Norton/McAffee/AVG Anti-Virus and Internet Security services. Display Drivers/Software, Storage Drivers (i.e. RAID), etc, etc. Trial an error may be the best approach on this tab. Turn a couple off, see where that gets you, then try a couple more. 7. - Now click the "Startup" Tab. You can turn ALL of these off if you want. Once again, READ what you are doing! In the picture below, I leave my RAID, VIDEO and Sidebar on, because I use that to monitor my system. (Vista Users - In the picture below, the 2 "Microsoft® Windows® Operating System" items you see, are for the Sidebar; they are not crucial!) 8. - When you have finished, click "Apply", then "Ok". ***IF YOU DO NOT WANT THE CHANGES TO TAKE AFFECT OR HAVE MADE A MISTAKE, CLICK "CANCEL"!*** The configuaration utility will then prompt you with the following image: 9. - Press "Restart" (Pressing "Exit without Restart" will not reboot your computer. However, when you manually reboot the system changes will take affect!), when the system starts back up, YOU WILL RECIEVE A "SYSTEM CONFIGURATION MESSAGE". Just Check the, "Don't show this again" box and click "Ok". ***IF YOU ARE EXPERIENCING PROBLEMS, REPEAT STEPS 1 AND 2. THIS TIME SELECTING "NORMAL STARTUP"*** Then click "Apply", "Ok", "Restart". This will return all Services and Startup options back to the original settings! OK... Almost there... O.o Now let's get some memory back.... 1. - Right-click My Computer(XP)/Computer(Vista)..>..Choose properties. VISTA USERS ONLY: The "System Properties" Window appears. Click "Advanced system settings". XP USERS: Click "Advanced" Tab. 2. - Click the "Settings" button in the Performance row, to open the "Performance Options" Window. 3. - Select the "Advanced" tab, then click the "Change..." button in the Virtual memory row. 4. - Uncheck the box for "Automatically manage paging file size for all drives" if it is checked. ***The next step requires a judgment on your part. In the above image, I have my "Intial Size" set to 4096MB (<--That's 4 GigaBytes!), and my Maximum size is set to 6114 (<--That's 6 GigaBytes!). HOWEVER! I have a 400GB in RAID 0 "C:\" drive! In other words, I HAVE ROOM TO SPARE! Most of you will want to set this to approximately 2048 Init/3072MB Max; ROUGHLY! ***NOTE: XP Users can only set a MAXIMUM of 4096MB for their Paging Files!*** 5. - Now click "Set". You will be prompted, after clicking "Ok", that you have to reboot, so... Reboot. What did I just do!?!? O.O Good question! You are very smart! ;-) In simple terms... This is going to expand your "Paging File". Windows uses the "Paging File" as "secondary memory", by writing "chunks" of data to the Hard Drive. This way it can recall information faster than searching the rest of the drive. This data is not permanent and is constantly changing. Ever wonder why your hard drive light flashes, even when Windows is idle? Windows allocates (or reserves) RAM and Virtual Memory (<--Paging File) for it's own greedy use; whether or not it actually needs it. This reserve is for system processes and what not. When the size of this is SET by the user, you free up the constant size changing, increasing or reducing, that windows can and will do to make more or less available; consequently allowing more room to write to the drive = freeing up valuable processing threads and RAM. In turn increasing performance. ...and, Lastly... Is the DREADED OOM!!!! This next tweak will prevent the Out Of Memory (OOM) Error. This is EXTREMELY effective when working with Adobe CS Series, AutoDesk Products and Games (Microsoft Flight Simulator Pilots, I am looking in your direction!) that are both Graphic and Processor/RAM intensive. Before I begin, let me briefly descibe what happens here: Windows thinks its the greatest thing since fire! So, on your PC it will block ALL programs from accessing what it thinks, is it's! I.E MEMORY; both RAM and Virtual! Once again, you need to go into the OS and tell it who's BOSS, and only give it what it NEEDS; NOT WHAT IT WANTS! XP needs roughly 512MB, while Vista needs about 1GB to function flawlessly with RAM! About 256MB - 512MB of Virtual for BOTH. It has a "Safe Guard" that will flag programs that try to use more than 2GB of either. When this happens, it sends an error message, "Out of Memory...". To prevent this from happening, and crashing your programs, you need to set this limiter to a higher value. Here is how you do it: On VISTA: (You have to run the command prompt with elevated privlages) 1. Click the Start..>..All Programs..>..Accessories..>..Right-Click the "Command Prompt" and choose "Run as Administrator". 2. At the command line type the following: BCDEDIT(SPACE)/Set(SPACE)IncreaseUserVA(SPACE)nnnn (nnnn = the amount you want to increases by! I have mine set for 4096MB) 3. Hit enter, and get the confirmation. 4. REBOOT 5. Confirm that it worked by running the command prompt, typing: BCDEDIT, hit enter and you will see the /userva switch now.... It will be under the "Windows Boot Loader" as increaseuserva = {value you set} On XP: 1. Right-Click the My Computer..>..Choose "Properties". 2. Click the "Advanced Tab". 3. Click the "Settings" button in the "Startup and Recovery row. 4. click the "Edit" button in the "System startup" row. Now you'll see the boot config. At the very end type /3GB so it looks like this: *** Do Not Copy as your own Boot file [boot loader] timeout=3 default=multi(0)disk(0)rdisk(0)partition(2)\WINDOWS [operating systems] multi(0)disk(0)rdisk(0)partition(2)\WINDOWS="Microsoft Windows XP Home Edition" /fastdetect /NoExecute=OptIn /3GB 5. - Reboot Well Folks, there you go! It will take most of you longer to read this than it will to actually complete these tasks! O.O I hope that this helps! ***IF YOU ARE UNSURE ABOUT ANY OF THE ABOVE, THEN DO NOT PREFORM THESE ACTIONS! ASK HERE FIRST! I, AND THE MODERATORS OF THIS FORUM, ASSUME NO RESPONSIBILITY FOR ANY DAMAGE, LOSS OF DATA/SOFTWARE/HARDWARE, OR OTHER LOSS FOR THE ACTIONS YOU PERSONALLY TAKE!*** Please feel free to ask questions here, if I was not clear on something... Happy Gaming/Programming Sven2157 ADMINS WILL YOU PLEASE STICKY THIS ive had numourous people asking me past few weeks about where my config post went and no one can find it.... Thanks........ ... NOW... on to the config.... FIRST.. COPY everything i paste below the line and open up NOTEPAD on your computer.... PASTE IT INTO NOTEPAD AND SAVE AS CONFIG_MP.CFG .... YOU HAVE TO USE THAT FILE NAME!!!!! Save to your desktop..... now.... make a COPY of your current config.... put in a safe place.... replace the old config with your new one in your cod4 profiles folder........ OPEN GAME...... now i have weird controls... SO SET THE CONTROLS TO WHAT YOU WANT TO USE!!! AND CHANGE THE NAME!!! thats all you have to do.... your ping will drop 10-30 .. your fps will increase by 30-50... and you will move faster.... hit more accurate.... .... -------------------------------------------------------------------------------------------------------------------------------------------------- // generated by Call of Duty, do not modify unbindall bind TAB "+scores" bind ESCAPE "togglemenu" bind SPACE "+gostand" bind 3 "openscriptmenu quickpromod 2" bind 4 "+smoke" bind 5 "+actionslot 3" bind 6 "+actionslot 4" bind 7 "+actionslot 2" bind 8 "openscriptmenu quickpromod 5" bind ` "toggleconsole" bind A "+moveleft" bind B "mp_QuickMessage" bind C "gocrouch" bind D "+moveright" bind E "+leanright" bind F "+activate" bind G "+frag" bind H "ufo" bind K "ufo" bind N "+actionslot 1" bind Q "+leanleft" bind R "+reload" bind S "+back" bind T "chatmodepublic" bind U "noclip" bind V "+melee" bind W "+forward" bind Y "chatmodeteam" bind Z "+talk" bind ~ "toggleconsole" bind PAUSE "toggle cl_paused" bind CTRL "goprone" bind SHIFT "+breath_sprint" bind F1 "vote yes" bind F2 "vote no" bind F4 "+scores" bind F12 "screenshotJPEG" bind KP_HOME "toggle cg_thirdpersonangle 340 320 300 280 260 240 220 200 180 160 140 120 100 80 60 40 20 0" bind KP_UPARROW "timescale 5.0" bind KP_PGUP "toggle cg_draw2D" bind KP_LEFTARROW "timescale 0.5" bind KP_5 "timescale 1" bind KP_RIGHTARROW "timescale 2.0" bind KP_END "toggle cg_thirdpersonangle 0 20 40 60 80 100 120 140 160 180 200 220 240 260 280 300 320 340 " bind KP_DOWNARROW "timescale 0.3" bind KP_PGDN "toggle cg_thirdperson" bind KP_ENTER "toggle g_compassShowEnemies" bind KP_INS "toggle cl_freezedemo" bind KP_DEL "toggle developer" bind KP_SLASH "quit" bind KP_MINUS "toggle cg_thirdpersonrange 1024 800 600 350 120" bind KP_PLUS "toggle cg_thirdpersonrange 120 350 600 800 1024" bind MOUSE1 "+attack" bind MOUSE2 "+toggleads_throw" bind MOUSE3 "+frag" bind MWHEELDOWN "weapnext" bind MWHEELUP "weapnext" seta ai_badPathSpam "0" seta ai_corpseCount "0" seta ai_debugAccuracy "0" seta ai_debugCoverSelection "0" seta ai_debugMeleeAttackSpots "0" seta ai_debugThreatSelection "0" seta ai_ShowCanshootChecks "0" seta ai_showClaimedNode "0" seta ai_showRegion "0" seta airlift_min_spec "0" seta animated_trees_enabled "1" seta bog_b_min_spec "0" seta ai_corpseCount "10" seta cg_blood "0" seta cg_bloodLimit "0" seta cg_bloodLimitMsec "330" seta cg_brass "0" seta cg_centerPrintY "-60" seta cg_chatHeight "8" seta cg_chatTime "12000" seta cg_connectionIconSize "0" seta cg_crosshairAlpha "1" seta cg_crosshairAlphaMin "0.5" seta cg_crosshairDynamic "0" seta cg_crosshairEnemyColor "0" seta cg_cursorHints "4" seta cg_debugInfoCornerOffset "0 0" seta cg_descriptiveText "1" seta cg_drawBreathHint "1" seta cg_drawCrosshair "1" seta cg_drawCrosshairNames "0" seta cg_drawFPS "Simple" seta cg_drawFPSLabels "0" seta cg_drawFriendlyFireCrosshair "1" seta cg_drawFriendlyNames "1" seta cg_drawLagometer "1" seta cg_drawMantleHint "0" seta cg_drawSnapshot "0" seta cg_drawTurretCrosshair "1" seta cg_enemyNameFadeIn "250" seta cg_enemyNameFadeOut "250" seta cg_footsteps "1" seta cg_fov "80" seta cg_friendlyNameFadeIn "0" seta cg_friendlyNameFadeOut "1500" seta cg_gameBoldMessageWidth "390" seta cg_gameMessageWidth "455" seta cg_headIconMinScreenRadius "0.015" seta cg_hintFadeTime "100" seta cg_hudChatIntermissionPosition "5 110" seta cg_hudChatPosition "5 204" seta cg_hudDamageIconHeight "64" seta cg_hudDamageIconInScope "0" seta cg_hudDamageIconOffset "128" seta cg_hudDamageIconTime "2000" seta cg_hudDamageIconWidth "128" seta cg_hudGrenadeIconEnabledFlash "1" seta cg_hudGrenadeIconMaxRangeFlash "500" seta cg_hudGrenadeIconHeight "25" seta cg_hudGrenadeIconInScope "1" seta cg_hudGrenadeIconMaxHeight "104" seta cg_hudGrenadeIconOffset "50" seta cg_hudGrenadeIconWidth "25" seta cg_hudGrenadePointerHeight "12" seta cg_hudGrenadePointerPivot "12 27" seta cg_hudGrenadePointerWidth "25" seta cg_hudMapBorderWidth "2" seta cg_hudMapFriendlyHeight "15" seta cg_hudMapFriendlyWidth "15" seta cg_hudMapPlayerHeight "20" seta cg_hudMapPlayerWidth "20" seta cg_hudMapRadarLineThickness "0.15" seta cg_hudProneY "-160" seta cg_hudSayPosition "5 180" seta cg_hudStanceHintPrints "1" seta cg_hudVotePosition "5 220" seta cg_invalidCmdHintBlinkInterval "600" seta cg_invalidCmdHintDuration "1800" seta cg_laserLight "0" seta cg_mapLocationSelectionCursorSpeed "0.6" seta cg_marks_ents_player_only "0" seta cg_nopredict "0" seta cg_overheadIconSize "0.7" seta cg_overheadNamesGlow "0 0 0 1" seta cg_overheadNamesMaxDist "10000" seta cg_overheadNamesSize "0.5" seta cg_overheadRankSize "0.5" seta cg_predictItems "1" seta cg_scoreboardBannerHeight "35" seta cg_scoreboardHeaderFontScale "0.3" seta cg_scoreboardHeight "435" seta cg_scoreboardItemHeight "18" seta cg_scoreboardPingHeight "0.7" seta cg_scoreboardPingWidth "0.036" seta cg_scoreboardRankFontScale "0.25" seta cg_scoreboardScrollStep "3" seta cg_scoreboardWidth "400" seta cg_ScoresPing_BgColor "0.25098 0.25098 0.25098 0.501961" seta cg_ScoresPing_HighColor "0.8 0 0 1" seta cg_ScoresPing_Interval "100" seta cg_ScoresPing_LowColor "0 0.74902 0 1" seta cg_ScoresPing_MaxBars "4" seta cg_ScoresPing_MedColor "0.8 0.8 0 1" seta cg_scriptIconSize "0" seta cg_sprintMeterDisabledColor "0.8 0.1 0.1 0.2" seta cg_sprintMeterEmptyColor "0.7 0.5 0.2 0.8" seta cg_sprintMeterFullColor "0.8 0.8 0.8 0.8" seta cg_subtitleMinTime "3" seta cg_subtitles "1" seta cg_subtitleWidthStandard "520" seta cg_subtitleWidthWidescreen "520" seta cg_teamChatsOnly "0" seta cg_viewZSmoothingMax "16" seta cg_viewZSmoothingMin "1" seta cg_viewZSmoothingTime "0.1" seta cg_voiceIconSize "0" seta cg_weaponCycleDelay "0" seta cg_weaponHintsCoD1Style "1" seta cg_youInKillCamSize "6" seta cl_allowDownload "1" seta cl_anglespeedkey "0" seta cl_anonymous "0" seta cl_connectionAttempts "20" seta cl_freelook "1" seta cl_maxpackets "42" seta cl_maxPing "800" seta cl_maxppf "5" seta cl_mouseAccel "0" seta cl_packetdup "1" seta cl_pitchspeed "140" seta cl_punkbuster "1" seta cl_voice "1" seta cl_wwwDownload "1" seta cl_yawspeed "140" seta com_introPlayed "1" seta com_maxfps "125" seta com_recommendedSet "1" seta compassClampIcons "1" seta compassCoords "740 3590 400" seta compassECoordCutoff "37" seta compassFriendlyHeight "18.75" seta compassFriendlyWidth "18.75" seta compassMaxRange "2500" seta compassMinRadius "0.0001" seta compassMinRange "0.0001" seta compassObjectiveArrowHeight "20" seta compassObjectiveArrowOffset "2" seta compassObjectiveArrowRotateDist "5" seta compassObjectiveArrowWidth "20" seta compassObjectiveDrawLines "1" seta compassObjectiveHeight "20" seta compassObjectiveIconHeight "16" seta compassObjectiveIconWidth "16" seta compassObjectiveMaxHeight "70" seta compassObjectiveMaxRange "2048" seta compassObjectiveMinAlpha "1" seta compassObjectiveMinHeight "-70" seta compassObjectiveNumRings "10" seta compassObjectiveRingSize "80" seta compassObjectiveRingTime "10000" seta compassObjectiveTextHeight "18" seta compassObjectiveTextScale "0.3" seta compassObjectiveWidth "20" seta compassPlayerHeight "15" seta compassPlayerWidth "15" seta compassRadarLineThickness "0.4" seta compassRadarPingFadeTime "4" seta compassRadarUpdateTime "4" seta compassRotation "1" seta compassSize "1" seta compassSoundPingFadeTime "2" seta compassTickertapeStretch "0.5" seta con_errormessagetime "8" seta con_gameMsgWindow0FadeInTime "0.25" seta con_gameMsgWindow0FadeOutTime "0.5" seta con_gameMsgWindow0Filter "gamenotify obituary" seta con_gameMsgWindow0LineCount "4" seta con_gameMsgWindow0MsgTime "5" seta con_gameMsgWindow0ScrollTime "0.25" seta con_gameMsgWindow0SplitscreenScale "1.5" seta con_gameMsgWindow1FadeInTime "0.25" seta con_gameMsgWindow1FadeOutTime "0.01" seta con_gameMsgWindow1Filter "boldgame" seta con_gameMsgWindow1LineCount "5" seta con_gameMsgWindow1MsgTime "8" seta con_gameMsgWindow1ScrollTime "0.25" seta con_gameMsgWindow1SplitscreenScale "1.5" seta con_gameMsgWindow2FadeInTime "0.75" seta con_gameMsgWindow2FadeOutTime "0.5" seta con_gameMsgWindow2Filter "subtitle" seta con_gameMsgWindow2LineCount "7" seta con_gameMsgWindow2MsgTime "5" seta con_gameMsgWindow2ScrollTime "0.25" seta con_gameMsgWindow2SplitscreenScale "1.5" seta con_gameMsgWindow3FadeInTime "0.25" seta con_gameMsgWindow3FadeOutTime "0.5" seta con_gameMsgWindow3Filter "" seta con_gameMsgWindow3LineCount "5" seta con_gameMsgWindow3MsgTime "5" seta con_gameMsgWindow3ScrollTime "0.25" seta con_gameMsgWindow3SplitscreenScale "1.5" seta con_inputBoxColor "0.25 0.25 0.2 1" seta con_inputHintBoxColor "0.4 0.4 0.35 1" seta con_matchPrefixOnly "1" seta con_minicon "0" seta con_miniconlines "5" seta con_minicontime "4" seta con_outputBarColor "1 1 0.95 0.6" seta con_outputSliderColor "0.15 0.15 0.1 0.6" seta con_outputWindowColor "0.35 0.35 0.3 0.75" seta con_typewriterColorGlowCheckpoint "0.6 0.5 0.6 1" seta con_typewriterColorGlowCompleted "0 0.3 0.8 1" seta con_typewriterColorGlowFailed "0.8 0 0 1" seta con_typewriterColorGlowUpdated "0 0.6 0.18 1" seta con_typewriterDecayDuration "700" seta con_typewriterDecayStartTime "6000" seta con_typewriterPrintSpeed "50" seta customclass1 "Custom Slot 1" seta customclass2 "Custom Slot 2" seta customclass3 "Custom Slot 3" seta customclass4 "Custom Slot 4" seta customclass5 "Custom Slot 5" seta drew_notes "5" seta dynEnt_active "0" seta fx_draw "1" seta fx_drawClouds "1" seta fx_marks "0" seta fx_marks_ents "0" seta fx_marks_smodels "0" seta g_allowvote "1" seta g_banIPs "" seta g_clonePlayerMaxVelocity "80" seta g_deadChat "1" seta g_dropForwardSpeed "10" seta g_dropHorzSpeedRand "100" seta g_dropUpSpeedBase "10" seta g_dropUpSpeedRand "5" seta g_log "games_mp.log" seta g_logSync "1" seta g_oldVoting "1" seta g_playerCollisionEjectSpeed "25" seta g_redCrosshairs "1" seta g_useGear "1" seta g_useholdspawndelay "500" seta g_voiceChatTalkingDuration "500" seta g_voteAbstainWeight "0.5" seta hud_deathQuoteFadeTime "1000" seta hud_enable "1" seta hud_fade_ammodisplay "1.7" seta hud_fade_compass "0" seta hud_fade_healthbar "0" seta hud_fade_offhand "1.7" seta hud_fade_sprint "1.7" seta hud_fade_stance "1.7" seta hud_fadeout_speed "0.1" seta hud_flash_period_offhand "0.5" seta hud_flash_time_offhand "2" seta hud_health_pulserate_critical "0.5" seta hud_health_pulserate_injured "1" seta hud_health_startpulse_critical "0.33" seta hud_health_startpulse_injured "1" seta in_mouse "1" seta loc_forceEnglish "0" seta loc_language "0" seta m_filter "0" seta m_forward "0.25" seta m_pitch "0.022" seta m_side "0.25" seta m_yaw "0.022" seta monkeytoy "0" seta name "Morphic Jackzor" seta net_noipx "0" seta net_noudp "0" seta net_socksEnabled "0" seta net_socksPassword "" seta net_socksPort "1080" seta net_socksServer "" seta net_socksUsername "" seta r_aaAlpha "dither (fast)" seta r_aaSamples "1" seta r_altModelLightingUpdate "1" seta r_aspectRatio "auto" seta r_autopriority "0" seta r_customMode "" seta r_debugLineWidth "1" seta r_depthPrepass "0" seta r_displayRefresh "120 Hz" seta r_distortion "0" seta r_dlightLimit "0" seta r_dof_enable "0" seta r_drawDecals "1" seta r_drawSun "1" seta r_drawWater "1" seta r_fastSkin "0" seta r_fullscreen "1" seta r_gamma "2.11458" seta r_glow_allowed "0" seta r_ignorehwgamma "0" seta r_inGameVideo "1" seta r_lodBiasRigid "0" seta r_lodBiasSkinned "0" seta r_lodScaleRigid "1" seta r_lodScaleSkinned "1" seta r_mode "1024x768" seta r_monitor "0" seta r_multiGpu "1" seta r_picmip "0" seta r_picmip_bump "0" seta r_picmip_manual "0" seta r_picmip_spec "0" seta r_picmip_water "0" seta r_polygonOffsetBias "-1" seta r_polygonOffsetScale "-1" seta r_portalBevels "0.7" seta r_preloadShaders "0" seta r_rendererPreference "Default" seta r_specular "0" seta r_texFilterAnisoMax "4" seta r_texFilterAnisoMin "1" seta r_texFilterMipMode "Unchanged" seta r_vsync "0" seta r_zFeather "0" seta ragdoll_enable "0" seta ragdoll_max_simulating "16" seta rate "25000" seta sensitivity "5" seta server1 "" seta server10 "" seta server11 "" seta server12 "" seta server13 "" seta server14 "" seta server15 "" seta server16 "" seta server2 "" seta server3 "" seta server4 "" seta server5 "" seta server6 "" seta server7 "" seta server8 "" seta server9 "" seta sm_enable "0" seta sm_maxLights "4" seta snaps "30" seta snd_cinematicVolumeScale "0.85" seta snd_enableEq "1" seta snd_errorOnMissing "0" seta snd_khz "44" seta snd_levelFadeTime "250" seta snd_outputConfiguration "5.1 speakers" seta snd_slaveFadeTime "500" seta snd_touchStreamFilesOnLoad "0" seta snd_volume "0.8" seta sv_allowDownload "1" seta sv_floodprotect "4" seta sv_hostname "CoD4Host" seta sv_maxclients "24" seta sv_maxPing "0" seta sv_maxRate "25000" seta sv_minPing "0" seta sv_punkbuster "1" seta sv_reconnectlimit "3" seta sv_voice "1" seta sv_wwwBaseURL "" seta sv_wwwDlDisconnected "0" seta sv_wwwDownload "0" seta sys_configSum "4379996" seta sys_configureGHz "8.6759" seta sys_gpu "NVIDIA GeForce 9800 GTX " seta sys_sysMB "2048" seta ui_bigFont "0.4" seta ui_browserFriendlyfire "-1" seta ui_browserHardcore "-1" seta ui_browserKillcam "-1" seta ui_browserMod "0" seta ui_browserOldSchool "-1" seta ui_browserShowDedicated "0" seta ui_browserShowEmpty "1" seta ui_browserShowFull "1" seta ui_browserShowPassword "-1" seta ui_browserShowPunkBuster "-1" seta ui_browserShowPure "1" seta ui_currentMap "0" seta ui_currentNetMap "0" seta ui_dedicated "0" seta ui_drawCrosshair "1" seta ui_extraBigFont "0.55" seta ui_gametype "0" seta ui_joinGametype "0" seta ui_maxclients "32" seta ui_netGametype "0" seta ui_netGametypeName "dm" seta ui_netSource "1" seta ui_serverStatusTimeOut "7000" seta ui_smallFont "0.25" seta vehDriverViewHeightMax "50" seta vehDriverViewHeightMin "-15" seta vid_xpos "3" seta vid_ypos "22" seta voice_deadChat "0" seta voice_global "0" seta voice_localEcho "0" seta winvoice_mic_mute "1" seta winvoice_mic_reclevel "65535" seta winvoice_mic_scaler "1" seta winvoice_save_voice "0" con_hidechannel *; con_showchannel dontfilter error gamenotify boldgame subtitle obituary logfile_only console_only gfx sound files devgui profile ui client server system playerweap ai anim physics fx leaderboards parserscript script Holy shit Wizid, you need a hobby. Spend some more time in your new bar. Thanks Bob Awards
bobbarker Posted October 24, 2011 Member ID: 689 Group: ***- Inactive Clan Members Followers: 69 Topic Count: 100 Topics Per Day: 0.02 Content Count: 2030 Content Per Day: 0.33 Reputation: 1533 Achievement Points: 13317 Solved Content: 0 Days Won: 1 Joined: 11/04/09 Status: Offline Last Seen: November 15, 2025 Birthday: 07/22/1965 Device: iPhone Posted October 24, 2011 WiZiD bobbarker WiZiD Tweaks for improved game performance. Call of duty ______________________________ Console Commands: *Enable Console first in options* then type in the following then hit enter. *First things first*: (back up your "normal" config) found here for *XP C:\Documents and Settings\<USERNAME>\Local Settings\Application Data\Activision\CoDWaW\players\profiles\<playername> Vista is in a similar place 1) Punkbuster Sleep setting: /pb_sleep 500 (tells punkbuster client software to wait longer before awakening and sending info to PB) Save PB setting to config: /pb_writecfg (makes the above setting permanent so you don’t have to do it each time you log in) - The above changes the frequency that your PC reports to the server and thus reduced frequency of network spikes and the associated latency. 2) Packet transfer setting: /cl_maxpackets 100 - This setting helps smooth out data transfer and should help if you have a cable or other high speed connection. This setting works in conjunction with the com_maxfps 125 setting. 3) Send duplicate packets: /cl_packetdup 0 or 1 - Manage whether or not extra or duplicate packets are sent to the server.(1 is default and this sends an extra packet of data in case the first one is lost. If you enable the lagometer (see tools below), then you can see if you are losing any packets.If yes, then leave this at 1. If no, you can consider changing to 0. 4) Snaps: /snaps This is possibly the most important setting for getting a good connection. Snaps setting determines how many updates you recieve from the server. 20 to 30 for 56K connects in quake series 40 for high speed internet im sure the same for cod. (30 is fine). 5) Enable higher Frames Per Second (FPS): /com_maxfps 125 (Default is 85 so this may help overall FPS. Some say this should be set at or just above your average FPS to smooth things out) - This allows your game to go allow higher frame rates than the default. Set it to a value you want based on the capabilities of you machines… to unlock FPS completely and see what you machine is capable of set to 0, it can go as high as 1000. 6) Field of View (FOV): /cg_fov 80 7)Shadows: /sm_enable 0 Turns off unique Shadows ingame 8)Depth of Field: /seta r_dof_enable "0" Gets rid of the "blur" around you gun and clears your perperipheral vision. - If you want to widen your FOV (field of view) from 65 degrees to 80 degrees, use this command. NOTE: This basically “backs you up” to give you a larger viewing area at the sides but it does make user/soldiers/enemies slightly smaller at the same time. This command does not affect machine performance and is merely a preference to give you the ability to see more. In game tools: ______________ 1) Show framerate on screen so you can see how your PC is performing: /cg_drawFPS 1 (choices are 1,2,or 3 where 0 = off / 1 = on) - At a minimum, you need to try to be above 60FPS so that you have no visual choppiness. Reduce textures, shadows, lighting etc. 2) Show network connection quality: /cg_drawlagometer 1 (puts a graph just above your grenades icon on screen) - Top meter on graph. GFX shown in Blue, (or blue with small amounts of yellow) then you system is in synch and your screen/system is refreshing in sync with the server’s perspective of the game world. If Yellow, then you are having issues and your screen/system may not be in synch with what the server thinks is happeing.. noticable lag bad hit rego. The blue shows how well your graphics card is staying in sync with the server as it relates to rendering the gaming environment. A few yellow items is OK but you want the vast majority to be blue. If you have a lot of yellow, this means that your graphics rendering and server rendering of the gameworld is out of sync.The smoother the flow on this meter, the better, the faster the higher your FPS is. - Bottom meter should be all or mostly green. Lots of yellow or red means there are issues. When you spawn or die, you can sometimes see lots of RED , this seems to be OK. If you are all green, then you can consider changing your cl_packetdup to 0 and you can increase your cl_maxpackets _________________________________ Performance improvements summary: *Enable Console first in options* Punkbuster Sleep setting: /pb_sleep 500 Save PB setting to config: /pb_writecfg Packet transfer setting: /cl_maxpackets 100 Send duplicate packets: /cl_packetdup 0 or 1 Max FPS: /com_maxfps 125 Field of View (FOV): /cg_fov 80 Draw your FPS on screen: /cg_drawfps 1 Draw your Lagometer on screen: /cg_drawlagometer 1 Shell Casings: /cg_brass o gets rid of the shell casings being ejected Shadows: /sm_enable 0 Turns off unique Shadows ingame __________________________________________________ Notes:*CG FOV :: Field of view, where the value is the angle of the circular arc that is displayed on your screen. High values will make the game appear "fisheyed". *MAX FPS :: This command limits your maximum FPS. You may ask why you would want to do this, and the answer is that it will help the server from having lag confusion when your frame rate has a sudden rise or fall. Run a timedemo, collect your average FPS and use that as the limit for when you play on-line. *MAXPACKETS :: This setting puts a limit on the maximum amount of packets that can be sent to the server via the client. This setting is useful for people with slower modems. Obviously we all have high speed connects so set to at least 100. Lower maxpacket settings i.e 30 lowers ping on screen but at the cost of registration. */sm_enable 0: Turns off unique Shadows ingame, it boosts FPS more than most commands. That's about it for now if I think of anything to add to this I will update the thread with a new reply post. Enjoy, try it out and give some feedback if things are better. Check here to see if your machine is up to the task of CoDWaW > http://www.systemrequirementslab.com/referrer/activision2?registration_option_id=7974 thankx, Introduction: For the last couple weeks, during beta, I have been digging deep under the hood of Crysis. I thought it would be fitting that I share my findings and move my guide to the community that I have waited with for Crysis for so long. I hope you enjoy it and that it helps you with basic and advanced tweaking in the days ahead. This will continue to be a work in progress. I will cover both some basic and advanced tweaking. I'll share the settings that I have found to be the most performance hungry and what you can do to get performance back or increase quality without draining performance too much. Then we will dig deep into one of the most, if not the most, tweakable games on the planet. We will also surpass very high settings with ultra for the uber machines as the guide fleshes out. BASIC TUNING Basic computer performance: I don't want to recreate the wheel but their are many things to do to increase performance in games with your computer. Details on how to do these things can be found by doing a google search for any of the following. * Latest drivers for your video card, motherboard, sound card can improve things greatly at times. * Defrag your hard drive. It's prefferable to defrag 'before' installing so that the files stay close together and contiguous. * If you only have 512MB or 1GB memory, 2GB is highly recommended. * Go into your driver control panel to make sure antialiasing(AA) or anisotropic filtering(AF) is not enabled unless you want them to be, they effect performance alot. Also you can change texture filtering quality to provide more performance in the drivers. * If you are running Vista make sure to be using the current hotfixes, some effect performance and memory usage tremendously. Nvidia has a great list of recommended ones here: Vista hotfixes * A video card like an 8800 GT for $250 will provide tremendous results if you haven't upgraded in a long time. * Disabling any unneeded running process, especially antivirus, while playing is recommended. Resolution: Resolution has a large impact because the game has so much geometry that the fillrate demands of large resolutions is beyond what people are used to. If you can lower resolution this will help gain many fps and provide smoother play. If you have an LCD you need to use what is called 1:1 pixel mapping, or otherwise known as disabling scaling. This allows the image to shrink but the quality of the image stays incredibly good. Scaling on the other hand, always looks bad if using anything other than your native resolution. Scaling can be disabled on some monitors. If your monitor doesn't support this feature some drivers support it. With nvidia you can disable it like so, image provided. So shrinking the image while maintaining incredible quality works well for performance, you can always slide your monitor closer you then won't notice the image is smaller. Custom resolutions can be used by using 'r_width=x' and 'r_height=x'. See below on advanced tweaking on how to use variables. In-Game Settings: The settings that have the biggest effect on performance are firstly shaders. This game is one of the most shader intensive games on the market. Going from high to medium shader settings works real well in giving an average of anywhere from 7-10 fps or more, depending on some variables. Next are Shadows and Post Processing. Shadows from high to medium looks very good still and provide a good boost of performance. Post processing has a big effect as well. The thing that people notice most about post processing is motion blur and depth of field. These can be easily turned on/off individually if desired seperate from the post process drop down box, as will be seen in the advanced tweaking section. Textures setting affects video memory usage quite a bit which we will look at next. Video Memory: Using beyond the amount of memory that is locally on the video card will produce performance problems like stuttering and hitching due to having to fetch data from system RAM over the much higher latency PCI express bus. In other words, adjust settings/resolution in the game not to exceed your video RAM, otherwise you will experience overall performance issues and the periodic flickering of geometry and LOD's as it streams in. The game is very video memory intensive. Resolution and AA effect the amount of video memory the game uses tremendously. Here is a breakdown of video memory across different settings and resolutions. * Windows XP * Nvidia Driver 169.01 1280x1024 medium * NoAA 184MB * 2xAA 295MB * 4xAA 355MB * 8xAA 395MB 1280x1024 high * NoAA 315MB * 2xAA 375MB * 4xAA 440MB * 8xAA 470MB -Texture medium- * NoAA 300MB * 2xAA 363MB * 4xAA 423MB * 8xAA 445MB 1680x1050 medium * NoAA 223MB * 2xAA 375MB * 4xAA 455MB 1680x1050 high * NoAA 368MB * 2xAA 456MB * 4xAA 535MB -Texture medium- * NoAA 340MB * 2xAA 428MB * 4xAA 505MB 1920x1200 Medium * NoAA 240MB * 2xAA 430MB * 4xAA 535MB 1920x1200 High * NoAA 400MB * 2xAA 515MB * 4xAA 615MB -Texture Medium- * NoAA 370MB * 2xAA 475MB * 4xAA 585MB AA clearly makes a large impact in video memory. Different game levels may change these numbers. Changing textures from medium to low makes no appreciable difference since it is still using the lowspec pak. The devs have made huge advances in optimizing this area since earlier builds of the game, either that or the textures are quite lower in quality, infact these are the numbers medium textures used to give as if high textures are missing. Final shipping game may reflect differences here, will update accordingly. The textures setting alone no longer makes the difference it did in earlier builds regardless of high/medium/low setting, which again seems to give some indication higher textures have been removed temporarily or entirely. Breakdown by video card memory: 256MB Video - 1680x1050 medium without AA or 1280x1024 medium with AA. 8800 GTS 320MB - Handles up 1680x1050 medium no aa, can go to high with some thrashing. Only AA at 1280x1024 looks to be viable with that memory limit. 512MB Video - Comes into it's first wall at 1680x1050 4xAA on high. Performance and not memory will impact you here. 8800 GTS 640MB - Handles up to 1920x1200 4x AA (All High). performance makes that out of reach on todays HW. 768MB and above - Memory will not be your limiting factor unless going to 2560x1600 with AA. Your GPU handling the raw processing of the geometry and shaders at that high resolution will be out of reach. I don't doubt that 1GB can be reached by tweaking Crysis and high resolutions with max AA on tomorrows HW. I already have found ways to approach 650MB at only 1280x1024. Basic video memory tips: * Find your video memory ceiling with resolution and texture setting first. Then adjust other parts of the game that are affecting raw performance like shaders or shadows until you get your acceptable performance. If you don't properly anticipate video memory usage, you won't realize why it is hitching on you, regardless of other settings. * You don't have to turn everything to medium to conserve memory, textures have the biggest effect by far. * Remember as more players enter the map this memory will climb a bit, as well as larger out door levels. Also as you stay in the game for a while this number will rise a little. I cached all the outdoors, but not the indoors. * Adding any tweaks for higher quality, especially along the lines of LOD or view distance, has the potential to raise memory usage even further. * The higher you go over your limit, the worse performance, texture stuttering, hitching and popping of geometry will become. * If your resolution doesn't appear just use something close, like 1680x1050 is close to 1600x1200. Benchmarking: Crysis came with two benchmarks to test and compare your performance. A GPU benchmark and a CPU benchmark stressing physics. They can be found in the Bin32 or Bin64 folders. Just double click on them to start. The game will run through 4 loops of the benchmark. When it's done it will show you the results, I suggest you ignore the first one since it was just caching the level and assets on the first run. You can make your own benchmarks but for now these two work well as standard tests. See the benchmarking tool mentioned in post 3 for an improved benchmarking experience. Antialiasing and Anisotropic filtering in Crysis First of all AA is a serious performance drain. More so than other games because of the incredible amount of triangles and polys in the scene. AA is only recommended for the highest end GPU's and keep in mind high resolutions will be more intensive. So if you choose to use it then keep in mind the video memory that will be used (shown above). There is some interesting information starting to come out about AA. Apparently it is preferred to use the in-game AA settings as the proper way to use AA. In other words, don't use the driver control panel but control it from in game. Additionally, HardOCP in their recent 8800GT review had this quote. "This comes directly from NVIDIA’s James Wang on the use of Transparency Antialiasing in Crysis: ” Crysis handles foliage very differently from normal engines so TRMS/SS won't work. Bit of a shame really. The game has some built-in foliage AA, but it only kicks in in "Very high" quality mode.”" I am actually pretty sure it can be enabled at high as well, not just very high. High and very high shader settings are compatible with in game AA, while low and medium shaders are not. Regardless of in game shader settings if AA is enabled, High shaders will also need to be enabled. If AA is currently enabled, but shaders is set to medium or low, AA will automatically be disabled by the game. So it will take a good medium to high end card to use AA not only because AA is demanding on it's own but because you will need to run atleast high shaders as well. As to Anisotropic Filtering, it can only be enabled in the driver settings. Unfortunately there is a bug with the nvidia drivers that makes a white halo around distant bushes and trees. I believe this bug only shows itself on a particular. This apparently will be fixed with a future driver. Vsync Vsynch can be enabled in the game with r_vsync = 1. It is off by default. ADVANCED TWEAKING Customizing the game: The in-game settings are like using a paint roller on a canvas, while tweaking is like the fine brush of the artist. The roller gets the job done but it's not going to be as fulfilling as it could be. You need a fine brush to make it the way you like. The developers didn't want to burden you with 20 choices of drop down boxes so they instead made those broad strokes for you. Unfortunately the difference in performance and quality between low/medium/high/veryhigh can be staggering. Sometimes a move from high to medium can change 20 variables, but it may not be necessary to change all 20 when only a few really effect performance or quality. The fine strokes will allow you to get exactly what you want and Crytek has really given us the ability to change just about everything in the game you would want. You do not have to sacrifice as much quality for performance as you may think. Sometimes you can keep settings high or medium and change one variable that is the big performance tanker or one setting that brings back some good quality at little cost. Enough intro lets get busy. How to make an autoexec.cfg In the early days of the beta people modified the cvar groups game files because it was the best they knew, if you have heard about this I do not recommend it. It changes the way your in-game settings work permanently and changing to medium or high won't have the desired effect anymore. We later learned that you can make an autoexec.cfg file in the "Crysis SP Demo" folder. Tweaks are made up of Console Variables (cvars for short), a list of the ones currently used by the game can be seen below. In this file you put in the tweaks you want one by one and the game will use them when it starts up. View Performance In Game Place the line r_displayinfo=1 in your autoexec.cfg. This will show you fps, system memory usage(not video), triangle count, etc. Also you can use fraps if you wish to show fps as well as take screenshots and make movies of the game. Enable The Console: By default the devs have disabled the console unless you learn the trick to enable it. You can enable it by adding the line con_restricted=0 to your autoexec.cfg and you can then use tweaks while in game in real time and watch with your own eyes the quality and performance changes. Pull down the console while in game by hitting the ~ (tilde) key. From there you can type in a cvar, without a value, and the game will tell you the current value. If you want to test a tweak, just type it in but instead of using an equals sign to put in a value like in the autoexec.cfg, just use a space. Example in console: r_displayinfo 1 If you have the fps shown in game you will see the performance effect of different settings. Enhancing on DX9: It is a very tweakable game. Crytek have given us the ability to tweak many many things to reach Very High equivalent settings and even far far beyond. I will give you a break down of every exact Very High setting(used in DX10) for reference. This is the real list of every setting and their values. So you can use this list and mimic exactly very high in DX9 to the fullest extent possible. Just add this list to an autoexec.cfg and you will have very high for DX9. sys_spec_GameEffects = 3 sys_spec_ObjectDetail = 3 sys_spec_Particles = 3 sys_spec_Physics = 3 sys_spec_PostProcessing = 3 sys_spec_Quality = 3 sys_spec_Shading = 3 sys_spec_Shadows = 3 sys_spec_Texture = 3 sys_spec_VolumetricEffects = 3 sys_spec_Water = 3 e_foliage_wind_activation_dist = 25 e_max_entity_lights = 16 e_obj_quality = 4 e_particles_max_emitter_draw_screen = 32 e_particles_quality = 4 e_shadows_cast_view_dist_ratio = 0.8 e_vegetation_sprites_distance_ratio = 1.5 e_view_dist_ratio_detail = 30 e_view_dist_ratio_vegetation = 45 e_water_ocean_fft = 1 e_water_tesselation_amount = 10 es_DebrisLifetimeScale = 1 g_battleDust_enable = 1 g_breakage_particles_limit = 250 g_ragdollDistance = 40 g_ragdollMinTime = 15 q_Renderer = 3 q_ShaderFX = 3 q_ShaderGeneral = 3 q_ShaderGlass = 3 q_ShaderHDR = 3 q_ShaderIce = 3 q_ShaderMetal = 3 q_ShaderPostProcess = 3 q_ShaderShadow = 3 q_ShaderSky = 3 q_ShaderTerrain = 3 q_ShaderVegetation = 3 q_ShaderWater = 3 r_BeamsDistFactor = .05 r_BeamsMaxSlices = 200 r_ColorGrading = 1 r_DepthOfField = 2 r_DetailNumLayers = 2 r_DynTexAtlasSpritesMaxSize = 32 r_MotionBlur = 4 r_ShadowJittering = 2.5 r_SSAO_quality = 2 r_SSAO_radius = 2 r_sunshafts = 1 r_TexAtlasSize = 2048 r_Usepom = 1 r_WaterReflectionsQuality = 3 r_WaterUpdateDistance = 0.2 In Game Settings: This chart shows the breakdown of "every" console variable that is changed by the in-game settings. It color codes every different type of in game menu(textures, game quality, shadows,etc) and shows you what variables actually change, when you change a drop down menu in the game, and what values they change to. To see more console variables that cannot be changed in game and to see all the definitions of the settings, follow the links below the image. See the full real size image with definitions and many more settings here. This list is a great starting point for your own tweaking adventure to mix and match settings as you like. Remember you can try most of them while in game in realtime in the console and see the effect on quality and performance. Get the original Excel spreadsheet for your own personal use here. You can copy/paste right into the game console. How do I do start?: summary You can start by making an autoexec.cfg in the main game folder. Add two settings to start. Just copy/paste them. r_displayinfo=1 con_restricted=0 Now you can open the console and start trying tweaks that look interesting one by one. Use your autoexec.cfg and fill it with the tweaks you like. When you check your in game settings it will show 'custom' if you have tweaks in your autoexec affecting that menu section. I will detail some of the ones I think are cool here next. Quality Comparisons: Some notable settings that effect quality. LIGHT AND WATER: r_sunshafts = 1 turns on the hidden feature of light shafts that dance through trees and past objects. Available in game through Very High in-game setting. The bottom is default all High in-game settings, the top is r_sunshafts = 1. Comparison pics... The following 3 settings work along with sun shafts... r_Beams - Toggles the volumetric light beams. Default is 3, it’s an optimized beam with glow support. 0 disables beams, 2 uses fake beams with probably beneficial performance (performance untested). 1 is the best and uses the real full resolution beams but it is slower. r_BeamsDistFactor - Distance between slices. Default is 0.01 in meters(likely reserved for Ultra High) and is likely the best setting for beams making it through the densest vegetation. You can try it and see what you like best (currently medium and high use 0.5, low uses 1). r_BeamsMaxSlices - Number of volumetric slices allowed per light beam. Default is 200 (reserved for very high specs). The max here is 300, so go ultra if you think you can really handle the performance hit. e_water_ocean_fft - Activates fft based ocean algorithm. Produces realistic wave undulation for the best quality and most realistic water. Everything is the same with water except undulation. This algorithm was used in movies like Titanic and Waterworld so it's very realistic. Screenshots wouldn't really show the difference but I have a short movie, it hardly does it justice, but atleast you can see the wave difference. FFA Water movie comparison 4MB TEXTURES & LOD: Distant LOD (level of detail) of textures and vegetation is probably my favorite section because it’s most noticeable as you look across the map and walk about. e_detail_materials_view_dist_xy - Max view distance of terrain XY materials. This is things like certain cliffs and other materials horizontal LOD in game. e_detail_materials_view_dist_z - Max view distance of terrain Z material. This is things like certain cliffs and other materials vertical LOD in game. This one doesn't need to be raised high, 256 or 512 max. (In the GPU benchmark when coming in from the sky this setting will show itself on vertical LOD). A picture is worth a thousand words on how these two work... Note: For the mountains to appear crisp like this you will also need r_TexturesStreaming set to 0. r_usepom - Enables Parallax Occlusion Mapping. A type of relief map that gives raised appearance to textures. Very cool but costs about 2 fps and can sometimes cause a fairly insignificant minor blurring of terrain textures in distance. Comparisons... VEGETATION & SPRITES: e_cull_veg_activation - Vegetation activation distance limit, 70 is a good step up from high(50). This is trees setting how far the farthest out can be seen. e_vegetation_sprites_distance_ratio - Allows changing distance on what vegetation switch into sprite. Raising this from 1 to 1.5 cost me about 1 fps in that view. Adds medium tree distance as well as certain near shrubs. Comparisons... e_view_dist_ratio_vegetation - View distance ratio for vegetation. Includes grass and shrubs like ferns and broad leafs, etc. 50 just about eliminates any popping effect with grass and shrubs, costs 1 fps in this scene. Comparisons... Controlling Antialiasing with Tweaks See above section on antialiasing and how it changes shader settings. These are the cvar settings for AA that you can use in your autoexec.cfg file. Only for XP. r_FSAA = 1 - turns on AA 2xAA = r_FSAA_samples = 2, r_FSAA_quality = 0 4xAA = r_FSAA_samples = 4, r_FSAA_quality = 0 8xAA = r_FSAA_samples = 4, r_FSAA_quality = 2 8xAAQ = r_FSAA_samples = 8, r_FSAA_quality = 0 16xAA = r_FSAA_samples = 4, r_FSAA_quality = 4 16xAAQ = r_FSAA_samples = 8, r_FSAA_quality = 2 Additional Background And Things To Know I just want to share on how these work in the game and some more background info to clear up anything hazy. *Make sure you take a look at the full size picture or the spreadsheet for the settings chart, the links are below the chart. They expose many more tweaks, their definitions, and the values that they accept. Know your in game settings. Play with that first to get a comfortable feel of what you like and what is available through the advanced settings menu options. The way the autoexec.cfg variables work is they build on the in-game settings. The in game settings are first loaded, which are stored in the game.cfg in your profile. As the game starts it loads the game.cfg then the autoexec.cfg overrides are loaded with what ever settings you chose. So for instance, you have in game shaders set to medium down from high. But medium changes over 20 settings, well maybe you want the perfomance benefit of most of those but you want Ambient Occlusion back on the terrain (it's a global lighting system to provide realistic lighting). You keep the in game setting at medium but turn on e_terrain_ao = 1 along with r_SSAO=1 which will override the 0 settings in the game. Or maybe you want better better shaders on terrain back to high(3) so q_ShaderTerrain = 3. Whether you like water, sky, terrain, vegetation, view distances....it's all at your finger tips for your preferences. Usually there is only a couple settings that really affect performance alot, the rest can add quality at little cost, the developers just didn't know your video memory, vid card, processor, ram, etc. so they made broader stroke settings than most people needed in certain cases. The tip to remember is that your configs will override and work on top of what is already set in the game menu last time you ran the game. If you prefer there is also way to change the drop down boxes from your autoexec. The sys_spec... settings will change low/medium/high and it will change all the broad stroke settings I color coded in my chart if you change those broad stoke settings. You will know when your autoexec is working because if you look at the game settings it will show custom instead of low/medium/high. Basically, many cvar values are often just a on/off setting for features [0/1] 0 is off, 1 is on. Others may have values that are based on different ranges, the definitions will tell you what most of the limits and ranges are. Some ranges maybe in meters, where others are clearly larger or smaller units of measure. If you see a pattern of numbers like 512/1024 then extrapolate that it's best to stick with the pattern, like those just mentioned for texture sizes and shadow maps. Sometimes you have ratios (as seen in some cvar names), which seem to affect more than one thing and they are likely multiplied internally in the game against some value so they are more broad sweeping. I expose some of the cool cvars with pics above but don't let that keep you from trying new things. Performance of these settings depends on your resolution, your video card, and the complexity of the scene you are looking at. If you are tweaking vegetation find the densist vegetation to see what the hugest impact will be. Same with terrain view distances and textures. In certain scenarios things combine where you are looking through the dense jungle up at the mountain this is good to test combined foliage/texture/view distance tweaks as it will show worst case scenarios. That is the balancing act, but most of the time you in buildings, in water, in vegetation, so you can pretty much raise them irrespective of each other to a degree. This is the point I am at in my configs in perfecting that balance of taking quality to the farthest point where it can mix well with the others. I also like long view distances on objects, I like seeing vehicles, enemies and buildings afar off so you can trade something else for that if you prefer. It's great to use the console and see the settings changed in real time. Just be aware that not all settings can be changed in real time. Either the value will not change and that will be clearly shown in the console, or it appears to change the value in the console but nothing in the game actually changes. In those cases it will be necessary to put the setting in the autoexec.cfg so that the renderer will be able to properly utilize that setting during startup when rendering the scene. There are a couple features restricted to DX10 but mostly they are time of day and geometry shader functions (GS in the cvar), not many at all. Enjoy the playground. More soon... Crysis Performance Reviews: See how different hardware and settings perform. Crysis (Demo Performance)- LegionHardware Crysis Demo Performance Analysis- Tweaktown Crysis demo performance in-depth - TechSpot DirectX 9 performance with the Crysis demo on 10 different cards - AMDZone To be Continued... Last edited by MadBoris (17-11-2007 23:54:33) Offline THIS GUIDE WAS CREATED BY Sven2157 Thought this guide may be useful for some of us here. You can also visit that link to see this same guide. http://www.techsupportforum.com/gaming-forum/pc-gaming-support/349169-optimising-your-system-games.html How to Properly Configure Your Computer for GAMES/PROGRAMS Hello everyone, I am constantly seeing people, all over the internet, with problems running their programs/games on their computers. They ALL are experiencing slow boot times, in game lag, freezing, OOM Errors (Out of Memory), low FPS and numerous other "issues". They are also, consuming A LOT of database space asking the same questions. I will try and consolidate those questions and answers here. So I am writing this "CHECK LIST GUIDE" of common problems and solutions. It contains basic/mandatory system configurations, as well as advanced techniques; thus improving your game play, software development/designing and overall computer performance. All while maintaining the best possible visual experience. ***PLEASE REMEMBER THAT THIS IS A GUIDE! NOT A MUST! ANY CHANGES YOU MAKE TO YOUR SYSTEM, ARE SOLELY YOUR CHOICE AND RESPONSIBILITY! I, NOR THE MODERATORS OF THESE FORUMS, CAN, AND WILL NOT, BE HELD LIABLE FOR YOUR OWN ACTIONS!*** So let's begin... First and Foremost! Please update your Motherboard, BIOS, SMBus/USB/Memory/Video/Audio/Storage Controllers (<--System), Video, Sound, Human Interface Device (HID) Controllers (<--Your Joystick/Gamepad), Mouse and other such drivers. Also run a system Defrag, to defragment your hard drive. This should be done at least monthly; as all of the afore mentioned will resolve 99.9% of the issues experienced by users! Also clear your Temporary files 1. - Click Start..>.."Run.." (Vista Users may not have this enabled <by default>, so the shortcut is "Windows Key+'R') 2. - In the "Run" Box type: %Temp% Your Temporary File Folder will come up. Select ALL, and delete them. Don't worry, they are TEMPORARY FILES. Some programs do not clear these when they are finished, so you have to go manually delete them. This then makes it easier for other programs to store temporary files needed for execution. Getting rid of the stuff you didn't even know was there... O.O(<--BTW I am writing this in notepad and transferring it to the forums; so my smilies my not show up -.-) When you download and install commercial products - Adobe Flash, Adobe Reader, Google Earth, etc, etc - , you have to be mindful what the installer is asking you... This is a common mistake by users. They want the program, but either don't realize that there are other programs "Piggy Backing" in, or don't care. This is where problems begin. "Well, what's wrong with the Google Toolbar?" 8-/ The answer to that is simple: EVERYTHING! These programs seem harmless, and have a very small file size: .4 - 2.5MB. But that is not where the problem lies. Programs like this, and Toolbars especially, are constantly TRANSMITTING data to their prospective authors. This includes where you surf, what you buy, where you live, what time you access the internet, who is logged into the Operating System (<-- BETTER BELIEVE IT! >:-{ ), your ISP, etc, etc. Consequently, this is not only eating up the processing power and RAM of your computer, but now you are losing crucial bandwidth. Ever wonder how "that guy" can come around the corner and just kill you, in FPS games? Because he has a CLEAR connection to the server, and saw you LONG before you knew he was there! "But I like my Toolbar (Google, or other)!" Why? IE7 and FireFox has a Google Search built right into them. They have Pop-Up Blockers, and Auto Complete, as well. Why have redundant software running? So let's get rid of ALL that crap, and free up some drive space! 1. - Click start..>..Control Panel..>..Add/Remove Programs(XP)/Programs and Features(Vista). 2. - Go through the list, when it populates, and remove ANY "extra" programs that you do not use. If you accidently remove something you need, you can certainly get it back. What you are looking for: (not in any particular order) Adobe.com Adobe Updater *Nothing like losing bandwidth, then getting kick out of game because Abode thinks it's more important! Apple Updater Google Chrome *Transmits data continuosly Google Desktop *I would love to slap the guy who invented this! ;-) Google Updater *Big process eater! Transmits data constantly! Google Toolbar MY SEARCH - ANYTHING! *Big process eater! Also Installs Viruses and Malware automatically! Java Updater Yahoo Search Yahoo Mail Yahoo Toolbar Windows Live Installer Windows Live SkyDrive Windows Live Photos MyWeb - ANYTHING! *Big process eater! Continuosly running. HP/Lexmark/Cannon/Kodak - Anything you don't use. As long as you don't delete the driver, your printer/camera/scanner will still function! Dell/Acer/HP/Gateway/eMachines, etc, etc Pre-Installed Manufacturer Programs *These programs are "extra" and cause your system to run slow. Most of them duplicate Windows built in features! Also, look for anything that you don't use or that looks suspicious. Once again, if you remove it, and find you need it, you can get it back! So don't be afraid; Don't be overzealous, either! Now for the real stuff! Processes and Services! These are the real KILLERS! When programs install, they generally write their own rules; as most users don't really know how to respond even when asked! The problem with this is they ALL FIGHT to be NUMERO UNO! They ALL think they are the greatest thing since crawling out of the sea, and growing lungs and legs! :-D So we have to go tell them ALL who the real boss is! YOU, the user! 1. - Click Start..>.."Run..." (Vista Users may not have this enabled <by default>, so the shortcut is "Windows Key+'R') 2. - When the "Run..." Box opens, type: MSCONFIG (<--not case sensative) 3. - When the "System Configuration" window appears, click "Selective startup". 4. - Click the "Services Tab". 5. - ***THIS IS AN IMPORTANT STEP! PAY ATTENTION TO WHAT YOU ARE DOING HERE!*** Click ONLY the "Hide all Microsoft Services" box! 6. - Now the window will only show you 3rd party services that start when Windows starts. However you NEED some of these! Like your Norton/McAffee/AVG Anti-Virus and Internet Security services. Display Drivers/Software, Storage Drivers (i.e. RAID), etc, etc. Trial an error may be the best approach on this tab. Turn a couple off, see where that gets you, then try a couple more. 7. - Now click the "Startup" Tab. You can turn ALL of these off if you want. Once again, READ what you are doing! In the picture below, I leave my RAID, VIDEO and Sidebar on, because I use that to monitor my system. (Vista Users - In the picture below, the 2 "Microsoft® Windows® Operating System" items you see, are for the Sidebar; they are not crucial!) 8. - When you have finished, click "Apply", then "Ok". ***IF YOU DO NOT WANT THE CHANGES TO TAKE AFFECT OR HAVE MADE A MISTAKE, CLICK "CANCEL"!*** The configuaration utility will then prompt you with the following image: 9. - Press "Restart" (Pressing "Exit without Restart" will not reboot your computer. However, when you manually reboot the system changes will take affect!), when the system starts back up, YOU WILL RECIEVE A "SYSTEM CONFIGURATION MESSAGE". Just Check the, "Don't show this again" box and click "Ok". ***IF YOU ARE EXPERIENCING PROBLEMS, REPEAT STEPS 1 AND 2. THIS TIME SELECTING "NORMAL STARTUP"*** Then click "Apply", "Ok", "Restart". This will return all Services and Startup options back to the original settings! OK... Almost there... O.o Now let's get some memory back.... 1. - Right-click My Computer(XP)/Computer(Vista)..>..Choose properties. VISTA USERS ONLY: The "System Properties" Window appears. Click "Advanced system settings". XP USERS: Click "Advanced" Tab. 2. - Click the "Settings" button in the Performance row, to open the "Performance Options" Window. 3. - Select the "Advanced" tab, then click the "Change..." button in the Virtual memory row. 4. - Uncheck the box for "Automatically manage paging file size for all drives" if it is checked. ***The next step requires a judgment on your part. In the above image, I have my "Intial Size" set to 4096MB (<--That's 4 GigaBytes!), and my Maximum size is set to 6114 (<--That's 6 GigaBytes!). HOWEVER! I have a 400GB in RAID 0 "C:\" drive! In other words, I HAVE ROOM TO SPARE! Most of you will want to set this to approximately 2048 Init/3072MB Max; ROUGHLY! ***NOTE: XP Users can only set a MAXIMUM of 4096MB for their Paging Files!*** 5. - Now click "Set". You will be prompted, after clicking "Ok", that you have to reboot, so... Reboot. What did I just do!?!? O.O Good question! You are very smart! ;-) In simple terms... This is going to expand your "Paging File". Windows uses the "Paging File" as "secondary memory", by writing "chunks" of data to the Hard Drive. This way it can recall information faster than searching the rest of the drive. This data is not permanent and is constantly changing. Ever wonder why your hard drive light flashes, even when Windows is idle? Windows allocates (or reserves) RAM and Virtual Memory (<--Paging File) for it's own greedy use; whether or not it actually needs it. This reserve is for system processes and what not. When the size of this is SET by the user, you free up the constant size changing, increasing or reducing, that windows can and will do to make more or less available; consequently allowing more room to write to the drive = freeing up valuable processing threads and RAM. In turn increasing performance. ...and, Lastly... Is the DREADED OOM!!!! This next tweak will prevent the Out Of Memory (OOM) Error. This is EXTREMELY effective when working with Adobe CS Series, AutoDesk Products and Games (Microsoft Flight Simulator Pilots, I am looking in your direction!) that are both Graphic and Processor/RAM intensive. Before I begin, let me briefly descibe what happens here: Windows thinks its the greatest thing since fire! So, on your PC it will block ALL programs from accessing what it thinks, is it's! I.E MEMORY; both RAM and Virtual! Once again, you need to go into the OS and tell it who's BOSS, and only give it what it NEEDS; NOT WHAT IT WANTS! XP needs roughly 512MB, while Vista needs about 1GB to function flawlessly with RAM! About 256MB - 512MB of Virtual for BOTH. It has a "Safe Guard" that will flag programs that try to use more than 2GB of either. When this happens, it sends an error message, "Out of Memory...". To prevent this from happening, and crashing your programs, you need to set this limiter to a higher value. Here is how you do it: On VISTA: (You have to run the command prompt with elevated privlages) 1. Click the Start..>..All Programs..>..Accessories..>..Right-Click the "Command Prompt" and choose "Run as Administrator". 2. At the command line type the following: BCDEDIT(SPACE)/Set(SPACE)IncreaseUserVA(SPACE)nnnn (nnnn = the amount you want to increases by! I have mine set for 4096MB) 3. Hit enter, and get the confirmation. 4. REBOOT 5. Confirm that it worked by running the command prompt, typing: BCDEDIT, hit enter and you will see the /userva switch now.... It will be under the "Windows Boot Loader" as increaseuserva = {value you set} On XP: 1. Right-Click the My Computer..>..Choose "Properties". 2. Click the "Advanced Tab". 3. Click the "Settings" button in the "Startup and Recovery row. 4. click the "Edit" button in the "System startup" row. Now you'll see the boot config. At the very end type /3GB so it looks like this: *** Do Not Copy as your own Boot file [boot loader] timeout=3 default=multi(0)disk(0)rdisk(0)partition(2)\WINDOWS [operating systems] multi(0)disk(0)rdisk(0)partition(2)\WINDOWS="Microsoft Windows XP Home Edition" /fastdetect /NoExecute=OptIn /3GB 5. - Reboot Well Folks, there you go! It will take most of you longer to read this than it will to actually complete these tasks! O.O I hope that this helps! ***IF YOU ARE UNSURE ABOUT ANY OF THE ABOVE, THEN DO NOT PREFORM THESE ACTIONS! ASK HERE FIRST! I, AND THE MODERATORS OF THIS FORUM, ASSUME NO RESPONSIBILITY FOR ANY DAMAGE, LOSS OF DATA/SOFTWARE/HARDWARE, OR OTHER LOSS FOR THE ACTIONS YOU PERSONALLY TAKE!*** Please feel free to ask questions here, if I was not clear on something... Happy Gaming/Programming Sven2157 ADMINS WILL YOU PLEASE STICKY THIS ive had numourous people asking me past few weeks about where my config post went and no one can find it.... Thanks........ ... NOW... on to the config.... FIRST.. COPY everything i paste below the line and open up NOTEPAD on your computer.... PASTE IT INTO NOTEPAD AND SAVE AS CONFIG_MP.CFG .... YOU HAVE TO USE THAT FILE NAME!!!!! Save to your desktop..... now.... make a COPY of your current config.... put in a safe place.... replace the old config with your new one in your cod4 profiles folder........ OPEN GAME...... now i have weird controls... SO SET THE CONTROLS TO WHAT YOU WANT TO USE!!! AND CHANGE THE NAME!!! thats all you have to do.... your ping will drop 10-30 .. your fps will increase by 30-50... and you will move faster.... hit more accurate.... .... -------------------------------------------------------------------------------------------------------------------------------------------------- // generated by Call of Duty, do not modify unbindall bind TAB "+scores" bind ESCAPE "togglemenu" bind SPACE "+gostand" bind 3 "openscriptmenu quickpromod 2" bind 4 "+smoke" bind 5 "+actionslot 3" bind 6 "+actionslot 4" bind 7 "+actionslot 2" bind 8 "openscriptmenu quickpromod 5" bind ` "toggleconsole" bind A "+moveleft" bind B "mp_QuickMessage" bind C "gocrouch" bind D "+moveright" bind E "+leanright" bind F "+activate" bind G "+frag" bind H "ufo" bind K "ufo" bind N "+actionslot 1" bind Q "+leanleft" bind R "+reload" bind S "+back" bind T "chatmodepublic" bind U "noclip" bind V "+melee" bind W "+forward" bind Y "chatmodeteam" bind Z "+talk" bind ~ "toggleconsole" bind PAUSE "toggle cl_paused" bind CTRL "goprone" bind SHIFT "+breath_sprint" bind F1 "vote yes" bind F2 "vote no" bind F4 "+scores" bind F12 "screenshotJPEG" bind KP_HOME "toggle cg_thirdpersonangle 340 320 300 280 260 240 220 200 180 160 140 120 100 80 60 40 20 0" bind KP_UPARROW "timescale 5.0" bind KP_PGUP "toggle cg_draw2D" bind KP_LEFTARROW "timescale 0.5" bind KP_5 "timescale 1" bind KP_RIGHTARROW "timescale 2.0" bind KP_END "toggle cg_thirdpersonangle 0 20 40 60 80 100 120 140 160 180 200 220 240 260 280 300 320 340 " bind KP_DOWNARROW "timescale 0.3" bind KP_PGDN "toggle cg_thirdperson" bind KP_ENTER "toggle g_compassShowEnemies" bind KP_INS "toggle cl_freezedemo" bind KP_DEL "toggle developer" bind KP_SLASH "quit" bind KP_MINUS "toggle cg_thirdpersonrange 1024 800 600 350 120" bind KP_PLUS "toggle cg_thirdpersonrange 120 350 600 800 1024" bind MOUSE1 "+attack" bind MOUSE2 "+toggleads_throw" bind MOUSE3 "+frag" bind MWHEELDOWN "weapnext" bind MWHEELUP "weapnext" seta ai_badPathSpam "0" seta ai_corpseCount "0" seta ai_debugAccuracy "0" seta ai_debugCoverSelection "0" seta ai_debugMeleeAttackSpots "0" seta ai_debugThreatSelection "0" seta ai_ShowCanshootChecks "0" seta ai_showClaimedNode "0" seta ai_showRegion "0" seta airlift_min_spec "0" seta animated_trees_enabled "1" seta bog_b_min_spec "0" seta ai_corpseCount "10" seta cg_blood "0" seta cg_bloodLimit "0" seta cg_bloodLimitMsec "330" seta cg_brass "0" seta cg_centerPrintY "-60" seta cg_chatHeight "8" seta cg_chatTime "12000" seta cg_connectionIconSize "0" seta cg_crosshairAlpha "1" seta cg_crosshairAlphaMin "0.5" seta cg_crosshairDynamic "0" seta cg_crosshairEnemyColor "0" seta cg_cursorHints "4" seta cg_debugInfoCornerOffset "0 0" seta cg_descriptiveText "1" seta cg_drawBreathHint "1" seta cg_drawCrosshair "1" seta cg_drawCrosshairNames "0" seta cg_drawFPS "Simple" seta cg_drawFPSLabels "0" seta cg_drawFriendlyFireCrosshair "1" seta cg_drawFriendlyNames "1" seta cg_drawLagometer "1" seta cg_drawMantleHint "0" seta cg_drawSnapshot "0" seta cg_drawTurretCrosshair "1" seta cg_enemyNameFadeIn "250" seta cg_enemyNameFadeOut "250" seta cg_footsteps "1" seta cg_fov "80" seta cg_friendlyNameFadeIn "0" seta cg_friendlyNameFadeOut "1500" seta cg_gameBoldMessageWidth "390" seta cg_gameMessageWidth "455" seta cg_headIconMinScreenRadius "0.015" seta cg_hintFadeTime "100" seta cg_hudChatIntermissionPosition "5 110" seta cg_hudChatPosition "5 204" seta cg_hudDamageIconHeight "64" seta cg_hudDamageIconInScope "0" seta cg_hudDamageIconOffset "128" seta cg_hudDamageIconTime "2000" seta cg_hudDamageIconWidth "128" seta cg_hudGrenadeIconEnabledFlash "1" seta cg_hudGrenadeIconMaxRangeFlash "500" seta cg_hudGrenadeIconHeight "25" seta cg_hudGrenadeIconInScope "1" seta cg_hudGrenadeIconMaxHeight "104" seta cg_hudGrenadeIconOffset "50" seta cg_hudGrenadeIconWidth "25" seta cg_hudGrenadePointerHeight "12" seta cg_hudGrenadePointerPivot "12 27" seta cg_hudGrenadePointerWidth "25" seta cg_hudMapBorderWidth "2" seta cg_hudMapFriendlyHeight "15" seta cg_hudMapFriendlyWidth "15" seta cg_hudMapPlayerHeight "20" seta cg_hudMapPlayerWidth "20" seta cg_hudMapRadarLineThickness "0.15" seta cg_hudProneY "-160" seta cg_hudSayPosition "5 180" seta cg_hudStanceHintPrints "1" seta cg_hudVotePosition "5 220" seta cg_invalidCmdHintBlinkInterval "600" seta cg_invalidCmdHintDuration "1800" seta cg_laserLight "0" seta cg_mapLocationSelectionCursorSpeed "0.6" seta cg_marks_ents_player_only "0" seta cg_nopredict "0" seta cg_overheadIconSize "0.7" seta cg_overheadNamesGlow "0 0 0 1" seta cg_overheadNamesMaxDist "10000" seta cg_overheadNamesSize "0.5" seta cg_overheadRankSize "0.5" seta cg_predictItems "1" seta cg_scoreboardBannerHeight "35" seta cg_scoreboardHeaderFontScale "0.3" seta cg_scoreboardHeight "435" seta cg_scoreboardItemHeight "18" seta cg_scoreboardPingHeight "0.7" seta cg_scoreboardPingWidth "0.036" seta cg_scoreboardRankFontScale "0.25" seta cg_scoreboardScrollStep "3" seta cg_scoreboardWidth "400" seta cg_ScoresPing_BgColor "0.25098 0.25098 0.25098 0.501961" seta cg_ScoresPing_HighColor "0.8 0 0 1" seta cg_ScoresPing_Interval "100" seta cg_ScoresPing_LowColor "0 0.74902 0 1" seta cg_ScoresPing_MaxBars "4" seta cg_ScoresPing_MedColor "0.8 0.8 0 1" seta cg_scriptIconSize "0" seta cg_sprintMeterDisabledColor "0.8 0.1 0.1 0.2" seta cg_sprintMeterEmptyColor "0.7 0.5 0.2 0.8" seta cg_sprintMeterFullColor "0.8 0.8 0.8 0.8" seta cg_subtitleMinTime "3" seta cg_subtitles "1" seta cg_subtitleWidthStandard "520" seta cg_subtitleWidthWidescreen "520" seta cg_teamChatsOnly "0" seta cg_viewZSmoothingMax "16" seta cg_viewZSmoothingMin "1" seta cg_viewZSmoothingTime "0.1" seta cg_voiceIconSize "0" seta cg_weaponCycleDelay "0" seta cg_weaponHintsCoD1Style "1" seta cg_youInKillCamSize "6" seta cl_allowDownload "1" seta cl_anglespeedkey "0" seta cl_anonymous "0" seta cl_connectionAttempts "20" seta cl_freelook "1" seta cl_maxpackets "42" seta cl_maxPing "800" seta cl_maxppf "5" seta cl_mouseAccel "0" seta cl_packetdup "1" seta cl_pitchspeed "140" seta cl_punkbuster "1" seta cl_voice "1" seta cl_wwwDownload "1" seta cl_yawspeed "140" seta com_introPlayed "1" seta com_maxfps "125" seta com_recommendedSet "1" seta compassClampIcons "1" seta compassCoords "740 3590 400" seta compassECoordCutoff "37" seta compassFriendlyHeight "18.75" seta compassFriendlyWidth "18.75" seta compassMaxRange "2500" seta compassMinRadius "0.0001" seta compassMinRange "0.0001" seta compassObjectiveArrowHeight "20" seta compassObjectiveArrowOffset "2" seta compassObjectiveArrowRotateDist "5" seta compassObjectiveArrowWidth "20" seta compassObjectiveDrawLines "1" seta compassObjectiveHeight "20" seta compassObjectiveIconHeight "16" seta compassObjectiveIconWidth "16" seta compassObjectiveMaxHeight "70" seta compassObjectiveMaxRange "2048" seta compassObjectiveMinAlpha "1" seta compassObjectiveMinHeight "-70" seta compassObjectiveNumRings "10" seta compassObjectiveRingSize "80" seta compassObjectiveRingTime "10000" seta compassObjectiveTextHeight "18" seta compassObjectiveTextScale "0.3" seta compassObjectiveWidth "20" seta compassPlayerHeight "15" seta compassPlayerWidth "15" seta compassRadarLineThickness "0.4" seta compassRadarPingFadeTime "4" seta compassRadarUpdateTime "4" seta compassRotation "1" seta compassSize "1" seta compassSoundPingFadeTime "2" seta compassTickertapeStretch "0.5" seta con_errormessagetime "8" seta con_gameMsgWindow0FadeInTime "0.25" seta con_gameMsgWindow0FadeOutTime "0.5" seta con_gameMsgWindow0Filter "gamenotify obituary" seta con_gameMsgWindow0LineCount "4" seta con_gameMsgWindow0MsgTime "5" seta con_gameMsgWindow0ScrollTime "0.25" seta con_gameMsgWindow0SplitscreenScale "1.5" seta con_gameMsgWindow1FadeInTime "0.25" seta con_gameMsgWindow1FadeOutTime "0.01" seta con_gameMsgWindow1Filter "boldgame" seta con_gameMsgWindow1LineCount "5" seta con_gameMsgWindow1MsgTime "8" seta con_gameMsgWindow1ScrollTime "0.25" seta con_gameMsgWindow1SplitscreenScale "1.5" seta con_gameMsgWindow2FadeInTime "0.75" seta con_gameMsgWindow2FadeOutTime "0.5" seta con_gameMsgWindow2Filter "subtitle" seta con_gameMsgWindow2LineCount "7" seta con_gameMsgWindow2MsgTime "5" seta con_gameMsgWindow2ScrollTime "0.25" seta con_gameMsgWindow2SplitscreenScale "1.5" seta con_gameMsgWindow3FadeInTime "0.25" seta con_gameMsgWindow3FadeOutTime "0.5" seta con_gameMsgWindow3Filter "" seta con_gameMsgWindow3LineCount "5" seta con_gameMsgWindow3MsgTime "5" seta con_gameMsgWindow3ScrollTime "0.25" seta con_gameMsgWindow3SplitscreenScale "1.5" seta con_inputBoxColor "0.25 0.25 0.2 1" seta con_inputHintBoxColor "0.4 0.4 0.35 1" seta con_matchPrefixOnly "1" seta con_minicon "0" seta con_miniconlines "5" seta con_minicontime "4" seta con_outputBarColor "1 1 0.95 0.6" seta con_outputSliderColor "0.15 0.15 0.1 0.6" seta con_outputWindowColor "0.35 0.35 0.3 0.75" seta con_typewriterColorGlowCheckpoint "0.6 0.5 0.6 1" seta con_typewriterColorGlowCompleted "0 0.3 0.8 1" seta con_typewriterColorGlowFailed "0.8 0 0 1" seta con_typewriterColorGlowUpdated "0 0.6 0.18 1" seta con_typewriterDecayDuration "700" seta con_typewriterDecayStartTime "6000" seta con_typewriterPrintSpeed "50" seta customclass1 "Custom Slot 1" seta customclass2 "Custom Slot 2" seta customclass3 "Custom Slot 3" seta customclass4 "Custom Slot 4" seta customclass5 "Custom Slot 5" seta drew_notes "5" seta dynEnt_active "0" seta fx_draw "1" seta fx_drawClouds "1" seta fx_marks "0" seta fx_marks_ents "0" seta fx_marks_smodels "0" seta g_allowvote "1" seta g_banIPs "" seta g_clonePlayerMaxVelocity "80" seta g_deadChat "1" seta g_dropForwardSpeed "10" seta g_dropHorzSpeedRand "100" seta g_dropUpSpeedBase "10" seta g_dropUpSpeedRand "5" seta g_log "games_mp.log" seta g_logSync "1" seta g_oldVoting "1" seta g_playerCollisionEjectSpeed "25" seta g_redCrosshairs "1" seta g_useGear "1" seta g_useholdspawndelay "500" seta g_voiceChatTalkingDuration "500" seta g_voteAbstainWeight "0.5" seta hud_deathQuoteFadeTime "1000" seta hud_enable "1" seta hud_fade_ammodisplay "1.7" seta hud_fade_compass "0" seta hud_fade_healthbar "0" seta hud_fade_offhand "1.7" seta hud_fade_sprint "1.7" seta hud_fade_stance "1.7" seta hud_fadeout_speed "0.1" seta hud_flash_period_offhand "0.5" seta hud_flash_time_offhand "2" seta hud_health_pulserate_critical "0.5" seta hud_health_pulserate_injured "1" seta hud_health_startpulse_critical "0.33" seta hud_health_startpulse_injured "1" seta in_mouse "1" seta loc_forceEnglish "0" seta loc_language "0" seta m_filter "0" seta m_forward "0.25" seta m_pitch "0.022" seta m_side "0.25" seta m_yaw "0.022" seta monkeytoy "0" seta name "Morphic Jackzor" seta net_noipx "0" seta net_noudp "0" seta net_socksEnabled "0" seta net_socksPassword "" seta net_socksPort "1080" seta net_socksServer "" seta net_socksUsername "" seta r_aaAlpha "dither (fast)" seta r_aaSamples "1" seta r_altModelLightingUpdate "1" seta r_aspectRatio "auto" seta r_autopriority "0" seta r_customMode "" seta r_debugLineWidth "1" seta r_depthPrepass "0" seta r_displayRefresh "120 Hz" seta r_distortion "0" seta r_dlightLimit "0" seta r_dof_enable "0" seta r_drawDecals "1" seta r_drawSun "1" seta r_drawWater "1" seta r_fastSkin "0" seta r_fullscreen "1" seta r_gamma "2.11458" seta r_glow_allowed "0" seta r_ignorehwgamma "0" seta r_inGameVideo "1" seta r_lodBiasRigid "0" seta r_lodBiasSkinned "0" seta r_lodScaleRigid "1" seta r_lodScaleSkinned "1" seta r_mode "1024x768" seta r_monitor "0" seta r_multiGpu "1" seta r_picmip "0" seta r_picmip_bump "0" seta r_picmip_manual "0" seta r_picmip_spec "0" seta r_picmip_water "0" seta r_polygonOffsetBias "-1" seta r_polygonOffsetScale "-1" seta r_portalBevels "0.7" seta r_preloadShaders "0" seta r_rendererPreference "Default" seta r_specular "0" seta r_texFilterAnisoMax "4" seta r_texFilterAnisoMin "1" seta r_texFilterMipMode "Unchanged" seta r_vsync "0" seta r_zFeather "0" seta ragdoll_enable "0" seta ragdoll_max_simulating "16" seta rate "25000" seta sensitivity "5" seta server1 "" seta server10 "" seta server11 "" seta server12 "" seta server13 "" seta server14 "" seta server15 "" seta server16 "" seta server2 "" seta server3 "" seta server4 "" seta server5 "" seta server6 "" seta server7 "" seta server8 "" seta server9 "" seta sm_enable "0" seta sm_maxLights "4" seta snaps "30" seta snd_cinematicVolumeScale "0.85" seta snd_enableEq "1" seta snd_errorOnMissing "0" seta snd_khz "44" seta snd_levelFadeTime "250" seta snd_outputConfiguration "5.1 speakers" seta snd_slaveFadeTime "500" seta snd_touchStreamFilesOnLoad "0" seta snd_volume "0.8" seta sv_allowDownload "1" seta sv_floodprotect "4" seta sv_hostname "CoD4Host" seta sv_maxclients "24" seta sv_maxPing "0" seta sv_maxRate "25000" seta sv_minPing "0" seta sv_punkbuster "1" seta sv_reconnectlimit "3" seta sv_voice "1" seta sv_wwwBaseURL "" seta sv_wwwDlDisconnected "0" seta sv_wwwDownload "0" seta sys_configSum "4379996" seta sys_configureGHz "8.6759" seta sys_gpu "NVIDIA GeForce 9800 GTX " seta sys_sysMB "2048" seta ui_bigFont "0.4" seta ui_browserFriendlyfire "-1" seta ui_browserHardcore "-1" seta ui_browserKillcam "-1" seta ui_browserMod "0" seta ui_browserOldSchool "-1" seta ui_browserShowDedicated "0" seta ui_browserShowEmpty "1" seta ui_browserShowFull "1" seta ui_browserShowPassword "-1" seta ui_browserShowPunkBuster "-1" seta ui_browserShowPure "1" seta ui_currentMap "0" seta ui_currentNetMap "0" seta ui_dedicated "0" seta ui_drawCrosshair "1" seta ui_extraBigFont "0.55" seta ui_gametype "0" seta ui_joinGametype "0" seta ui_maxclients "32" seta ui_netGametype "0" seta ui_netGametypeName "dm" seta ui_netSource "1" seta ui_serverStatusTimeOut "7000" seta ui_smallFont "0.25" seta vehDriverViewHeightMax "50" seta vehDriverViewHeightMin "-15" seta vid_xpos "3" seta vid_ypos "22" seta voice_deadChat "0" seta voice_global "0" seta voice_localEcho "0" seta winvoice_mic_mute "1" seta winvoice_mic_reclevel "65535" seta winvoice_mic_scaler "1" seta winvoice_save_voice "0" con_hidechannel *; con_showchannel dontfilter error gamenotify boldgame subtitle obituary logfile_only console_only gfx sound files devgui profile ui client server system playerweap ai anim physics fx leaderboards parserscript script Holy shit Wizid, you need a hobby. Spend some more time in your new bar. Thanks BobNP Wiz Awards
RD Posted October 24, 2011 Member ID: 2520 Group: **- Inactive Registered Users Followers: 5 Topic Count: 50 Topics Per Day: 0.01 Content Count: 627 Content Per Day: 0.11 Reputation: 48 Achievement Points: 3748 Solved Content: 0 Days Won: 0 Joined: 05/23/11 Status: Offline Last Seen: January 16, 2018 Birthday: 08/18/1953 Posted October 24, 2011 Could you say that 1 more time please Wiz? I missed what you said right after......"Tweaks for improved game performance"
Labob Posted October 24, 2011 Member ID: 42 Group: *** Clan Members Followers: 50 Topic Count: 338 Topics Per Day: 0.06 Content Count: 8394 Content Per Day: 1.37 Reputation: 6143 Achievement Points: 54511 Solved Content: 0 Days Won: 14 Joined: 09/01/09 Status: Offline Last Seen: May 28 Birthday: 01/30/1959 Device: Windows Posted October 24, 2011 Jeez and tweak is such a short word Awards
chris4874 Posted October 24, 2011 Member ID: 2491 Group: **- Inactive Registered Users Followers: 0 Topic Count: 37 Topics Per Day: 0.01 Content Count: 354 Content Per Day: 0.06 Reputation: 0 Achievement Points: 2140 Solved Content: 0 Days Won: 0 Joined: 05/11/11 Status: Offline Last Seen: Never Birthday: 04/20/1961 Posted October 24, 2011 since there has been one put up already this is yitch 2 the basis for all config files tweaks but in no way complete but a good place to start, but some bits have to be changed, you cannot have r_lod scale rigid set to 4 it cuts all the veg back and is in my mind a cheat,also set snaps to 30 i think this server works on that?,fps can be set to what you can get,constant setting it to 0 makes it jump far to much for me, if you get 125 fps all the time set it to 125,the maxipackets bit needs to moved around to suit your self my is set to 100,hunkmegs needs changing to your pc specs [half of your ram]fov 80 is great if your pc can hack it[fps hit ] mine is 73, between 65 [stock setting] and 80 works good,set corpse count to 1 some times a game will crash because of it but it has not happened to me [yet lol]set lag to 1 then you can find out if the server is lagging [HERES A HINT IT IS LOL]or you,have fun,this is for cod 4 only and for gods sake back up your config file first,my own config file is a mix of this and lots of team stuff that i found [with frankenstein i am always having to look for an edge] it all works,but it is not cheating in any way[its been checked] you can get kicked [temp] if you try them on some servers,punkbuster is such a cruel mistress lol // yitch2.cfg seta ai_badPathSpam "0" seta ai_corpseCount "0" seta ai_debugAccuracy "0" seta ai_debugCoverSelection "0" seta ai_debugMeleeAttackSpots "0" seta ai_debugThreatSelection "0" seta ai_ShowCanshootChecks "0" seta ai_showClaimedNode "0" seta ai_showRegion "0" seta cg_blood "0" seta cg_brass "0" seta cg_centerPrintY "-60" seta cg_chatHeight "8" seta cg_chatTime "12000" seta cg_connectionIconSize "0" seta cg_crosshairAlpha "1" seta cg_crosshairAlphaMin "0.5" seta cg_crosshairDynamic "0" seta cg_crosshairEnemyColor "1" seta cg_cursorHints "4" seta cg_debugInfoCornerOffset "0 0" seta cg_descriptiveText "1" seta cg_drawBreathHint "1" seta cg_drawCrosshair "1" seta cg_drawCrosshairNames "1" seta cg_drawFPS "Simple" seta cg_drawFPSLabels "1" seta cg_drawFriendlyNames "1" seta cg_drawLagometer "0" seta cg_drawMantleHint "1" seta cg_drawSnapshot "0" seta cg_drawTurretCrosshair "1" seta cg_enemyNameFadeIn "250" seta cg_enemyNameFadeOut "250" seta cg_fov "80" seta cg_friendlyNameFadeIn "0" seta cg_friendlyNameFadeOut "1500" seta cg_gameBoldMessageWidth "390" seta cg_gameMessageWidth "455" seta cg_headIconMinScreenRadius "0.02" seta cg_hintFadeTime "100" seta cg_hudChatIntermissionPosition "5 110" seta cg_hudChatPosition "5 150" seta cg_hudDamageIconHeight "64" seta cg_hudDamageIconInScope "0" seta cg_hudDamageIconOffset "128" seta cg_hudDamageIconTime "2000" seta cg_hudDamageIconWidth "128" seta cg_hudGrenadeIconEnabledFlash "0" seta cg_hudGrenadeIconHeight "25" seta cg_hudGrenadeIconInScope "1" seta cg_hudGrenadeIconMaxHeight "104" seta cg_hudGrenadeIconMaxRangeFlash "500" seta cg_hudGrenadeIconMaxRangeFrag "250" seta cg_hudGrenadeIconOffset "50" seta cg_hudGrenadeIconWidth "25" seta cg_hudGrenadePointerHeight "12" seta cg_hudGrenadePointerPivot "12 27" seta cg_hudGrenadePointerPulseFreq "11" seta cg_hudGrenadePointerPulseMax "3" seta cg_hudGrenadePointerPulseMin "-3" seta cg_hudGrenadePointerWidth "25" seta cg_hudMapBorderWidth "2" seta cg_hudMapFriendlyHeight "15" seta cg_hudMapFriendlyWidth "15" seta cg_hudMapPlayerHeight "20" seta cg_hudMapPlayerWidth "20" seta cg_hudMapRadarLineThickness "0.15" seta cg_hudProneY "-160" seta cg_hudSayPosition "5 126" seta cg_hudStanceHintPrints "0" seta cg_hudVotePosition "5 220" seta cg_invalidCmdHintBlinkInterval "600" seta cg_invalidCmdHintDuration "1800" seta cg_laserLight "0" seta cg_mapLocationSelectionCursorSpeed "0.6" seta cg_marks "1" seta cg_marks_ents_player_only "1" seta cg_overheadIconSize "0.7" seta cg_overheadNamesGlow "0 0 0 1" seta cg_overheadNamesMaxDist "10000" seta cg_overheadNamesSize "0.5" seta cg_overheadRankSize "0.5" seta cg_predictItems "1" seta cg_scoreboardBannerHeight "35" seta cg_scoreboardHeaderFontScale "0.3" seta cg_scoreboardHeight "435" seta cg_scoreboardItemHeight "18" seta cg_scoreboardPingHeight "0.7" seta cg_scoreboardPingWidth "0.036" seta cg_scoreboardRankFontScale "0.25" seta cg_scoreboardScrollStep "3" seta cg_scoreboardWidth "400" seta cg_ScoresPing_BgColor "0.25098 0.25098 0.25098 0.501961" seta cg_ScoresPing_HighColor "0.8 0 0 1" seta cg_ScoresPing_Interval "100" seta cg_ScoresPing_LowColor "0 0.74902 0 1" seta cg_ScoresPing_MaxBars "4" seta cg_ScoresPing_MedColor "0.8 0.8 0 1" seta cg_scriptIconSize "0" seta cg_sprintMeterDisabledColor "0.8 0.1 0.1 0.2" seta cg_sprintMeterEmptyColor "0.7 0.5 0.2 0.8" seta cg_sprintMeterFullColor "0.8 0.8 0.8 0.8" seta cg_subtitleMinTime "3" seta cg_subtitles "1" seta cg_subtitleWidthStandard "520" seta cg_subtitleWidthWidescreen "520" seta cg_teamChatsOnly "0" seta cg_viewZSmoothingMax "16" seta cg_viewZSmoothingMin "1" seta cg_viewZSmoothingTime "0.1" seta cg_voiceIconSize "0" seta cg_weaponCycleDelay "0" seta cg_weaponHintsCoD1Style "1" seta cg_youInKillCamSize "6" seta cl_allowDownload "1" seta cl_anonymous "0" seta cl_connectionAttempts "10" seta cl_freelook "1" seta cl_maxpackets "30" seta cl_maxPing "800" seta cl_mouseAccel "0" seta cl_packetdup "1" seta cl_pitchspeed "140" seta cl_punkbuster "1" seta cl_voice "1" seta cl_wwwDownload "1" seta cl_yawspeed "140" seta com_hunkMegs "1024" seta com_introPlayed "1" seta com_maxfps "0" seta com_recommendedSet "1" seta compassClampIcons "1" seta compassCoords "740 3590 400" seta compassDebug "0" seta compassECoordCutoff "37" seta compassFriendlyHeight "15" seta compassFriendlyWidth "15" seta compassMaxRange "2500" seta compassMinRadius "0.0001" seta compassMinRange "0.0001" seta compassObjectiveArrowHeight "16" seta compassObjectiveArrowOffset "2" seta compassObjectiveArrowRotateDist "5" seta compassObjectiveArrowWidth "16" seta compassObjectiveDrawLines "1" seta compassObjectiveHeight "16" seta compassObjectiveIconHeight "16" seta compassObjectiveIconWidth "16" seta compassObjectiveMaxHeight "70" seta compassObjectiveMaxRange "2048" seta compassObjectiveMinAlpha "1" seta compassObjectiveMinHeight "-70" seta compassObjectiveNumRings "10" seta compassObjectiveRingSize "64" seta compassObjectiveRingTime "10000" seta compassObjectiveTextHeight "18" seta compassObjectiveTextScale "0.3" seta compassObjectiveWidth "16" seta compassPlayerHeight "15" seta compassPlayerWidth "15" seta compassRadarLineThickness "0.4" seta compassRadarPingFadeTime "4" seta compassRadarUpdateTime "4" seta compassRotation "1" seta compassSize "1" seta compassSoundPingFadeTime "2" seta compassTickertapeStretch "0.5" seta con_errormessagetime "8" seta con_gameMsgWindow0FadeInTime "0.25" seta con_gameMsgWindow0FadeOutTime "0.5" seta con_gameMsgWindow0Filter "gamenotify obituary" seta con_gameMsgWindow0LineCount "4" seta con_gameMsgWindow0MsgTime "5" seta con_gameMsgWindow0ScrollTime "0.25" seta con_gameMsgWindow0SplitscreenScale "1.5" seta con_gameMsgWindow1FadeInTime "0.25" seta con_gameMsgWindow1FadeOutTime "0.5" seta con_gameMsgWindow1Filter "boldgame" seta con_gameMsgWindow1LineCount "5" seta con_gameMsgWindow1MsgTime "8" seta con_gameMsgWindow1ScrollTime "0.25" seta con_gameMsgWindow1SplitscreenScale "1.5" seta con_gameMsgWindow2FadeInTime "0.25" seta con_gameMsgWindow2FadeOutTime "0.5" seta con_gameMsgWindow2Filter "subtitle" seta con_gameMsgWindow2LineCount "7" seta con_gameMsgWindow2MsgTime "5" seta con_gameMsgWindow2ScrollTime "0.25" seta con_gameMsgWindow2SplitscreenScale "1.5" seta con_gameMsgWindow3FadeInTime "0.25" seta con_gameMsgWindow3FadeOutTime "0.5" seta con_gameMsgWindow3Filter "" seta con_gameMsgWindow3LineCount "5" seta con_gameMsgWindow3MsgTime "5" seta con_gameMsgWindow3ScrollTime "0.25" seta con_gameMsgWindow3SplitscreenScale "1.5" seta con_inputBoxColor "0.25 0.25 0.2 1" seta con_inputHintBoxColor "0.4 0.4 0.35 1" seta con_matchPrefixOnly "1" seta con_minicon "0" seta con_miniconlines "5" seta con_minicontime "4" seta con_outputBarColor "1 1 0.95 0.6" seta con_outputSliderColor "0.15 0.15 0.1 0.6" seta con_outputWindowColor "0.35 0.35 0.3 0.75" seta con_restricted "0" seta con_typewriterColorGlowCheckpoint "0.6 0.5 0.6 1" seta con_typewriterColorGlowCompleted "0 0.3 0.8 1" seta con_typewriterColorGlowFailed "0.8 0 0 1" seta con_typewriterColorGlowUpdated "0 0.6 0.18 1" seta con_typewriterDecayDuration "700" seta con_typewriterDecayStartTime "6000" seta con_typewriterPrintSpeed "50" seta drew_notes "1" seta dynEnt_active "1" seta fx_draw "1" seta fx_drawClouds "1" seta fx_marks "0" seta fx_marks_ents "0" seta fx_marks_smodels "0" seta fx_sort "0" seta g_allowvote "1" seta g_antilag "1" seta g_banIPs "" seta g_clonePlayerMaxVelocity "80" seta g_deadChat "1" seta g_dropForwardSpeed "10" seta g_dropHorzSpeedRand "100" seta g_dropUpSpeedBase "10" seta g_dropUpSpeedRand "5" seta g_log "games_mp.log" seta g_logSync "0" seta g_oldVoting "1" seta g_playerCollisionEjectSpeed "25" seta g_redCrosshairs "1" seta g_useGear "1" seta g_useholdspawndelay "500" seta g_voiceChatTalkingDuration "500" seta g_voteAbstainWeight "0.5" seta hud_deathQuoteFadeTime "1000" seta hud_enable "1" seta hud_fade_ammodisplay "0" seta hud_fade_compass "0" seta hud_fade_healthbar "2" seta hud_fade_offhand "8" seta hud_fade_sprint "1.7" seta hud_fade_stance "1.7" seta hud_fadeout_speed "0.1" seta hud_flash_period_offhand "0.5" seta hud_flash_time_offhand "2" seta hud_health_pulserate_critical "0.5" seta hud_health_pulserate_injured "1" seta hud_health_startpulse_critical "0.33" seta hud_health_startpulse_injured "1" seta in_mouse "1" seta loc_forceEnglish "0" seta loc_language "0" seta m_filter "0" seta m_forward "0.25" seta m_pitch "0.022" seta m_side "0.25" seta m_yaw "0.022" seta monkeytoy "0" seta mss_khz "44" seta net_noipx "0" seta net_noudp "0" seta net_socksEnabled "0" seta net_socksPassword "" seta net_socksPort "1080" seta net_socksServer "" seta net_socksUsername "" seta pb_sleep "500" seta r_aaAlpha "off" seta r_aaSamples "1" seta r_altModelLightingUpdate "1" seta r_aspectRatio "auto" seta r_autopriority "0" seta r_colorbits "32" seta r_compressmodels "1" seta r_customMode "" seta r_debugLineWidth "1" seta r_depthbits "32" seta r_depthPrepass "0" seta r_depthPrepassModels "0" seta r_detail "0" seta r_distortion "0" seta r_dlightLimit "0" seta r_dof_enable "0" seta r_drawDecals "0" seta r_drawSun "0" seta r_drawWater "0" seta r_ext_compiled_vertex_array "1" seta r_ext_compress_textures "1" seta r_ext_compressed_textures "1" seta r_ext_multitexture "1" seta r_ext_NV_fog_dist "0" seta r_ext_texture_env_add "1 " seta r_ext_texture_filter_anisotropic "0" seta r_ext_transform_hint "1" seta r_fastSkin "1" seta r_fastsky "1" seta r_fog "1" seta r_forceLod "none" seta r_fullscreen "1" seta r_gamma "1.50" seta r_glow "1" seta r_glow_allowed "0" seta r_gpuSync "adaptive" seta r_ignorehwgamma "0" seta r_inGameVideo "0" seta r_lodBias "0" seta r_lodBiasRigid "0" seta r_lodBiasSkinned "0" seta r_lodScale "1" seta r_lodScaleRigid "4" seta r_lodScaleSkinned "4" seta r_monitor "0" seta r_multiGpu "0" seta r_normal "0" seta r_nv_fence "0 " seta r_nv_fog_available "0" seta r_nv_fog_dist "0" seta r_nv_fogdist_mode "GL_EYE_RADIAL_NV" seta r_nv_register_combiners "0 " seta r_nv_texture_shader "0" seta r_nv_vertex_array_range "0 " seta r_optimize "1" seta r_optimizeLightmaps "1" seta r_optimizeXModels "5" seta r_outdoor "1" seta r_outdoorAwayBias "32" seta r_outdoorDownBias "0" seta r_outdoorFeather "8" seta r_picmip "3" seta r_picmip_bump "3" seta r_picmip_manual "1" seta r_picmip_spec "3" seta r_picmip_water "1" seta r_polygonOffsetBias "-1" seta r_polygonOffsetScale "-1" seta r_portalBevels "0.7" seta r_preloadShaders "1" seta r_rendererInUse "Shader model 2.0" seta r_rendererPreference "Shader model 2.0" seta r_specular "0" seta r_subdivisions "999" seta r_sunflare_max_size "669.9" seta r_swapInterval "0" seta r_texFilterAnisoMax "1" seta r_texFilterAnisoMin "3" seta r_texFilterMipMode "Unchanged" seta r_texturebits "32" seta r_vsync "0" seta r_zFeather "0" seta ragdoll_enable "0" seta ragdoll_max_simulating "0" seta rate "25000" seta sc_enable "0" seta sm_enable "0" seta sm_maxLights "1" seta sm_spotEnable "1" seta snaps "20" seta snd_bits "16" seta snd_cinematicVolumeScale "0.85" seta snd_debugReplace "0" seta snd_drawEqChannels "0" seta snd_drawEqEnts "0" seta snd_enableEq "0" seta snd_errorOnMissing "0" seta snd_khz "44" seta snd_levelFadeTime "250" seta snd_outputConfiguration "Windows default" seta snd_slaveFadeTime "500" seta snd_touchStreamFilesOnLoad "0" seta snd_volume "0.8"
Ruggerxi Posted October 24, 2011 Member ID: 6 Group: ++++ Senior Admin Followers: 191 Topic Count: 2840 Topics Per Day: 0.46 Content Count: 12675 Content Per Day: 2.07 Reputation: 14170 Achievement Points: 108781 Solved Content: 0 Days Won: 155 Joined: 09/01/09 Status: Offline Last Seen: 14 hours ago Birthday: 08/25/1976 Device: iPhone Author Posted October 24, 2011 Thank you! Awards
Unchileno Posted October 24, 2011 Member ID: 101 Group: *** Clan Members Followers: 110 Topic Count: 765 Topics Per Day: 0.12 Content Count: 8142 Content Per Day: 1.33 Reputation: 6780 Achievement Points: 61634 Solved Content: 0 Days Won: 14 Joined: 09/02/09 Status: Offline Last Seen: June 4 Birthday: 01/23/1974 Device: Android Posted October 24, 2011 bobbarker WiZiD bobbarker WiZiD Tweaks for improved game performance. Call of duty ______________________________ Console Commands: *Enable Console first in options* then type in the following then hit enter. *First things first*: (back up your "normal" config) found here for *XP C:\Documents and Settings\<USERNAME>\Local Settings\Application Data\Activision\CoDWaW\players\profiles\<playername> Vista is in a similar place 1) Punkbuster Sleep setting: /pb_sleep 500 (tells punkbuster client software to wait longer before awakening and sending info to PB) Save PB setting to config: /pb_writecfg (makes the above setting permanent so you don’t have to do it each time you log in) - The above changes the frequency that your PC reports to the server and thus reduced frequency of network spikes and the associated latency. 2) Packet transfer setting: /cl_maxpackets 100 - This setting helps smooth out data transfer and should help if you have a cable or other high speed connection. This setting works in conjunction with the com_maxfps 125 setting. 3) Send duplicate packets: /cl_packetdup 0 or 1 - Manage whether or not extra or duplicate packets are sent to the server.(1 is default and this sends an extra packet of data in case the first one is lost. If you enable the lagometer (see tools below), then you can see if you are losing any packets.If yes, then leave this at 1. If no, you can consider changing to 0. 4) Snaps: /snaps This is possibly the most important setting for getting a good connection. Snaps setting determines how many updates you recieve from the server. 20 to 30 for 56K connects in quake series 40 for high speed internet im sure the same for cod. (30 is fine). 5) Enable higher Frames Per Second (FPS): /com_maxfps 125 (Default is 85 so this may help overall FPS. Some say this should be set at or just above your average FPS to smooth things out) - This allows your game to go allow higher frame rates than the default. Set it to a value you want based on the capabilities of you machines… to unlock FPS completely and see what you machine is capable of set to 0, it can go as high as 1000. 6) Field of View (FOV): /cg_fov 80 7)Shadows: /sm_enable 0 Turns off unique Shadows ingame 8)Depth of Field: /seta r_dof_enable "0" Gets rid of the "blur" around you gun and clears your perperipheral vision. - If you want to widen your FOV (field of view) from 65 degrees to 80 degrees, use this command. NOTE: This basically “backs you up” to give you a larger viewing area at the sides but it does make user/soldiers/enemies slightly smaller at the same time. This command does not affect machine performance and is merely a preference to give you the ability to see more. In game tools: ______________ 1) Show framerate on screen so you can see how your PC is performing: /cg_drawFPS 1 (choices are 1,2,or 3 where 0 = off / 1 = on) - At a minimum, you need to try to be above 60FPS so that you have no visual choppiness. Reduce textures, shadows, lighting etc. 2) Show network connection quality: /cg_drawlagometer 1 (puts a graph just above your grenades icon on screen) - Top meter on graph. GFX shown in Blue, (or blue with small amounts of yellow) then you system is in synch and your screen/system is refreshing in sync with the server’s perspective of the game world. If Yellow, then you are having issues and your screen/system may not be in synch with what the server thinks is happeing.. noticable lag bad hit rego. The blue shows how well your graphics card is staying in sync with the server as it relates to rendering the gaming environment. A few yellow items is OK but you want the vast majority to be blue. If you have a lot of yellow, this means that your graphics rendering and server rendering of the gameworld is out of sync.The smoother the flow on this meter, the better, the faster the higher your FPS is. - Bottom meter should be all or mostly green. Lots of yellow or red means there are issues. When you spawn or die, you can sometimes see lots of RED , this seems to be OK. If you are all green, then you can consider changing your cl_packetdup to 0 and you can increase your cl_maxpackets _________________________________ Performance improvements summary: *Enable Console first in options* Punkbuster Sleep setting: /pb_sleep 500 Save PB setting to config: /pb_writecfg Packet transfer setting: /cl_maxpackets 100 Send duplicate packets: /cl_packetdup 0 or 1 Max FPS: /com_maxfps 125 Field of View (FOV): /cg_fov 80 Draw your FPS on screen: /cg_drawfps 1 Draw your Lagometer on screen: /cg_drawlagometer 1 Shell Casings: /cg_brass o gets rid of the shell casings being ejected Shadows: /sm_enable 0 Turns off unique Shadows ingame __________________________________________________ Notes:*CG FOV :: Field of view, where the value is the angle of the circular arc that is displayed on your screen. High values will make the game appear "fisheyed". *MAX FPS :: This command limits your maximum FPS. You may ask why you would want to do this, and the answer is that it will help the server from having lag confusion when your frame rate has a sudden rise or fall. Run a timedemo, collect your average FPS and use that as the limit for when you play on-line. *MAXPACKETS :: This setting puts a limit on the maximum amount of packets that can be sent to the server via the client. This setting is useful for people with slower modems. Obviously we all have high speed connects so set to at least 100. Lower maxpacket settings i.e 30 lowers ping on screen but at the cost of registration. */sm_enable 0: Turns off unique Shadows ingame, it boosts FPS more than most commands. That's about it for now if I think of anything to add to this I will update the thread with a new reply post. Enjoy, try it out and give some feedback if things are better. Check here to see if your machine is up to the task of CoDWaW > http://www.systemrequirementslab.com/referrer/activision2?registration_option_id=7974 thankx, Introduction: For the last couple weeks, during beta, I have been digging deep under the hood of Crysis. I thought it would be fitting that I share my findings and move my guide to the community that I have waited with for Crysis for so long. I hope you enjoy it and that it helps you with basic and advanced tweaking in the days ahead. This will continue to be a work in progress. I will cover both some basic and advanced tweaking. I'll share the settings that I have found to be the most performance hungry and what you can do to get performance back or increase quality without draining performance too much. Then we will dig deep into one of the most, if not the most, tweakable games on the planet. We will also surpass very high settings with ultra for the uber machines as the guide fleshes out. BASIC TUNING Basic computer performance: I don't want to recreate the wheel but their are many things to do to increase performance in games with your computer. Details on how to do these things can be found by doing a google search for any of the following. * Latest drivers for your video card, motherboard, sound card can improve things greatly at times. * Defrag your hard drive. It's prefferable to defrag 'before' installing so that the files stay close together and contiguous. * If you only have 512MB or 1GB memory, 2GB is highly recommended. * Go into your driver control panel to make sure antialiasing(AA) or anisotropic filtering(AF) is not enabled unless you want them to be, they effect performance alot. Also you can change texture filtering quality to provide more performance in the drivers. * If you are running Vista make sure to be using the current hotfixes, some effect performance and memory usage tremendously. Nvidia has a great list of recommended ones here: Vista hotfixes * A video card like an 8800 GT for $250 will provide tremendous results if you haven't upgraded in a long time. * Disabling any unneeded running process, especially antivirus, while playing is recommended. Resolution: Resolution has a large impact because the game has so much geometry that the fillrate demands of large resolutions is beyond what people are used to. If you can lower resolution this will help gain many fps and provide smoother play. If you have an LCD you need to use what is called 1:1 pixel mapping, or otherwise known as disabling scaling. This allows the image to shrink but the quality of the image stays incredibly good. Scaling on the other hand, always looks bad if using anything other than your native resolution. Scaling can be disabled on some monitors. If your monitor doesn't support this feature some drivers support it. With nvidia you can disable it like so, image provided. So shrinking the image while maintaining incredible quality works well for performance, you can always slide your monitor closer you then won't notice the image is smaller. Custom resolutions can be used by using 'r_width=x' and 'r_height=x'. See below on advanced tweaking on how to use variables. In-Game Settings: The settings that have the biggest effect on performance are firstly shaders. This game is one of the most shader intensive games on the market. Going from high to medium shader settings works real well in giving an average of anywhere from 7-10 fps or more, depending on some variables. Next are Shadows and Post Processing. Shadows from high to medium looks very good still and provide a good boost of performance. Post processing has a big effect as well. The thing that people notice most about post processing is motion blur and depth of field. These can be easily turned on/off individually if desired seperate from the post process drop down box, as will be seen in the advanced tweaking section. Textures setting affects video memory usage quite a bit which we will look at next. Video Memory: Using beyond the amount of memory that is locally on the video card will produce performance problems like stuttering and hitching due to having to fetch data from system RAM over the much higher latency PCI express bus. In other words, adjust settings/resolution in the game not to exceed your video RAM, otherwise you will experience overall performance issues and the periodic flickering of geometry and LOD's as it streams in. The game is very video memory intensive. Resolution and AA effect the amount of video memory the game uses tremendously. Here is a breakdown of video memory across different settings and resolutions. * Windows XP * Nvidia Driver 169.01 1280x1024 medium * NoAA 184MB * 2xAA 295MB * 4xAA 355MB * 8xAA 395MB 1280x1024 high * NoAA 315MB * 2xAA 375MB * 4xAA 440MB * 8xAA 470MB -Texture medium- * NoAA 300MB * 2xAA 363MB * 4xAA 423MB * 8xAA 445MB 1680x1050 medium * NoAA 223MB * 2xAA 375MB * 4xAA 455MB 1680x1050 high * NoAA 368MB * 2xAA 456MB * 4xAA 535MB -Texture medium- * NoAA 340MB * 2xAA 428MB * 4xAA 505MB 1920x1200 Medium * NoAA 240MB * 2xAA 430MB * 4xAA 535MB 1920x1200 High * NoAA 400MB * 2xAA 515MB * 4xAA 615MB -Texture Medium- * NoAA 370MB * 2xAA 475MB * 4xAA 585MB AA clearly makes a large impact in video memory. Different game levels may change these numbers. Changing textures from medium to low makes no appreciable difference since it is still using the lowspec pak. The devs have made huge advances in optimizing this area since earlier builds of the game, either that or the textures are quite lower in quality, infact these are the numbers medium textures used to give as if high textures are missing. Final shipping game may reflect differences here, will update accordingly. The textures setting alone no longer makes the difference it did in earlier builds regardless of high/medium/low setting, which again seems to give some indication higher textures have been removed temporarily or entirely. Breakdown by video card memory: 256MB Video - 1680x1050 medium without AA or 1280x1024 medium with AA. 8800 GTS 320MB - Handles up 1680x1050 medium no aa, can go to high with some thrashing. Only AA at 1280x1024 looks to be viable with that memory limit. 512MB Video - Comes into it's first wall at 1680x1050 4xAA on high. Performance and not memory will impact you here. 8800 GTS 640MB - Handles up to 1920x1200 4x AA (All High). performance makes that out of reach on todays HW. 768MB and above - Memory will not be your limiting factor unless going to 2560x1600 with AA. Your GPU handling the raw processing of the geometry and shaders at that high resolution will be out of reach. I don't doubt that 1GB can be reached by tweaking Crysis and high resolutions with max AA on tomorrows HW. I already have found ways to approach 650MB at only 1280x1024. Basic video memory tips: * Find your video memory ceiling with resolution and texture setting first. Then adjust other parts of the game that are affecting raw performance like shaders or shadows until you get your acceptable performance. If you don't properly anticipate video memory usage, you won't realize why it is hitching on you, regardless of other settings. * You don't have to turn everything to medium to conserve memory, textures have the biggest effect by far. * Remember as more players enter the map this memory will climb a bit, as well as larger out door levels. Also as you stay in the game for a while this number will rise a little. I cached all the outdoors, but not the indoors. * Adding any tweaks for higher quality, especially along the lines of LOD or view distance, has the potential to raise memory usage even further. * The higher you go over your limit, the worse performance, texture stuttering, hitching and popping of geometry will become. * If your resolution doesn't appear just use something close, like 1680x1050 is close to 1600x1200. Benchmarking: Crysis came with two benchmarks to test and compare your performance. A GPU benchmark and a CPU benchmark stressing physics. They can be found in the Bin32 or Bin64 folders. Just double click on them to start. The game will run through 4 loops of the benchmark. When it's done it will show you the results, I suggest you ignore the first one since it was just caching the level and assets on the first run. You can make your own benchmarks but for now these two work well as standard tests. See the benchmarking tool mentioned in post 3 for an improved benchmarking experience. Antialiasing and Anisotropic filtering in Crysis First of all AA is a serious performance drain. More so than other games because of the incredible amount of triangles and polys in the scene. AA is only recommended for the highest end GPU's and keep in mind high resolutions will be more intensive. So if you choose to use it then keep in mind the video memory that will be used (shown above). There is some interesting information starting to come out about AA. Apparently it is preferred to use the in-game AA settings as the proper way to use AA. In other words, don't use the driver control panel but control it from in game. Additionally, HardOCP in their recent 8800GT review had this quote. "This comes directly from NVIDIA’s James Wang on the use of Transparency Antialiasing in Crysis: ” Crysis handles foliage very differently from normal engines so TRMS/SS won't work. Bit of a shame really. The game has some built-in foliage AA, but it only kicks in in "Very high" quality mode.”" I am actually pretty sure it can be enabled at high as well, not just very high. High and very high shader settings are compatible with in game AA, while low and medium shaders are not. Regardless of in game shader settings if AA is enabled, High shaders will also need to be enabled. If AA is currently enabled, but shaders is set to medium or low, AA will automatically be disabled by the game. So it will take a good medium to high end card to use AA not only because AA is demanding on it's own but because you will need to run atleast high shaders as well. As to Anisotropic Filtering, it can only be enabled in the driver settings. Unfortunately there is a bug with the nvidia drivers that makes a white halo around distant bushes and trees. I believe this bug only shows itself on a particular. This apparently will be fixed with a future driver. Vsync Vsynch can be enabled in the game with r_vsync = 1. It is off by default. ADVANCED TWEAKING Customizing the game: The in-game settings are like using a paint roller on a canvas, while tweaking is like the fine brush of the artist. The roller gets the job done but it's not going to be as fulfilling as it could be. You need a fine brush to make it the way you like. The developers didn't want to burden you with 20 choices of drop down boxes so they instead made those broad strokes for you. Unfortunately the difference in performance and quality between low/medium/high/veryhigh can be staggering. Sometimes a move from high to medium can change 20 variables, but it may not be necessary to change all 20 when only a few really effect performance or quality. The fine strokes will allow you to get exactly what you want and Crytek has really given us the ability to change just about everything in the game you would want. You do not have to sacrifice as much quality for performance as you may think. Sometimes you can keep settings high or medium and change one variable that is the big performance tanker or one setting that brings back some good quality at little cost. Enough intro lets get busy. How to make an autoexec.cfg In the early days of the beta people modified the cvar groups game files because it was the best they knew, if you have heard about this I do not recommend it. It changes the way your in-game settings work permanently and changing to medium or high won't have the desired effect anymore. We later learned that you can make an autoexec.cfg file in the "Crysis SP Demo" folder. Tweaks are made up of Console Variables (cvars for short), a list of the ones currently used by the game can be seen below. In this file you put in the tweaks you want one by one and the game will use them when it starts up. View Performance In Game Place the line r_displayinfo=1 in your autoexec.cfg. This will show you fps, system memory usage(not video), triangle count, etc. Also you can use fraps if you wish to show fps as well as take screenshots and make movies of the game. Enable The Console: By default the devs have disabled the console unless you learn the trick to enable it. You can enable it by adding the line con_restricted=0 to your autoexec.cfg and you can then use tweaks while in game in real time and watch with your own eyes the quality and performance changes. Pull down the console while in game by hitting the ~ (tilde) key. From there you can type in a cvar, without a value, and the game will tell you the current value. If you want to test a tweak, just type it in but instead of using an equals sign to put in a value like in the autoexec.cfg, just use a space. Example in console: r_displayinfo 1 If you have the fps shown in game you will see the performance effect of different settings. Enhancing on DX9: It is a very tweakable game. Crytek have given us the ability to tweak many many things to reach Very High equivalent settings and even far far beyond. I will give you a break down of every exact Very High setting(used in DX10) for reference. This is the real list of every setting and their values. So you can use this list and mimic exactly very high in DX9 to the fullest extent possible. Just add this list to an autoexec.cfg and you will have very high for DX9. sys_spec_GameEffects = 3 sys_spec_ObjectDetail = 3 sys_spec_Particles = 3 sys_spec_Physics = 3 sys_spec_PostProcessing = 3 sys_spec_Quality = 3 sys_spec_Shading = 3 sys_spec_Shadows = 3 sys_spec_Texture = 3 sys_spec_VolumetricEffects = 3 sys_spec_Water = 3 e_foliage_wind_activation_dist = 25 e_max_entity_lights = 16 e_obj_quality = 4 e_particles_max_emitter_draw_screen = 32 e_particles_quality = 4 e_shadows_cast_view_dist_ratio = 0.8 e_vegetation_sprites_distance_ratio = 1.5 e_view_dist_ratio_detail = 30 e_view_dist_ratio_vegetation = 45 e_water_ocean_fft = 1 e_water_tesselation_amount = 10 es_DebrisLifetimeScale = 1 g_battleDust_enable = 1 g_breakage_particles_limit = 250 g_ragdollDistance = 40 g_ragdollMinTime = 15 q_Renderer = 3 q_ShaderFX = 3 q_ShaderGeneral = 3 q_ShaderGlass = 3 q_ShaderHDR = 3 q_ShaderIce = 3 q_ShaderMetal = 3 q_ShaderPostProcess = 3 q_ShaderShadow = 3 q_ShaderSky = 3 q_ShaderTerrain = 3 q_ShaderVegetation = 3 q_ShaderWater = 3 r_BeamsDistFactor = .05 r_BeamsMaxSlices = 200 r_ColorGrading = 1 r_DepthOfField = 2 r_DetailNumLayers = 2 r_DynTexAtlasSpritesMaxSize = 32 r_MotionBlur = 4 r_ShadowJittering = 2.5 r_SSAO_quality = 2 r_SSAO_radius = 2 r_sunshafts = 1 r_TexAtlasSize = 2048 r_Usepom = 1 r_WaterReflectionsQuality = 3 r_WaterUpdateDistance = 0.2 In Game Settings: This chart shows the breakdown of "every" console variable that is changed by the in-game settings. It color codes every different type of in game menu(textures, game quality, shadows,etc) and shows you what variables actually change, when you change a drop down menu in the game, and what values they change to. To see more console variables that cannot be changed in game and to see all the definitions of the settings, follow the links below the image. See the full real size image with definitions and many more settings here. This list is a great starting point for your own tweaking adventure to mix and match settings as you like. Remember you can try most of them while in game in realtime in the console and see the effect on quality and performance. Get the original Excel spreadsheet for your own personal use here. You can copy/paste right into the game console. How do I do start?: summary You can start by making an autoexec.cfg in the main game folder. Add two settings to start. Just copy/paste them. r_displayinfo=1 con_restricted=0 Now you can open the console and start trying tweaks that look interesting one by one. Use your autoexec.cfg and fill it with the tweaks you like. When you check your in game settings it will show 'custom' if you have tweaks in your autoexec affecting that menu section. I will detail some of the ones I think are cool here next. Quality Comparisons: Some notable settings that effect quality. LIGHT AND WATER: r_sunshafts = 1 turns on the hidden feature of light shafts that dance through trees and past objects. Available in game through Very High in-game setting. The bottom is default all High in-game settings, the top is r_sunshafts = 1. Comparison pics... The following 3 settings work along with sun shafts... r_Beams - Toggles the volumetric light beams. Default is 3, it’s an optimized beam with glow support. 0 disables beams, 2 uses fake beams with probably beneficial performance (performance untested). 1 is the best and uses the real full resolution beams but it is slower. r_BeamsDistFactor - Distance between slices. Default is 0.01 in meters(likely reserved for Ultra High) and is likely the best setting for beams making it through the densest vegetation. You can try it and see what you like best (currently medium and high use 0.5, low uses 1). r_BeamsMaxSlices - Number of volumetric slices allowed per light beam. Default is 200 (reserved for very high specs). The max here is 300, so go ultra if you think you can really handle the performance hit. e_water_ocean_fft - Activates fft based ocean algorithm. Produces realistic wave undulation for the best quality and most realistic water. Everything is the same with water except undulation. This algorithm was used in movies like Titanic and Waterworld so it's very realistic. Screenshots wouldn't really show the difference but I have a short movie, it hardly does it justice, but atleast you can see the wave difference. FFA Water movie comparison 4MB TEXTURES & LOD: Distant LOD (level of detail) of textures and vegetation is probably my favorite section because it’s most noticeable as you look across the map and walk about. e_detail_materials_view_dist_xy - Max view distance of terrain XY materials. This is things like certain cliffs and other materials horizontal LOD in game. e_detail_materials_view_dist_z - Max view distance of terrain Z material. This is things like certain cliffs and other materials vertical LOD in game. This one doesn't need to be raised high, 256 or 512 max. (In the GPU benchmark when coming in from the sky this setting will show itself on vertical LOD). A picture is worth a thousand words on how these two work... Note: For the mountains to appear crisp like this you will also need r_TexturesStreaming set to 0. r_usepom - Enables Parallax Occlusion Mapping. A type of relief map that gives raised appearance to textures. Very cool but costs about 2 fps and can sometimes cause a fairly insignificant minor blurring of terrain textures in distance. Comparisons... VEGETATION & SPRITES: e_cull_veg_activation - Vegetation activation distance limit, 70 is a good step up from high(50). This is trees setting how far the farthest out can be seen. e_vegetation_sprites_distance_ratio - Allows changing distance on what vegetation switch into sprite. Raising this from 1 to 1.5 cost me about 1 fps in that view. Adds medium tree distance as well as certain near shrubs. Comparisons... e_view_dist_ratio_vegetation - View distance ratio for vegetation. Includes grass and shrubs like ferns and broad leafs, etc. 50 just about eliminates any popping effect with grass and shrubs, costs 1 fps in this scene. Comparisons... Controlling Antialiasing with Tweaks See above section on antialiasing and how it changes shader settings. These are the cvar settings for AA that you can use in your autoexec.cfg file. Only for XP. r_FSAA = 1 - turns on AA 2xAA = r_FSAA_samples = 2, r_FSAA_quality = 0 4xAA = r_FSAA_samples = 4, r_FSAA_quality = 0 8xAA = r_FSAA_samples = 4, r_FSAA_quality = 2 8xAAQ = r_FSAA_samples = 8, r_FSAA_quality = 0 16xAA = r_FSAA_samples = 4, r_FSAA_quality = 4 16xAAQ = r_FSAA_samples = 8, r_FSAA_quality = 2 Additional Background And Things To Know I just want to share on how these work in the game and some more background info to clear up anything hazy. *Make sure you take a look at the full size picture or the spreadsheet for the settings chart, the links are below the chart. They expose many more tweaks, their definitions, and the values that they accept. Know your in game settings. Play with that first to get a comfortable feel of what you like and what is available through the advanced settings menu options. The way the autoexec.cfg variables work is they build on the in-game settings. The in game settings are first loaded, which are stored in the game.cfg in your profile. As the game starts it loads the game.cfg then the autoexec.cfg overrides are loaded with what ever settings you chose. So for instance, you have in game shaders set to medium down from high. But medium changes over 20 settings, well maybe you want the perfomance benefit of most of those but you want Ambient Occlusion back on the terrain (it's a global lighting system to provide realistic lighting). You keep the in game setting at medium but turn on e_terrain_ao = 1 along with r_SSAO=1 which will override the 0 settings in the game. Or maybe you want better better shaders on terrain back to high(3) so q_ShaderTerrain = 3. Whether you like water, sky, terrain, vegetation, view distances....it's all at your finger tips for your preferences. Usually there is only a couple settings that really affect performance alot, the rest can add quality at little cost, the developers just didn't know your video memory, vid card, processor, ram, etc. so they made broader stroke settings than most people needed in certain cases. The tip to remember is that your configs will override and work on top of what is already set in the game menu last time you ran the game. If you prefer there is also way to change the drop down boxes from your autoexec. The sys_spec... settings will change low/medium/high and it will change all the broad stroke settings I color coded in my chart if you change those broad stoke settings. You will know when your autoexec is working because if you look at the game settings it will show custom instead of low/medium/high. Basically, many cvar values are often just a on/off setting for features [0/1] 0 is off, 1 is on. Others may have values that are based on different ranges, the definitions will tell you what most of the limits and ranges are. Some ranges maybe in meters, where others are clearly larger or smaller units of measure. If you see a pattern of numbers like 512/1024 then extrapolate that it's best to stick with the pattern, like those just mentioned for texture sizes and shadow maps. Sometimes you have ratios (as seen in some cvar names), which seem to affect more than one thing and they are likely multiplied internally in the game against some value so they are more broad sweeping. I expose some of the cool cvars with pics above but don't let that keep you from trying new things. Performance of these settings depends on your resolution, your video card, and the complexity of the scene you are looking at. If you are tweaking vegetation find the densist vegetation to see what the hugest impact will be. Same with terrain view distances and textures. In certain scenarios things combine where you are looking through the dense jungle up at the mountain this is good to test combined foliage/texture/view distance tweaks as it will show worst case scenarios. That is the balancing act, but most of the time you in buildings, in water, in vegetation, so you can pretty much raise them irrespective of each other to a degree. This is the point I am at in my configs in perfecting that balance of taking quality to the farthest point where it can mix well with the others. I also like long view distances on objects, I like seeing vehicles, enemies and buildings afar off so you can trade something else for that if you prefer. It's great to use the console and see the settings changed in real time. Just be aware that not all settings can be changed in real time. Either the value will not change and that will be clearly shown in the console, or it appears to change the value in the console but nothing in the game actually changes. In those cases it will be necessary to put the setting in the autoexec.cfg so that the renderer will be able to properly utilize that setting during startup when rendering the scene. There are a couple features restricted to DX10 but mostly they are time of day and geometry shader functions (GS in the cvar), not many at all. Enjoy the playground. More soon... Crysis Performance Reviews: See how different hardware and settings perform. Crysis (Demo Performance)- LegionHardware Crysis Demo Performance Analysis- Tweaktown Crysis demo performance in-depth - TechSpot DirectX 9 performance with the Crysis demo on 10 different cards - AMDZone To be Continued... Last edited by MadBoris (17-11-2007 23:54:33) Offline THIS GUIDE WAS CREATED BY Sven2157 Thought this guide may be useful for some of us here. You can also visit that link to see this same guide. http://www.techsupportforum.com/gaming-forum/pc-gaming-support/349169-optimising-your-system-games.html How to Properly Configure Your Computer for GAMES/PROGRAMS Hello everyone, I am constantly seeing people, all over the internet, with problems running their programs/games on their computers. They ALL are experiencing slow boot times, in game lag, freezing, OOM Errors (Out of Memory), low FPS and numerous other "issues". They are also, consuming A LOT of database space asking the same questions. I will try and consolidate those questions and answers here. So I am writing this "CHECK LIST GUIDE" of common problems and solutions. It contains basic/mandatory system configurations, as well as advanced techniques; thus improving your game play, software development/designing and overall computer performance. All while maintaining the best possible visual experience. ***PLEASE REMEMBER THAT THIS IS A GUIDE! NOT A MUST! ANY CHANGES YOU MAKE TO YOUR SYSTEM, ARE SOLELY YOUR CHOICE AND RESPONSIBILITY! I, NOR THE MODERATORS OF THESE FORUMS, CAN, AND WILL NOT, BE HELD LIABLE FOR YOUR OWN ACTIONS!*** So let's begin... First and Foremost! Please update your Motherboard, BIOS, SMBus/USB/Memory/Video/Audio/Storage Controllers (<--System), Video, Sound, Human Interface Device (HID) Controllers (<--Your Joystick/Gamepad), Mouse and other such drivers. Also run a system Defrag, to defragment your hard drive. This should be done at least monthly; as all of the afore mentioned will resolve 99.9% of the issues experienced by users! Also clear your Temporary files 1. - Click Start..>.."Run.." (Vista Users may not have this enabled <by default>, so the shortcut is "Windows Key+'R') 2. - In the "Run" Box type: %Temp% Your Temporary File Folder will come up. Select ALL, and delete them. Don't worry, they are TEMPORARY FILES. Some programs do not clear these when they are finished, so you have to go manually delete them. This then makes it easier for other programs to store temporary files needed for execution. Getting rid of the stuff you didn't even know was there... O.O(<--BTW I am writing this in notepad and transferring it to the forums; so my smilies my not show up -.-) When you download and install commercial products - Adobe Flash, Adobe Reader, Google Earth, etc, etc - , you have to be mindful what the installer is asking you... This is a common mistake by users. They want the program, but either don't realize that there are other programs "Piggy Backing" in, or don't care. This is where problems begin. "Well, what's wrong with the Google Toolbar?" 8-/ The answer to that is simple: EVERYTHING! These programs seem harmless, and have a very small file size: .4 - 2.5MB. But that is not where the problem lies. Programs like this, and Toolbars especially, are constantly TRANSMITTING data to their prospective authors. This includes where you surf, what you buy, where you live, what time you access the internet, who is logged into the Operating System (<-- BETTER BELIEVE IT! >:-{ ), your ISP, etc, etc. Consequently, this is not only eating up the processing power and RAM of your computer, but now you are losing crucial bandwidth. Ever wonder how "that guy" can come around the corner and just kill you, in FPS games? Because he has a CLEAR connection to the server, and saw you LONG before you knew he was there! "But I like my Toolbar (Google, or other)!" Why? IE7 and FireFox has a Google Search built right into them. They have Pop-Up Blockers, and Auto Complete, as well. Why have redundant software running? So let's get rid of ALL that crap, and free up some drive space! 1. - Click start..>..Control Panel..>..Add/Remove Programs(XP)/Programs and Features(Vista). 2. - Go through the list, when it populates, and remove ANY "extra" programs that you do not use. If you accidently remove something you need, you can certainly get it back. What you are looking for: (not in any particular order) Adobe.com Adobe Updater *Nothing like losing bandwidth, then getting kick out of game because Abode thinks it's more important! Apple Updater Google Chrome *Transmits data continuosly Google Desktop *I would love to slap the guy who invented this! ;-) Google Updater *Big process eater! Transmits data constantly! Google Toolbar MY SEARCH - ANYTHING! *Big process eater! Also Installs Viruses and Malware automatically! Java Updater Yahoo Search Yahoo Mail Yahoo Toolbar Windows Live Installer Windows Live SkyDrive Windows Live Photos MyWeb - ANYTHING! *Big process eater! Continuosly running. HP/Lexmark/Cannon/Kodak - Anything you don't use. As long as you don't delete the driver, your printer/camera/scanner will still function! Dell/Acer/HP/Gateway/eMachines, etc, etc Pre-Installed Manufacturer Programs *These programs are "extra" and cause your system to run slow. Most of them duplicate Windows built in features! Also, look for anything that you don't use or that looks suspicious. Once again, if you remove it, and find you need it, you can get it back! So don't be afraid; Don't be overzealous, either! Now for the real stuff! Processes and Services! These are the real KILLERS! When programs install, they generally write their own rules; as most users don't really know how to respond even when asked! The problem with this is they ALL FIGHT to be NUMERO UNO! They ALL think they are the greatest thing since crawling out of the sea, and growing lungs and legs! :-D So we have to go tell them ALL who the real boss is! YOU, the user! 1. - Click Start..>.."Run..." (Vista Users may not have this enabled <by default>, so the shortcut is "Windows Key+'R') 2. - When the "Run..." Box opens, type: MSCONFIG (<--not case sensative) 3. - When the "System Configuration" window appears, click "Selective startup". 4. - Click the "Services Tab". 5. - ***THIS IS AN IMPORTANT STEP! PAY ATTENTION TO WHAT YOU ARE DOING HERE!*** Click ONLY the "Hide all Microsoft Services" box! 6. - Now the window will only show you 3rd party services that start when Windows starts. However you NEED some of these! Like your Norton/McAffee/AVG Anti-Virus and Internet Security services. Display Drivers/Software, Storage Drivers (i.e. RAID), etc, etc. Trial an error may be the best approach on this tab. Turn a couple off, see where that gets you, then try a couple more. 7. - Now click the "Startup" Tab. You can turn ALL of these off if you want. Once again, READ what you are doing! In the picture below, I leave my RAID, VIDEO and Sidebar on, because I use that to monitor my system. (Vista Users - In the picture below, the 2 "Microsoft® Windows® Operating System" items you see, are for the Sidebar; they are not crucial!) 8. - When you have finished, click "Apply", then "Ok". ***IF YOU DO NOT WANT THE CHANGES TO TAKE AFFECT OR HAVE MADE A MISTAKE, CLICK "CANCEL"!*** The configuaration utility will then prompt you with the following image: 9. - Press "Restart" (Pressing "Exit without Restart" will not reboot your computer. However, when you manually reboot the system changes will take affect!), when the system starts back up, YOU WILL RECIEVE A "SYSTEM CONFIGURATION MESSAGE". Just Check the, "Don't show this again" box and click "Ok". ***IF YOU ARE EXPERIENCING PROBLEMS, REPEAT STEPS 1 AND 2. THIS TIME SELECTING "NORMAL STARTUP"*** Then click "Apply", "Ok", "Restart". This will return all Services and Startup options back to the original settings! OK... Almost there... O.o Now let's get some memory back.... 1. - Right-click My Computer(XP)/Computer(Vista)..>..Choose properties. VISTA USERS ONLY: The "System Properties" Window appears. Click "Advanced system settings". XP USERS: Click "Advanced" Tab. 2. - Click the "Settings" button in the Performance row, to open the "Performance Options" Window. 3. - Select the "Advanced" tab, then click the "Change..." button in the Virtual memory row. 4. - Uncheck the box for "Automatically manage paging file size for all drives" if it is checked. ***The next step requires a judgment on your part. In the above image, I have my "Intial Size" set to 4096MB (<--That's 4 GigaBytes!), and my Maximum size is set to 6114 (<--That's 6 GigaBytes!). HOWEVER! I have a 400GB in RAID 0 "C:\" drive! In other words, I HAVE ROOM TO SPARE! Most of you will want to set this to approximately 2048 Init/3072MB Max; ROUGHLY! ***NOTE: XP Users can only set a MAXIMUM of 4096MB for their Paging Files!*** 5. - Now click "Set". You will be prompted, after clicking "Ok", that you have to reboot, so... Reboot. What did I just do!?!? O.O Good question! You are very smart! ;-) In simple terms... This is going to expand your "Paging File". Windows uses the "Paging File" as "secondary memory", by writing "chunks" of data to the Hard Drive. This way it can recall information faster than searching the rest of the drive. This data is not permanent and is constantly changing. Ever wonder why your hard drive light flashes, even when Windows is idle? Windows allocates (or reserves) RAM and Virtual Memory (<--Paging File) for it's own greedy use; whether or not it actually needs it. This reserve is for system processes and what not. When the size of this is SET by the user, you free up the constant size changing, increasing or reducing, that windows can and will do to make more or less available; consequently allowing more room to write to the drive = freeing up valuable processing threads and RAM. In turn increasing performance. ...and, Lastly... Is the DREADED OOM!!!! This next tweak will prevent the Out Of Memory (OOM) Error. This is EXTREMELY effective when working with Adobe CS Series, AutoDesk Products and Games (Microsoft Flight Simulator Pilots, I am looking in your direction!) that are both Graphic and Processor/RAM intensive. Before I begin, let me briefly descibe what happens here: Windows thinks its the greatest thing since fire! So, on your PC it will block ALL programs from accessing what it thinks, is it's! I.E MEMORY; both RAM and Virtual! Once again, you need to go into the OS and tell it who's BOSS, and only give it what it NEEDS; NOT WHAT IT WANTS! XP needs roughly 512MB, while Vista needs about 1GB to function flawlessly with RAM! About 256MB - 512MB of Virtual for BOTH. It has a "Safe Guard" that will flag programs that try to use more than 2GB of either. When this happens, it sends an error message, "Out of Memory...". To prevent this from happening, and crashing your programs, you need to set this limiter to a higher value. Here is how you do it: On VISTA: (You have to run the command prompt with elevated privlages) 1. Click the Start..>..All Programs..>..Accessories..>..Right-Click the "Command Prompt" and choose "Run as Administrator". 2. At the command line type the following: BCDEDIT(SPACE)/Set(SPACE)IncreaseUserVA(SPACE)nnnn (nnnn = the amount you want to increases by! I have mine set for 4096MB) 3. Hit enter, and get the confirmation. 4. REBOOT 5. Confirm that it worked by running the command prompt, typing: BCDEDIT, hit enter and you will see the /userva switch now.... It will be under the "Windows Boot Loader" as increaseuserva = {value you set} On XP: 1. Right-Click the My Computer..>..Choose "Properties". 2. Click the "Advanced Tab". 3. Click the "Settings" button in the "Startup and Recovery row. 4. click the "Edit" button in the "System startup" row. Now you'll see the boot config. At the very end type /3GB so it looks like this: *** Do Not Copy as your own Boot file [boot loader] timeout=3 default=multi(0)disk(0)rdisk(0)partition(2)\WINDOWS [operating systems] multi(0)disk(0)rdisk(0)partition(2)\WINDOWS="Microsoft Windows XP Home Edition" /fastdetect /NoExecute=OptIn /3GB 5. - Reboot Well Folks, there you go! It will take most of you longer to read this than it will to actually complete these tasks! O.O I hope that this helps! ***IF YOU ARE UNSURE ABOUT ANY OF THE ABOVE, THEN DO NOT PREFORM THESE ACTIONS! ASK HERE FIRST! I, AND THE MODERATORS OF THIS FORUM, ASSUME NO RESPONSIBILITY FOR ANY DAMAGE, LOSS OF DATA/SOFTWARE/HARDWARE, OR OTHER LOSS FOR THE ACTIONS YOU PERSONALLY TAKE!*** Please feel free to ask questions here, if I was not clear on something... Happy Gaming/Programming Sven2157 ADMINS WILL YOU PLEASE STICKY THIS ive had numourous people asking me past few weeks about where my config post went and no one can find it.... Thanks........ ... NOW... on to the config.... FIRST.. COPY everything i paste below the line and open up NOTEPAD on your computer.... PASTE IT INTO NOTEPAD AND SAVE AS CONFIG_MP.CFG .... YOU HAVE TO USE THAT FILE NAME!!!!! Save to your desktop..... now.... make a COPY of your current config.... put in a safe place.... replace the old config with your new one in your cod4 profiles folder........ OPEN GAME...... now i have weird controls... SO SET THE CONTROLS TO WHAT YOU WANT TO USE!!! AND CHANGE THE NAME!!! thats all you have to do.... your ping will drop 10-30 .. your fps will increase by 30-50... and you will move faster.... hit more accurate.... .... -------------------------------------------------------------------------------------------------------------------------------------------------- // generated by Call of Duty, do not modify unbindall bind TAB "+scores" bind ESCAPE "togglemenu" bind SPACE "+gostand" bind 3 "openscriptmenu quickpromod 2" bind 4 "+smoke" bind 5 "+actionslot 3" bind 6 "+actionslot 4" bind 7 "+actionslot 2" bind 8 "openscriptmenu quickpromod 5" bind ` "toggleconsole" bind A "+moveleft" bind B "mp_QuickMessage" bind C "gocrouch" bind D "+moveright" bind E "+leanright" bind F "+activate" bind G "+frag" bind H "ufo" bind K "ufo" bind N "+actionslot 1" bind Q "+leanleft" bind R "+reload" bind S "+back" bind T "chatmodepublic" bind U "noclip" bind V "+melee" bind W "+forward" bind Y "chatmodeteam" bind Z "+talk" bind ~ "toggleconsole" bind PAUSE "toggle cl_paused" bind CTRL "goprone" bind SHIFT "+breath_sprint" bind F1 "vote yes" bind F2 "vote no" bind F4 "+scores" bind F12 "screenshotJPEG" bind KP_HOME "toggle cg_thirdpersonangle 340 320 300 280 260 240 220 200 180 160 140 120 100 80 60 40 20 0" bind KP_UPARROW "timescale 5.0" bind KP_PGUP "toggle cg_draw2D" bind KP_LEFTARROW "timescale 0.5" bind KP_5 "timescale 1" bind KP_RIGHTARROW "timescale 2.0" bind KP_END "toggle cg_thirdpersonangle 0 20 40 60 80 100 120 140 160 180 200 220 240 260 280 300 320 340 " bind KP_DOWNARROW "timescale 0.3" bind KP_PGDN "toggle cg_thirdperson" bind KP_ENTER "toggle g_compassShowEnemies" bind KP_INS "toggle cl_freezedemo" bind KP_DEL "toggle developer" bind KP_SLASH "quit" bind KP_MINUS "toggle cg_thirdpersonrange 1024 800 600 350 120" bind KP_PLUS "toggle cg_thirdpersonrange 120 350 600 800 1024" bind MOUSE1 "+attack" bind MOUSE2 "+toggleads_throw" bind MOUSE3 "+frag" bind MWHEELDOWN "weapnext" bind MWHEELUP "weapnext" seta ai_badPathSpam "0" seta ai_corpseCount "0" seta ai_debugAccuracy "0" seta ai_debugCoverSelection "0" seta ai_debugMeleeAttackSpots "0" seta ai_debugThreatSelection "0" seta ai_ShowCanshootChecks "0" seta ai_showClaimedNode "0" seta ai_showRegion "0" seta airlift_min_spec "0" seta animated_trees_enabled "1" seta bog_b_min_spec "0" seta ai_corpseCount "10" seta cg_blood "0" seta cg_bloodLimit "0" seta cg_bloodLimitMsec "330" seta cg_brass "0" seta cg_centerPrintY "-60" seta cg_chatHeight "8" seta cg_chatTime "12000" seta cg_connectionIconSize "0" seta cg_crosshairAlpha "1" seta cg_crosshairAlphaMin "0.5" seta cg_crosshairDynamic "0" seta cg_crosshairEnemyColor "0" seta cg_cursorHints "4" seta cg_debugInfoCornerOffset "0 0" seta cg_descriptiveText "1" seta cg_drawBreathHint "1" seta cg_drawCrosshair "1" seta cg_drawCrosshairNames "0" seta cg_drawFPS "Simple" seta cg_drawFPSLabels "0" seta cg_drawFriendlyFireCrosshair "1" seta cg_drawFriendlyNames "1" seta cg_drawLagometer "1" seta cg_drawMantleHint "0" seta cg_drawSnapshot "0" seta cg_drawTurretCrosshair "1" seta cg_enemyNameFadeIn "250" seta cg_enemyNameFadeOut "250" seta cg_footsteps "1" seta cg_fov "80" seta cg_friendlyNameFadeIn "0" seta cg_friendlyNameFadeOut "1500" seta cg_gameBoldMessageWidth "390" seta cg_gameMessageWidth "455" seta cg_headIconMinScreenRadius "0.015" seta cg_hintFadeTime "100" seta cg_hudChatIntermissionPosition "5 110" seta cg_hudChatPosition "5 204" seta cg_hudDamageIconHeight "64" seta cg_hudDamageIconInScope "0" seta cg_hudDamageIconOffset "128" seta cg_hudDamageIconTime "2000" seta cg_hudDamageIconWidth "128" seta cg_hudGrenadeIconEnabledFlash "1" seta cg_hudGrenadeIconMaxRangeFlash "500" seta cg_hudGrenadeIconHeight "25" seta cg_hudGrenadeIconInScope "1" seta cg_hudGrenadeIconMaxHeight "104" seta cg_hudGrenadeIconOffset "50" seta cg_hudGrenadeIconWidth "25" seta cg_hudGrenadePointerHeight "12" seta cg_hudGrenadePointerPivot "12 27" seta cg_hudGrenadePointerWidth "25" seta cg_hudMapBorderWidth "2" seta cg_hudMapFriendlyHeight "15" seta cg_hudMapFriendlyWidth "15" seta cg_hudMapPlayerHeight "20" seta cg_hudMapPlayerWidth "20" seta cg_hudMapRadarLineThickness "0.15" seta cg_hudProneY "-160" seta cg_hudSayPosition "5 180" seta cg_hudStanceHintPrints "1" seta cg_hudVotePosition "5 220" seta cg_invalidCmdHintBlinkInterval "600" seta cg_invalidCmdHintDuration "1800" seta cg_laserLight "0" seta cg_mapLocationSelectionCursorSpeed "0.6" seta cg_marks_ents_player_only "0" seta cg_nopredict "0" seta cg_overheadIconSize "0.7" seta cg_overheadNamesGlow "0 0 0 1" seta cg_overheadNamesMaxDist "10000" seta cg_overheadNamesSize "0.5" seta cg_overheadRankSize "0.5" seta cg_predictItems "1" seta cg_scoreboardBannerHeight "35" seta cg_scoreboardHeaderFontScale "0.3" seta cg_scoreboardHeight "435" seta cg_scoreboardItemHeight "18" seta cg_scoreboardPingHeight "0.7" seta cg_scoreboardPingWidth "0.036" seta cg_scoreboardRankFontScale "0.25" seta cg_scoreboardScrollStep "3" seta cg_scoreboardWidth "400" seta cg_ScoresPing_BgColor "0.25098 0.25098 0.25098 0.501961" seta cg_ScoresPing_HighColor "0.8 0 0 1" seta cg_ScoresPing_Interval "100" seta cg_ScoresPing_LowColor "0 0.74902 0 1" seta cg_ScoresPing_MaxBars "4" seta cg_ScoresPing_MedColor "0.8 0.8 0 1" seta cg_scriptIconSize "0" seta cg_sprintMeterDisabledColor "0.8 0.1 0.1 0.2" seta cg_sprintMeterEmptyColor "0.7 0.5 0.2 0.8" seta cg_sprintMeterFullColor "0.8 0.8 0.8 0.8" seta cg_subtitleMinTime "3" seta cg_subtitles "1" seta cg_subtitleWidthStandard "520" seta cg_subtitleWidthWidescreen "520" seta cg_teamChatsOnly "0" seta cg_viewZSmoothingMax "16" seta cg_viewZSmoothingMin "1" seta cg_viewZSmoothingTime "0.1" seta cg_voiceIconSize "0" seta cg_weaponCycleDelay "0" seta cg_weaponHintsCoD1Style "1" seta cg_youInKillCamSize "6" seta cl_allowDownload "1" seta cl_anglespeedkey "0" seta cl_anonymous "0" seta cl_connectionAttempts "20" seta cl_freelook "1" seta cl_maxpackets "42" seta cl_maxPing "800" seta cl_maxppf "5" seta cl_mouseAccel "0" seta cl_packetdup "1" seta cl_pitchspeed "140" seta cl_punkbuster "1" seta cl_voice "1" seta cl_wwwDownload "1" seta cl_yawspeed "140" seta com_introPlayed "1" seta com_maxfps "125" seta com_recommendedSet "1" seta compassClampIcons "1" seta compassCoords "740 3590 400" seta compassECoordCutoff "37" seta compassFriendlyHeight "18.75" seta compassFriendlyWidth "18.75" seta compassMaxRange "2500" seta compassMinRadius "0.0001" seta compassMinRange "0.0001" seta compassObjectiveArrowHeight "20" seta compassObjectiveArrowOffset "2" seta compassObjectiveArrowRotateDist "5" seta compassObjectiveArrowWidth "20" seta compassObjectiveDrawLines "1" seta compassObjectiveHeight "20" seta compassObjectiveIconHeight "16" seta compassObjectiveIconWidth "16" seta compassObjectiveMaxHeight "70" seta compassObjectiveMaxRange "2048" seta compassObjectiveMinAlpha "1" seta compassObjectiveMinHeight "-70" seta compassObjectiveNumRings "10" seta compassObjectiveRingSize "80" seta compassObjectiveRingTime "10000" seta compassObjectiveTextHeight "18" seta compassObjectiveTextScale "0.3" seta compassObjectiveWidth "20" seta compassPlayerHeight "15" seta compassPlayerWidth "15" seta compassRadarLineThickness "0.4" seta compassRadarPingFadeTime "4" seta compassRadarUpdateTime "4" seta compassRotation "1" seta compassSize "1" seta compassSoundPingFadeTime "2" seta compassTickertapeStretch "0.5" seta con_errormessagetime "8" seta con_gameMsgWindow0FadeInTime "0.25" seta con_gameMsgWindow0FadeOutTime "0.5" seta con_gameMsgWindow0Filter "gamenotify obituary" seta con_gameMsgWindow0LineCount "4" seta con_gameMsgWindow0MsgTime "5" seta con_gameMsgWindow0ScrollTime "0.25" seta con_gameMsgWindow0SplitscreenScale "1.5" seta con_gameMsgWindow1FadeInTime "0.25" seta con_gameMsgWindow1FadeOutTime "0.01" seta con_gameMsgWindow1Filter "boldgame" seta con_gameMsgWindow1LineCount "5" seta con_gameMsgWindow1MsgTime "8" seta con_gameMsgWindow1ScrollTime "0.25" seta con_gameMsgWindow1SplitscreenScale "1.5" seta con_gameMsgWindow2FadeInTime "0.75" seta con_gameMsgWindow2FadeOutTime "0.5" seta con_gameMsgWindow2Filter "subtitle" seta con_gameMsgWindow2LineCount "7" seta con_gameMsgWindow2MsgTime "5" seta con_gameMsgWindow2ScrollTime "0.25" seta con_gameMsgWindow2SplitscreenScale "1.5" seta con_gameMsgWindow3FadeInTime "0.25" seta con_gameMsgWindow3FadeOutTime "0.5" seta con_gameMsgWindow3Filter "" seta con_gameMsgWindow3LineCount "5" seta con_gameMsgWindow3MsgTime "5" seta con_gameMsgWindow3ScrollTime "0.25" seta con_gameMsgWindow3SplitscreenScale "1.5" seta con_inputBoxColor "0.25 0.25 0.2 1" seta con_inputHintBoxColor "0.4 0.4 0.35 1" seta con_matchPrefixOnly "1" seta con_minicon "0" seta con_miniconlines "5" seta con_minicontime "4" seta con_outputBarColor "1 1 0.95 0.6" seta con_outputSliderColor "0.15 0.15 0.1 0.6" seta con_outputWindowColor "0.35 0.35 0.3 0.75" seta con_typewriterColorGlowCheckpoint "0.6 0.5 0.6 1" seta con_typewriterColorGlowCompleted "0 0.3 0.8 1" seta con_typewriterColorGlowFailed "0.8 0 0 1" seta con_typewriterColorGlowUpdated "0 0.6 0.18 1" seta con_typewriterDecayDuration "700" seta con_typewriterDecayStartTime "6000" seta con_typewriterPrintSpeed "50" seta customclass1 "Custom Slot 1" seta customclass2 "Custom Slot 2" seta customclass3 "Custom Slot 3" seta customclass4 "Custom Slot 4" seta customclass5 "Custom Slot 5" seta drew_notes "5" seta dynEnt_active "0" seta fx_draw "1" seta fx_drawClouds "1" seta fx_marks "0" seta fx_marks_ents "0" seta fx_marks_smodels "0" seta g_allowvote "1" seta g_banIPs "" seta g_clonePlayerMaxVelocity "80" seta g_deadChat "1" seta g_dropForwardSpeed "10" seta g_dropHorzSpeedRand "100" seta g_dropUpSpeedBase "10" seta g_dropUpSpeedRand "5" seta g_log "games_mp.log" seta g_logSync "1" seta g_oldVoting "1" seta g_playerCollisionEjectSpeed "25" seta g_redCrosshairs "1" seta g_useGear "1" seta g_useholdspawndelay "500" seta g_voiceChatTalkingDuration "500" seta g_voteAbstainWeight "0.5" seta hud_deathQuoteFadeTime "1000" seta hud_enable "1" seta hud_fade_ammodisplay "1.7" seta hud_fade_compass "0" seta hud_fade_healthbar "0" seta hud_fade_offhand "1.7" seta hud_fade_sprint "1.7" seta hud_fade_stance "1.7" seta hud_fadeout_speed "0.1" seta hud_flash_period_offhand "0.5" seta hud_flash_time_offhand "2" seta hud_health_pulserate_critical "0.5" seta hud_health_pulserate_injured "1" seta hud_health_startpulse_critical "0.33" seta hud_health_startpulse_injured "1" seta in_mouse "1" seta loc_forceEnglish "0" seta loc_language "0" seta m_filter "0" seta m_forward "0.25" seta m_pitch "0.022" seta m_side "0.25" seta m_yaw "0.022" seta monkeytoy "0" seta name "Morphic Jackzor" seta net_noipx "0" seta net_noudp "0" seta net_socksEnabled "0" seta net_socksPassword "" seta net_socksPort "1080" seta net_socksServer "" seta net_socksUsername "" seta r_aaAlpha "dither (fast)" seta r_aaSamples "1" seta r_altModelLightingUpdate "1" seta r_aspectRatio "auto" seta r_autopriority "0" seta r_customMode "" seta r_debugLineWidth "1" seta r_depthPrepass "0" seta r_displayRefresh "120 Hz" seta r_distortion "0" seta r_dlightLimit "0" seta r_dof_enable "0" seta r_drawDecals "1" seta r_drawSun "1" seta r_drawWater "1" seta r_fastSkin "0" seta r_fullscreen "1" seta r_gamma "2.11458" seta r_glow_allowed "0" seta r_ignorehwgamma "0" seta r_inGameVideo "1" seta r_lodBiasRigid "0" seta r_lodBiasSkinned "0" seta r_lodScaleRigid "1" seta r_lodScaleSkinned "1" seta r_mode "1024x768" seta r_monitor "0" seta r_multiGpu "1" seta r_picmip "0" seta r_picmip_bump "0" seta r_picmip_manual "0" seta r_picmip_spec "0" seta r_picmip_water "0" seta r_polygonOffsetBias "-1" seta r_polygonOffsetScale "-1" seta r_portalBevels "0.7" seta r_preloadShaders "0" seta r_rendererPreference "Default" seta r_specular "0" seta r_texFilterAnisoMax "4" seta r_texFilterAnisoMin "1" seta r_texFilterMipMode "Unchanged" seta r_vsync "0" seta r_zFeather "0" seta ragdoll_enable "0" seta ragdoll_max_simulating "16" seta rate "25000" seta sensitivity "5" seta server1 "" seta server10 "" seta server11 "" seta server12 "" seta server13 "" seta server14 "" seta server15 "" seta server16 "" seta server2 "" seta server3 "" seta server4 "" seta server5 "" seta server6 "" seta server7 "" seta server8 "" seta server9 "" seta sm_enable "0" seta sm_maxLights "4" seta snaps "30" seta snd_cinematicVolumeScale "0.85" seta snd_enableEq "1" seta snd_errorOnMissing "0" seta snd_khz "44" seta snd_levelFadeTime "250" seta snd_outputConfiguration "5.1 speakers" seta snd_slaveFadeTime "500" seta snd_touchStreamFilesOnLoad "0" seta snd_volume "0.8" seta sv_allowDownload "1" seta sv_floodprotect "4" seta sv_hostname "CoD4Host" seta sv_maxclients "24" seta sv_maxPing "0" seta sv_maxRate "25000" seta sv_minPing "0" seta sv_punkbuster "1" seta sv_reconnectlimit "3" seta sv_voice "1" seta sv_wwwBaseURL "" seta sv_wwwDlDisconnected "0" seta sv_wwwDownload "0" seta sys_configSum "4379996" seta sys_configureGHz "8.6759" seta sys_gpu "NVIDIA GeForce 9800 GTX " seta sys_sysMB "2048" seta ui_bigFont "0.4" seta ui_browserFriendlyfire "-1" seta ui_browserHardcore "-1" seta ui_browserKillcam "-1" seta ui_browserMod "0" seta ui_browserOldSchool "-1" seta ui_browserShowDedicated "0" seta ui_browserShowEmpty "1" seta ui_browserShowFull "1" seta ui_browserShowPassword "-1" seta ui_browserShowPunkBuster "-1" seta ui_browserShowPure "1" seta ui_currentMap "0" seta ui_currentNetMap "0" seta ui_dedicated "0" seta ui_drawCrosshair "1" seta ui_extraBigFont "0.55" seta ui_gametype "0" seta ui_joinGametype "0" seta ui_maxclients "32" seta ui_netGametype "0" seta ui_netGametypeName "dm" seta ui_netSource "1" seta ui_serverStatusTimeOut "7000" seta ui_smallFont "0.25" seta vehDriverViewHeightMax "50" seta vehDriverViewHeightMin "-15" seta vid_xpos "3" seta vid_ypos "22" seta voice_deadChat "0" seta voice_global "0" seta voice_localEcho "0" seta winvoice_mic_mute "1" seta winvoice_mic_reclevel "65535" seta winvoice_mic_scaler "1" seta winvoice_save_voice "0" con_hidechannel *; con_showchannel dontfilter error gamenotify boldgame subtitle obituary logfile_only console_only gfx sound files devgui profile ui client server system playerweap ai anim physics fx leaderboards parserscript script Holy shit Wizid, you need a hobby. Spend some more time in your new bar. Thanks BobNP Wiz IDIOTS.... P.S..Hey Wizid...gezzz is a BIG 1.. Awards
Damage_inc- Posted October 24, 2011 Member ID: 2048 Group: ***- Inactive Clan Members Followers: 0 Topic Count: 294 Topics Per Day: 0.05 Content Count: 6689 Content Per Day: 1.18 Reputation: 4709 Achievement Points: 48999 Solved Content: 0 Days Won: 5 Joined: 12/15/10 Status: Offline Last Seen: November 29, 2023 Birthday: 05/30/1967 Posted October 24, 2011 /rate 25000 /cl_maxpackets 100 /com_maxfps 125 /cl_packetdup 1 /snaps 30 just set these they work best for ping all the other 4 pages of stuff people are presenting are for fps gl Awards
BiG CheesE Posted October 24, 2011 Member ID: 589 Group: *** Clan Members Followers: 12 Topic Count: 347 Topics Per Day: 0.06 Content Count: 1346 Content Per Day: 0.22 Reputation: 341 Achievement Points: 10798 Solved Content: 0 Days Won: 0 Joined: 10/18/09 Status: Offline Last Seen: June 12 Birthday: 07/04/1979 Device: Android Posted October 24, 2011 UnChileno bobbarker WiZiD bobbarker WiZiD Tweaks for improved game performance. Call of duty ______________________________ Console Commands: *Enable Console first in options* then type in the following then hit enter. *First things first*: (back up your "normal" config) found here for *XP C:\Documents and Settings\<USERNAME>\Local Settings\Application Data\Activision\CoDWaW\players\profiles\<playername> Vista is in a similar place 1) Punkbuster Sleep setting: /pb_sleep 500 (tells punkbuster client software to wait longer before awakening and sending info to PB) Save PB setting to config: /pb_writecfg (makes the above setting permanent so you don’t have to do it each time you log in) - The above changes the frequency that your PC reports to the server and thus reduced frequency of network spikes and the associated latency. 2) Packet transfer setting: /cl_maxpackets 100 - This setting helps smooth out data transfer and should help if you have a cable or other high speed connection. This setting works in conjunction with the com_maxfps 125 setting. 3) Send duplicate packets: /cl_packetdup 0 or 1 - Manage whether or not extra or duplicate packets are sent to the server.(1 is default and this sends an extra packet of data in case the first one is lost. If you enable the lagometer (see tools below), then you can see if you are losing any packets.If yes, then leave this at 1. If no, you can consider changing to 0. 4) Snaps: /snaps This is possibly the most important setting for getting a good connection. Snaps setting determines how many updates you recieve from the server. 20 to 30 for 56K connects in quake series 40 for high speed internet im sure the same for cod. (30 is fine). 5) Enable higher Frames Per Second (FPS): /com_maxfps 125 (Default is 85 so this may help overall FPS. Some say this should be set at or just above your average FPS to smooth things out) - This allows your game to go allow higher frame rates than the default. Set it to a value you want based on the capabilities of you machines… to unlock FPS completely and see what you machine is capable of set to 0, it can go as high as 1000. 6) Field of View (FOV): /cg_fov 80 7)Shadows: /sm_enable 0 Turns off unique Shadows ingame 8)Depth of Field: /seta r_dof_enable "0" Gets rid of the "blur" around you gun and clears your perperipheral vision. - If you want to widen your FOV (field of view) from 65 degrees to 80 degrees, use this command. NOTE: This basically “backs you up” to give you a larger viewing area at the sides but it does make user/soldiers/enemies slightly smaller at the same time. This command does not affect machine performance and is merely a preference to give you the ability to see more. In game tools: ______________ 1) Show framerate on screen so you can see how your PC is performing: /cg_drawFPS 1 (choices are 1,2,or 3 where 0 = off / 1 = on) - At a minimum, you need to try to be above 60FPS so that you have no visual choppiness. Reduce textures, shadows, lighting etc. 2) Show network connection quality: /cg_drawlagometer 1 (puts a graph just above your grenades icon on screen) - Top meter on graph. GFX shown in Blue, (or blue with small amounts of yellow) then you system is in synch and your screen/system is refreshing in sync with the server’s perspective of the game world. If Yellow, then you are having issues and your screen/system may not be in synch with what the server thinks is happeing.. noticable lag bad hit rego. The blue shows how well your graphics card is staying in sync with the server as it relates to rendering the gaming environment. A few yellow items is OK but you want the vast majority to be blue. If you have a lot of yellow, this means that your graphics rendering and server rendering of the gameworld is out of sync.The smoother the flow on this meter, the better, the faster the higher your FPS is. - Bottom meter should be all or mostly green. Lots of yellow or red means there are issues. When you spawn or die, you can sometimes see lots of RED , this seems to be OK. If you are all green, then you can consider changing your cl_packetdup to 0 and you can increase your cl_maxpackets _________________________________ Performance improvements summary: *Enable Console first in options* Punkbuster Sleep setting: /pb_sleep 500 Save PB setting to config: /pb_writecfg Packet transfer setting: /cl_maxpackets 100 Send duplicate packets: /cl_packetdup 0 or 1 Max FPS: /com_maxfps 125 Field of View (FOV): /cg_fov 80 Draw your FPS on screen: /cg_drawfps 1 Draw your Lagometer on screen: /cg_drawlagometer 1 Shell Casings: /cg_brass o gets rid of the shell casings being ejected Shadows: /sm_enable 0 Turns off unique Shadows ingame __________________________________________________ Notes:*CG FOV :: Field of view, where the value is the angle of the circular arc that is displayed on your screen. High values will make the game appear "fisheyed". *MAX FPS :: This command limits your maximum FPS. You may ask why you would want to do this, and the answer is that it will help the server from having lag confusion when your frame rate has a sudden rise or fall. Run a timedemo, collect your average FPS and use that as the limit for when you play on-line. *MAXPACKETS :: This setting puts a limit on the maximum amount of packets that can be sent to the server via the client. This setting is useful for people with slower modems. Obviously we all have high speed connects so set to at least 100. Lower maxpacket settings i.e 30 lowers ping on screen but at the cost of registration. */sm_enable 0: Turns off unique Shadows ingame, it boosts FPS more than most commands. That's about it for now if I think of anything to add to this I will update the thread with a new reply post. Enjoy, try it out and give some feedback if things are better. Check here to see if your machine is up to the task of CoDWaW > http://www.systemrequirementslab.com/referrer/activision2?registration_option_id=7974 thankx, Introduction: For the last couple weeks, during beta, I have been digging deep under the hood of Crysis. I thought it would be fitting that I share my findings and move my guide to the community that I have waited with for Crysis for so long. I hope you enjoy it and that it helps you with basic and advanced tweaking in the days ahead. This will continue to be a work in progress. I will cover both some basic and advanced tweaking. I'll share the settings that I have found to be the most performance hungry and what you can do to get performance back or increase quality without draining performance too much. Then we will dig deep into one of the most, if not the most, tweakable games on the planet. We will also surpass very high settings with ultra for the uber machines as the guide fleshes out. BASIC TUNING Basic computer performance: I don't want to recreate the wheel but their are many things to do to increase performance in games with your computer. Details on how to do these things can be found by doing a google search for any of the following. * Latest drivers for your video card, motherboard, sound card can improve things greatly at times. * Defrag your hard drive. It's prefferable to defrag 'before' installing so that the files stay close together and contiguous. * If you only have 512MB or 1GB memory, 2GB is highly recommended. * Go into your driver control panel to make sure antialiasing(AA) or anisotropic filtering(AF) is not enabled unless you want them to be, they effect performance alot. Also you can change texture filtering quality to provide more performance in the drivers. * If you are running Vista make sure to be using the current hotfixes, some effect performance and memory usage tremendously. Nvidia has a great list of recommended ones here: Vista hotfixes * A video card like an 8800 GT for $250 will provide tremendous results if you haven't upgraded in a long time. * Disabling any unneeded running process, especially antivirus, while playing is recommended. Resolution: Resolution has a large impact because the game has so much geometry that the fillrate demands of large resolutions is beyond what people are used to. If you can lower resolution this will help gain many fps and provide smoother play. If you have an LCD you need to use what is called 1:1 pixel mapping, or otherwise known as disabling scaling. This allows the image to shrink but the quality of the image stays incredibly good. Scaling on the other hand, always looks bad if using anything other than your native resolution. Scaling can be disabled on some monitors. If your monitor doesn't support this feature some drivers support it. With nvidia you can disable it like so, image provided. So shrinking the image while maintaining incredible quality works well for performance, you can always slide your monitor closer you then won't notice the image is smaller. Custom resolutions can be used by using 'r_width=x' and 'r_height=x'. See below on advanced tweaking on how to use variables. In-Game Settings: The settings that have the biggest effect on performance are firstly shaders. This game is one of the most shader intensive games on the market. Going from high to medium shader settings works real well in giving an average of anywhere from 7-10 fps or more, depending on some variables. Next are Shadows and Post Processing. Shadows from high to medium looks very good still and provide a good boost of performance. Post processing has a big effect as well. The thing that people notice most about post processing is motion blur and depth of field. These can be easily turned on/off individually if desired seperate from the post process drop down box, as will be seen in the advanced tweaking section. Textures setting affects video memory usage quite a bit which we will look at next. Video Memory: Using beyond the amount of memory that is locally on the video card will produce performance problems like stuttering and hitching due to having to fetch data from system RAM over the much higher latency PCI express bus. In other words, adjust settings/resolution in the game not to exceed your video RAM, otherwise you will experience overall performance issues and the periodic flickering of geometry and LOD's as it streams in. The game is very video memory intensive. Resolution and AA effect the amount of video memory the game uses tremendously. Here is a breakdown of video memory across different settings and resolutions. * Windows XP * Nvidia Driver 169.01 1280x1024 medium * NoAA 184MB * 2xAA 295MB * 4xAA 355MB * 8xAA 395MB 1280x1024 high * NoAA 315MB * 2xAA 375MB * 4xAA 440MB * 8xAA 470MB -Texture medium- * NoAA 300MB * 2xAA 363MB * 4xAA 423MB * 8xAA 445MB 1680x1050 medium * NoAA 223MB * 2xAA 375MB * 4xAA 455MB 1680x1050 high * NoAA 368MB * 2xAA 456MB * 4xAA 535MB -Texture medium- * NoAA 340MB * 2xAA 428MB * 4xAA 505MB 1920x1200 Medium * NoAA 240MB * 2xAA 430MB * 4xAA 535MB 1920x1200 High * NoAA 400MB * 2xAA 515MB * 4xAA 615MB -Texture Medium- * NoAA 370MB * 2xAA 475MB * 4xAA 585MB AA clearly makes a large impact in video memory. Different game levels may change these numbers. Changing textures from medium to low makes no appreciable difference since it is still using the lowspec pak. The devs have made huge advances in optimizing this area since earlier builds of the game, either that or the textures are quite lower in quality, infact these are the numbers medium textures used to give as if high textures are missing. Final shipping game may reflect differences here, will update accordingly. The textures setting alone no longer makes the difference it did in earlier builds regardless of high/medium/low setting, which again seems to give some indication higher textures have been removed temporarily or entirely. Breakdown by video card memory: 256MB Video - 1680x1050 medium without AA or 1280x1024 medium with AA. 8800 GTS 320MB - Handles up 1680x1050 medium no aa, can go to high with some thrashing. Only AA at 1280x1024 looks to be viable with that memory limit. 512MB Video - Comes into it's first wall at 1680x1050 4xAA on high. Performance and not memory will impact you here. 8800 GTS 640MB - Handles up to 1920x1200 4x AA (All High). performance makes that out of reach on todays HW. 768MB and above - Memory will not be your limiting factor unless going to 2560x1600 with AA. Your GPU handling the raw processing of the geometry and shaders at that high resolution will be out of reach. I don't doubt that 1GB can be reached by tweaking Crysis and high resolutions with max AA on tomorrows HW. I already have found ways to approach 650MB at only 1280x1024. Basic video memory tips: * Find your video memory ceiling with resolution and texture setting first. Then adjust other parts of the game that are affecting raw performance like shaders or shadows until you get your acceptable performance. If you don't properly anticipate video memory usage, you won't realize why it is hitching on you, regardless of other settings. * You don't have to turn everything to medium to conserve memory, textures have the biggest effect by far. * Remember as more players enter the map this memory will climb a bit, as well as larger out door levels. Also as you stay in the game for a while this number will rise a little. I cached all the outdoors, but not the indoors. * Adding any tweaks for higher quality, especially along the lines of LOD or view distance, has the potential to raise memory usage even further. * The higher you go over your limit, the worse performance, texture stuttering, hitching and popping of geometry will become. * If your resolution doesn't appear just use something close, like 1680x1050 is close to 1600x1200. Benchmarking: Crysis came with two benchmarks to test and compare your performance. A GPU benchmark and a CPU benchmark stressing physics. They can be found in the Bin32 or Bin64 folders. Just double click on them to start. The game will run through 4 loops of the benchmark. When it's done it will show you the results, I suggest you ignore the first one since it was just caching the level and assets on the first run. You can make your own benchmarks but for now these two work well as standard tests. See the benchmarking tool mentioned in post 3 for an improved benchmarking experience. Antialiasing and Anisotropic filtering in Crysis First of all AA is a serious performance drain. More so than other games because of the incredible amount of triangles and polys in the scene. AA is only recommended for the highest end GPU's and keep in mind high resolutions will be more intensive. So if you choose to use it then keep in mind the video memory that will be used (shown above). There is some interesting information starting to come out about AA. Apparently it is preferred to use the in-game AA settings as the proper way to use AA. In other words, don't use the driver control panel but control it from in game. Additionally, HardOCP in their recent 8800GT review had this quote. "This comes directly from NVIDIA’s James Wang on the use of Transparency Antialiasing in Crysis: ” Crysis handles foliage very differently from normal engines so TRMS/SS won't work. Bit of a shame really. The game has some built-in foliage AA, but it only kicks in in "Very high" quality mode.”" I am actually pretty sure it can be enabled at high as well, not just very high. High and very high shader settings are compatible with in game AA, while low and medium shaders are not. Regardless of in game shader settings if AA is enabled, High shaders will also need to be enabled. If AA is currently enabled, but shaders is set to medium or low, AA will automatically be disabled by the game. So it will take a good medium to high end card to use AA not only because AA is demanding on it's own but because you will need to run atleast high shaders as well. As to Anisotropic Filtering, it can only be enabled in the driver settings. Unfortunately there is a bug with the nvidia drivers that makes a white halo around distant bushes and trees. I believe this bug only shows itself on a particular. This apparently will be fixed with a future driver. Vsync Vsynch can be enabled in the game with r_vsync = 1. It is off by default. ADVANCED TWEAKING Customizing the game: The in-game settings are like using a paint roller on a canvas, while tweaking is like the fine brush of the artist. The roller gets the job done but it's not going to be as fulfilling as it could be. You need a fine brush to make it the way you like. The developers didn't want to burden you with 20 choices of drop down boxes so they instead made those broad strokes for you. Unfortunately the difference in performance and quality between low/medium/high/veryhigh can be staggering. Sometimes a move from high to medium can change 20 variables, but it may not be necessary to change all 20 when only a few really effect performance or quality. The fine strokes will allow you to get exactly what you want and Crytek has really given us the ability to change just about everything in the game you would want. You do not have to sacrifice as much quality for performance as you may think. Sometimes you can keep settings high or medium and change one variable that is the big performance tanker or one setting that brings back some good quality at little cost. Enough intro lets get busy. How to make an autoexec.cfg In the early days of the beta people modified the cvar groups game files because it was the best they knew, if you have heard about this I do not recommend it. It changes the way your in-game settings work permanently and changing to medium or high won't have the desired effect anymore. We later learned that you can make an autoexec.cfg file in the "Crysis SP Demo" folder. Tweaks are made up of Console Variables (cvars for short), a list of the ones currently used by the game can be seen below. In this file you put in the tweaks you want one by one and the game will use them when it starts up. View Performance In Game Place the line r_displayinfo=1 in your autoexec.cfg. This will show you fps, system memory usage(not video), triangle count, etc. Also you can use fraps if you wish to show fps as well as take screenshots and make movies of the game. Enable The Console: By default the devs have disabled the console unless you learn the trick to enable it. You can enable it by adding the line con_restricted=0 to your autoexec.cfg and you can then use tweaks while in game in real time and watch with your own eyes the quality and performance changes. Pull down the console while in game by hitting the ~ (tilde) key. From there you can type in a cvar, without a value, and the game will tell you the current value. If you want to test a tweak, just type it in but instead of using an equals sign to put in a value like in the autoexec.cfg, just use a space. Example in console: r_displayinfo 1 If you have the fps shown in game you will see the performance effect of different settings. Enhancing on DX9: It is a very tweakable game. Crytek have given us the ability to tweak many many things to reach Very High equivalent settings and even far far beyond. I will give you a break down of every exact Very High setting(used in DX10) for reference. This is the real list of every setting and their values. So you can use this list and mimic exactly very high in DX9 to the fullest extent possible. Just add this list to an autoexec.cfg and you will have very high for DX9. sys_spec_GameEffects = 3 sys_spec_ObjectDetail = 3 sys_spec_Particles = 3 sys_spec_Physics = 3 sys_spec_PostProcessing = 3 sys_spec_Quality = 3 sys_spec_Shading = 3 sys_spec_Shadows = 3 sys_spec_Texture = 3 sys_spec_VolumetricEffects = 3 sys_spec_Water = 3 e_foliage_wind_activation_dist = 25 e_max_entity_lights = 16 e_obj_quality = 4 e_particles_max_emitter_draw_screen = 32 e_particles_quality = 4 e_shadows_cast_view_dist_ratio = 0.8 e_vegetation_sprites_distance_ratio = 1.5 e_view_dist_ratio_detail = 30 e_view_dist_ratio_vegetation = 45 e_water_ocean_fft = 1 e_water_tesselation_amount = 10 es_DebrisLifetimeScale = 1 g_battleDust_enable = 1 g_breakage_particles_limit = 250 g_ragdollDistance = 40 g_ragdollMinTime = 15 q_Renderer = 3 q_ShaderFX = 3 q_ShaderGeneral = 3 q_ShaderGlass = 3 q_ShaderHDR = 3 q_ShaderIce = 3 q_ShaderMetal = 3 q_ShaderPostProcess = 3 q_ShaderShadow = 3 q_ShaderSky = 3 q_ShaderTerrain = 3 q_ShaderVegetation = 3 q_ShaderWater = 3 r_BeamsDistFactor = .05 r_BeamsMaxSlices = 200 r_ColorGrading = 1 r_DepthOfField = 2 r_DetailNumLayers = 2 r_DynTexAtlasSpritesMaxSize = 32 r_MotionBlur = 4 r_ShadowJittering = 2.5 r_SSAO_quality = 2 r_SSAO_radius = 2 r_sunshafts = 1 r_TexAtlasSize = 2048 r_Usepom = 1 r_WaterReflectionsQuality = 3 r_WaterUpdateDistance = 0.2 In Game Settings: This chart shows the breakdown of "every" console variable that is changed by the in-game settings. It color codes every different type of in game menu(textures, game quality, shadows,etc) and shows you what variables actually change, when you change a drop down menu in the game, and what values they change to. To see more console variables that cannot be changed in game and to see all the definitions of the settings, follow the links below the image. See the full real size image with definitions and many more settings here. This list is a great starting point for your own tweaking adventure to mix and match settings as you like. Remember you can try most of them while in game in realtime in the console and see the effect on quality and performance. Get the original Excel spreadsheet for your own personal use here. You can copy/paste right into the game console. How do I do start?: summary You can start by making an autoexec.cfg in the main game folder. Add two settings to start. Just copy/paste them. r_displayinfo=1 con_restricted=0 Now you can open the console and start trying tweaks that look interesting one by one. Use your autoexec.cfg and fill it with the tweaks you like. When you check your in game settings it will show 'custom' if you have tweaks in your autoexec affecting that menu section. I will detail some of the ones I think are cool here next. Quality Comparisons: Some notable settings that effect quality. LIGHT AND WATER: r_sunshafts = 1 turns on the hidden feature of light shafts that dance through trees and past objects. Available in game through Very High in-game setting. The bottom is default all High in-game settings, the top is r_sunshafts = 1. Comparison pics... The following 3 settings work along with sun shafts... r_Beams - Toggles the volumetric light beams. Default is 3, it’s an optimized beam with glow support. 0 disables beams, 2 uses fake beams with probably beneficial performance (performance untested). 1 is the best and uses the real full resolution beams but it is slower. r_BeamsDistFactor - Distance between slices. Default is 0.01 in meters(likely reserved for Ultra High) and is likely the best setting for beams making it through the densest vegetation. You can try it and see what you like best (currently medium and high use 0.5, low uses 1). r_BeamsMaxSlices - Number of volumetric slices allowed per light beam. Default is 200 (reserved for very high specs). The max here is 300, so go ultra if you think you can really handle the performance hit. e_water_ocean_fft - Activates fft based ocean algorithm. Produces realistic wave undulation for the best quality and most realistic water. Everything is the same with water except undulation. This algorithm was used in movies like Titanic and Waterworld so it's very realistic. Screenshots wouldn't really show the difference but I have a short movie, it hardly does it justice, but atleast you can see the wave difference. FFA Water movie comparison 4MB TEXTURES & LOD: Distant LOD (level of detail) of textures and vegetation is probably my favorite section because it’s most noticeable as you look across the map and walk about. e_detail_materials_view_dist_xy - Max view distance of terrain XY materials. This is things like certain cliffs and other materials horizontal LOD in game. e_detail_materials_view_dist_z - Max view distance of terrain Z material. This is things like certain cliffs and other materials vertical LOD in game. This one doesn't need to be raised high, 256 or 512 max. (In the GPU benchmark when coming in from the sky this setting will show itself on vertical LOD). A picture is worth a thousand words on how these two work... Note: For the mountains to appear crisp like this you will also need r_TexturesStreaming set to 0. r_usepom - Enables Parallax Occlusion Mapping. A type of relief map that gives raised appearance to textures. Very cool but costs about 2 fps and can sometimes cause a fairly insignificant minor blurring of terrain textures in distance. Comparisons... VEGETATION & SPRITES: e_cull_veg_activation - Vegetation activation distance limit, 70 is a good step up from high(50). This is trees setting how far the farthest out can be seen. e_vegetation_sprites_distance_ratio - Allows changing distance on what vegetation switch into sprite. Raising this from 1 to 1.5 cost me about 1 fps in that view. Adds medium tree distance as well as certain near shrubs. Comparisons... e_view_dist_ratio_vegetation - View distance ratio for vegetation. Includes grass and shrubs like ferns and broad leafs, etc. 50 just about eliminates any popping effect with grass and shrubs, costs 1 fps in this scene. Comparisons... Controlling Antialiasing with Tweaks See above section on antialiasing and how it changes shader settings. These are the cvar settings for AA that you can use in your autoexec.cfg file. Only for XP. r_FSAA = 1 - turns on AA 2xAA = r_FSAA_samples = 2, r_FSAA_quality = 0 4xAA = r_FSAA_samples = 4, r_FSAA_quality = 0 8xAA = r_FSAA_samples = 4, r_FSAA_quality = 2 8xAAQ = r_FSAA_samples = 8, r_FSAA_quality = 0 16xAA = r_FSAA_samples = 4, r_FSAA_quality = 4 16xAAQ = r_FSAA_samples = 8, r_FSAA_quality = 2 Additional Background And Things To Know I just want to share on how these work in the game and some more background info to clear up anything hazy. *Make sure you take a look at the full size picture or the spreadsheet for the settings chart, the links are below the chart. They expose many more tweaks, their definitions, and the values that they accept. Know your in game settings. Play with that first to get a comfortable feel of what you like and what is available through the advanced settings menu options. The way the autoexec.cfg variables work is they build on the in-game settings. The in game settings are first loaded, which are stored in the game.cfg in your profile. As the game starts it loads the game.cfg then the autoexec.cfg overrides are loaded with what ever settings you chose. So for instance, you have in game shaders set to medium down from high. But medium changes over 20 settings, well maybe you want the perfomance benefit of most of those but you want Ambient Occlusion back on the terrain (it's a global lighting system to provide realistic lighting). You keep the in game setting at medium but turn on e_terrain_ao = 1 along with r_SSAO=1 which will override the 0 settings in the game. Or maybe you want better better shaders on terrain back to high(3) so q_ShaderTerrain = 3. Whether you like water, sky, terrain, vegetation, view distances....it's all at your finger tips for your preferences. Usually there is only a couple settings that really affect performance alot, the rest can add quality at little cost, the developers just didn't know your video memory, vid card, processor, ram, etc. so they made broader stroke settings than most people needed in certain cases. The tip to remember is that your configs will override and work on top of what is already set in the game menu last time you ran the game. If you prefer there is also way to change the drop down boxes from your autoexec. The sys_spec... settings will change low/medium/high and it will change all the broad stroke settings I color coded in my chart if you change those broad stoke settings. You will know when your autoexec is working because if you look at the game settings it will show custom instead of low/medium/high. Basically, many cvar values are often just a on/off setting for features [0/1] 0 is off, 1 is on. Others may have values that are based on different ranges, the definitions will tell you what most of the limits and ranges are. Some ranges maybe in meters, where others are clearly larger or smaller units of measure. If you see a pattern of numbers like 512/1024 then extrapolate that it's best to stick with the pattern, like those just mentioned for texture sizes and shadow maps. Sometimes you have ratios (as seen in some cvar names), which seem to affect more than one thing and they are likely multiplied internally in the game against some value so they are more broad sweeping. I expose some of the cool cvars with pics above but don't let that keep you from trying new things. Performance of these settings depends on your resolution, your video card, and the complexity of the scene you are looking at. If you are tweaking vegetation find the densist vegetation to see what the hugest impact will be. Same with terrain view distances and textures. In certain scenarios things combine where you are looking through the dense jungle up at the mountain this is good to test combined foliage/texture/view distance tweaks as it will show worst case scenarios. That is the balancing act, but most of the time you in buildings, in water, in vegetation, so you can pretty much raise them irrespective of each other to a degree. This is the point I am at in my configs in perfecting that balance of taking quality to the farthest point where it can mix well with the others. I also like long view distances on objects, I like seeing vehicles, enemies and buildings afar off so you can trade something else for that if you prefer. It's great to use the console and see the settings changed in real time. Just be aware that not all settings can be changed in real time. Either the value will not change and that will be clearly shown in the console, or it appears to change the value in the console but nothing in the game actually changes. In those cases it will be necessary to put the setting in the autoexec.cfg so that the renderer will be able to properly utilize that setting during startup when rendering the scene. There are a couple features restricted to DX10 but mostly they are time of day and geometry shader functions (GS in the cvar), not many at all. Enjoy the playground. More soon... Crysis Performance Reviews: See how different hardware and settings perform. Crysis (Demo Performance)- LegionHardware Crysis Demo Performance Analysis- Tweaktown Crysis demo performance in-depth - TechSpot DirectX 9 performance with the Crysis demo on 10 different cards - AMDZone To be Continued... Last edited by MadBoris (17-11-2007 23:54:33) Offline THIS GUIDE WAS CREATED BY Sven2157 Thought this guide may be useful for some of us here. You can also visit that link to see this same guide. http://www.techsupportforum.com/gaming-forum/pc-gaming-support/349169-optimising-your-system-games.html How to Properly Configure Your Computer for GAMES/PROGRAMS Hello everyone, I am constantly seeing people, all over the internet, with problems running their programs/games on their computers. They ALL are experiencing slow boot times, in game lag, freezing, OOM Errors (Out of Memory), low FPS and numerous other "issues". They are also, consuming A LOT of database space asking the same questions. I will try and consolidate those questions and answers here. So I am writing this "CHECK LIST GUIDE" of common problems and solutions. It contains basic/mandatory system configurations, as well as advanced techniques; thus improving your game play, software development/designing and overall computer performance. All while maintaining the best possible visual experience. ***PLEASE REMEMBER THAT THIS IS A GUIDE! NOT A MUST! ANY CHANGES YOU MAKE TO YOUR SYSTEM, ARE SOLELY YOUR CHOICE AND RESPONSIBILITY! I, NOR THE MODERATORS OF THESE FORUMS, CAN, AND WILL NOT, BE HELD LIABLE FOR YOUR OWN ACTIONS!*** So let's begin... First and Foremost! Please update your Motherboard, BIOS, SMBus/USB/Memory/Video/Audio/Storage Controllers (<--System), Video, Sound, Human Interface Device (HID) Controllers (<--Your Joystick/Gamepad), Mouse and other such drivers. Also run a system Defrag, to defragment your hard drive. This should be done at least monthly; as all of the afore mentioned will resolve 99.9% of the issues experienced by users! Also clear your Temporary files 1. - Click Start..>.."Run.." (Vista Users may not have this enabled <by default>, so the shortcut is "Windows Key+'R') 2. - In the "Run" Box type: %Temp% Your Temporary File Folder will come up. Select ALL, and delete them. Don't worry, they are TEMPORARY FILES. Some programs do not clear these when they are finished, so you have to go manually delete them. This then makes it easier for other programs to store temporary files needed for execution. Getting rid of the stuff you didn't even know was there... O.O(<--BTW I am writing this in notepad and transferring it to the forums; so my smilies my not show up -.-) When you download and install commercial products - Adobe Flash, Adobe Reader, Google Earth, etc, etc - , you have to be mindful what the installer is asking you... This is a common mistake by users. They want the program, but either don't realize that there are other programs "Piggy Backing" in, or don't care. This is where problems begin. "Well, what's wrong with the Google Toolbar?" 8-/ The answer to that is simple: EVERYTHING! These programs seem harmless, and have a very small file size: .4 - 2.5MB. But that is not where the problem lies. Programs like this, and Toolbars especially, are constantly TRANSMITTING data to their prospective authors. This includes where you surf, what you buy, where you live, what time you access the internet, who is logged into the Operating System (<-- BETTER BELIEVE IT! >:-{ ), your ISP, etc, etc. Consequently, this is not only eating up the processing power and RAM of your computer, but now you are losing crucial bandwidth. Ever wonder how "that guy" can come around the corner and just kill you, in FPS games? Because he has a CLEAR connection to the server, and saw you LONG before you knew he was there! "But I like my Toolbar (Google, or other)!" Why? IE7 and FireFox has a Google Search built right into them. They have Pop-Up Blockers, and Auto Complete, as well. Why have redundant software running? So let's get rid of ALL that crap, and free up some drive space! 1. - Click start..>..Control Panel..>..Add/Remove Programs(XP)/Programs and Features(Vista). 2. - Go through the list, when it populates, and remove ANY "extra" programs that you do not use. If you accidently remove something you need, you can certainly get it back. What you are looking for: (not in any particular order) Adobe.com Adobe Updater *Nothing like losing bandwidth, then getting kick out of game because Abode thinks it's more important! Apple Updater Google Chrome *Transmits data continuosly Google Desktop *I would love to slap the guy who invented this! ;-) Google Updater *Big process eater! Transmits data constantly! Google Toolbar MY SEARCH - ANYTHING! *Big process eater! Also Installs Viruses and Malware automatically! Java Updater Yahoo Search Yahoo Mail Yahoo Toolbar Windows Live Installer Windows Live SkyDrive Windows Live Photos MyWeb - ANYTHING! *Big process eater! Continuosly running. HP/Lexmark/Cannon/Kodak - Anything you don't use. As long as you don't delete the driver, your printer/camera/scanner will still function! Dell/Acer/HP/Gateway/eMachines, etc, etc Pre-Installed Manufacturer Programs *These programs are "extra" and cause your system to run slow. Most of them duplicate Windows built in features! Also, look for anything that you don't use or that looks suspicious. Once again, if you remove it, and find you need it, you can get it back! So don't be afraid; Don't be overzealous, either! Now for the real stuff! Processes and Services! These are the real KILLERS! When programs install, they generally write their own rules; as most users don't really know how to respond even when asked! The problem with this is they ALL FIGHT to be NUMERO UNO! They ALL think they are the greatest thing since crawling out of the sea, and growing lungs and legs! :-D So we have to go tell them ALL who the real boss is! YOU, the user! 1. - Click Start..>.."Run..." (Vista Users may not have this enabled <by default>, so the shortcut is "Windows Key+'R') 2. - When the "Run..." Box opens, type: MSCONFIG (<--not case sensative) 3. - When the "System Configuration" window appears, click "Selective startup". 4. - Click the "Services Tab". 5. - ***THIS IS AN IMPORTANT STEP! PAY ATTENTION TO WHAT YOU ARE DOING HERE!*** Click ONLY the "Hide all Microsoft Services" box! 6. - Now the window will only show you 3rd party services that start when Windows starts. However you NEED some of these! Like your Norton/McAffee/AVG Anti-Virus and Internet Security services. Display Drivers/Software, Storage Drivers (i.e. RAID), etc, etc. Trial an error may be the best approach on this tab. Turn a couple off, see where that gets you, then try a couple more. 7. - Now click the "Startup" Tab. You can turn ALL of these off if you want. Once again, READ what you are doing! In the picture below, I leave my RAID, VIDEO and Sidebar on, because I use that to monitor my system. (Vista Users - In the picture below, the 2 "Microsoft® Windows® Operating System" items you see, are for the Sidebar; they are not crucial!) 8. - When you have finished, click "Apply", then "Ok". ***IF YOU DO NOT WANT THE CHANGES TO TAKE AFFECT OR HAVE MADE A MISTAKE, CLICK "CANCEL"!*** The configuaration utility will then prompt you with the following image: 9. - Press "Restart" (Pressing "Exit without Restart" will not reboot your computer. However, when you manually reboot the system changes will take affect!), when the system starts back up, YOU WILL RECIEVE A "SYSTEM CONFIGURATION MESSAGE". Just Check the, "Don't show this again" box and click "Ok". ***IF YOU ARE EXPERIENCING PROBLEMS, REPEAT STEPS 1 AND 2. THIS TIME SELECTING "NORMAL STARTUP"*** Then click "Apply", "Ok", "Restart". This will return all Services and Startup options back to the original settings! OK... Almost there... O.o Now let's get some memory back.... 1. - Right-click My Computer(XP)/Computer(Vista)..>..Choose properties. VISTA USERS ONLY: The "System Properties" Window appears. Click "Advanced system settings". XP USERS: Click "Advanced" Tab. 2. - Click the "Settings" button in the Performance row, to open the "Performance Options" Window. 3. - Select the "Advanced" tab, then click the "Change..." button in the Virtual memory row. 4. - Uncheck the box for "Automatically manage paging file size for all drives" if it is checked. ***The next step requires a judgment on your part. In the above image, I have my "Intial Size" set to 4096MB (<--That's 4 GigaBytes!), and my Maximum size is set to 6114 (<--That's 6 GigaBytes!). HOWEVER! I have a 400GB in RAID 0 "C:\" drive! In other words, I HAVE ROOM TO SPARE! Most of you will want to set this to approximately 2048 Init/3072MB Max; ROUGHLY! ***NOTE: XP Users can only set a MAXIMUM of 4096MB for their Paging Files!*** 5. - Now click "Set". You will be prompted, after clicking "Ok", that you have to reboot, so... Reboot. What did I just do!?!? O.O Good question! You are very smart! ;-) In simple terms... This is going to expand your "Paging File". Windows uses the "Paging File" as "secondary memory", by writing "chunks" of data to the Hard Drive. This way it can recall information faster than searching the rest of the drive. This data is not permanent and is constantly changing. Ever wonder why your hard drive light flashes, even when Windows is idle? Windows allocates (or reserves) RAM and Virtual Memory (<--Paging File) for it's own greedy use; whether or not it actually needs it. This reserve is for system processes and what not. When the size of this is SET by the user, you free up the constant size changing, increasing or reducing, that windows can and will do to make more or less available; consequently allowing more room to write to the drive = freeing up valuable processing threads and RAM. In turn increasing performance. ...and, Lastly... Is the DREADED OOM!!!! This next tweak will prevent the Out Of Memory (OOM) Error. This is EXTREMELY effective when working with Adobe CS Series, AutoDesk Products and Games (Microsoft Flight Simulator Pilots, I am looking in your direction!) that are both Graphic and Processor/RAM intensive. Before I begin, let me briefly descibe what happens here: Windows thinks its the greatest thing since fire! So, on your PC it will block ALL programs from accessing what it thinks, is it's! I.E MEMORY; both RAM and Virtual! Once again, you need to go into the OS and tell it who's BOSS, and only give it what it NEEDS; NOT WHAT IT WANTS! XP needs roughly 512MB, while Vista needs about 1GB to function flawlessly with RAM! About 256MB - 512MB of Virtual for BOTH. It has a "Safe Guard" that will flag programs that try to use more than 2GB of either. When this happens, it sends an error message, "Out of Memory...". To prevent this from happening, and crashing your programs, you need to set this limiter to a higher value. Here is how you do it: On VISTA: (You have to run the command prompt with elevated privlages) 1. Click the Start..>..All Programs..>..Accessories..>..Right-Click the "Command Prompt" and choose "Run as Administrator". 2. At the command line type the following: BCDEDIT(SPACE)/Set(SPACE)IncreaseUserVA(SPACE)nnnn (nnnn = the amount you want to increases by! I have mine set for 4096MB) 3. Hit enter, and get the confirmation. 4. REBOOT 5. Confirm that it worked by running the command prompt, typing: BCDEDIT, hit enter and you will see the /userva switch now.... It will be under the "Windows Boot Loader" as increaseuserva = {value you set} On XP: 1. Right-Click the My Computer..>..Choose "Properties". 2. Click the "Advanced Tab". 3. Click the "Settings" button in the "Startup and Recovery row. 4. click the "Edit" button in the "System startup" row. Now you'll see the boot config. At the very end type /3GB so it looks like this: *** Do Not Copy as your own Boot file [boot loader] timeout=3 default=multi(0)disk(0)rdisk(0)partition(2)\WINDOWS [operating systems] multi(0)disk(0)rdisk(0)partition(2)\WINDOWS="Microsoft Windows XP Home Edition" /fastdetect /NoExecute=OptIn /3GB 5. - Reboot Well Folks, there you go! It will take most of you longer to read this than it will to actually complete these tasks! O.O I hope that this helps! ***IF YOU ARE UNSURE ABOUT ANY OF THE ABOVE, THEN DO NOT PREFORM THESE ACTIONS! ASK HERE FIRST! I, AND THE MODERATORS OF THIS FORUM, ASSUME NO RESPONSIBILITY FOR ANY DAMAGE, LOSS OF DATA/SOFTWARE/HARDWARE, OR OTHER LOSS FOR THE ACTIONS YOU PERSONALLY TAKE!*** Please feel free to ask questions here, if I was not clear on something... Happy Gaming/Programming Sven2157 ADMINS WILL YOU PLEASE STICKY THIS ive had numourous people asking me past few weeks about where my config post went and no one can find it.... Thanks........ ... NOW... on to the config.... FIRST.. COPY everything i paste below the line and open up NOTEPAD on your computer.... PASTE IT INTO NOTEPAD AND SAVE AS CONFIG_MP.CFG .... YOU HAVE TO USE THAT FILE NAME!!!!! Save to your desktop..... now.... make a COPY of your current config.... put in a safe place.... replace the old config with your new one in your cod4 profiles folder........ OPEN GAME...... now i have weird controls... SO SET THE CONTROLS TO WHAT YOU WANT TO USE!!! AND CHANGE THE NAME!!! thats all you have to do.... your ping will drop 10-30 .. your fps will increase by 30-50... and you will move faster.... hit more accurate.... .... -------------------------------------------------------------------------------------------------------------------------------------------------- // generated by Call of Duty, do not modify unbindall bind TAB "+scores" bind ESCAPE "togglemenu" bind SPACE "+gostand" bind 3 "openscriptmenu quickpromod 2" bind 4 "+smoke" bind 5 "+actionslot 3" bind 6 "+actionslot 4" bind 7 "+actionslot 2" bind 8 "openscriptmenu quickpromod 5" bind ` "toggleconsole" bind A "+moveleft" bind B "mp_QuickMessage" bind C "gocrouch" bind D "+moveright" bind E "+leanright" bind F "+activate" bind G "+frag" bind H "ufo" bind K "ufo" bind N "+actionslot 1" bind Q "+leanleft" bind R "+reload" bind S "+back" bind T "chatmodepublic" bind U "noclip" bind V "+melee" bind W "+forward" bind Y "chatmodeteam" bind Z "+talk" bind ~ "toggleconsole" bind PAUSE "toggle cl_paused" bind CTRL "goprone" bind SHIFT "+breath_sprint" bind F1 "vote yes" bind F2 "vote no" bind F4 "+scores" bind F12 "screenshotJPEG" bind KP_HOME "toggle cg_thirdpersonangle 340 320 300 280 260 240 220 200 180 160 140 120 100 80 60 40 20 0" bind KP_UPARROW "timescale 5.0" bind KP_PGUP "toggle cg_draw2D" bind KP_LEFTARROW "timescale 0.5" bind KP_5 "timescale 1" bind KP_RIGHTARROW "timescale 2.0" bind KP_END "toggle cg_thirdpersonangle 0 20 40 60 80 100 120 140 160 180 200 220 240 260 280 300 320 340 " bind KP_DOWNARROW "timescale 0.3" bind KP_PGDN "toggle cg_thirdperson" bind KP_ENTER "toggle g_compassShowEnemies" bind KP_INS "toggle cl_freezedemo" bind KP_DEL "toggle developer" bind KP_SLASH "quit" bind KP_MINUS "toggle cg_thirdpersonrange 1024 800 600 350 120" bind KP_PLUS "toggle cg_thirdpersonrange 120 350 600 800 1024" bind MOUSE1 "+attack" bind MOUSE2 "+toggleads_throw" bind MOUSE3 "+frag" bind MWHEELDOWN "weapnext" bind MWHEELUP "weapnext" seta ai_badPathSpam "0" seta ai_corpseCount "0" seta ai_debugAccuracy "0" seta ai_debugCoverSelection "0" seta ai_debugMeleeAttackSpots "0" seta ai_debugThreatSelection "0" seta ai_ShowCanshootChecks "0" seta ai_showClaimedNode "0" seta ai_showRegion "0" seta airlift_min_spec "0" seta animated_trees_enabled "1" seta bog_b_min_spec "0" seta ai_corpseCount "10" seta cg_blood "0" seta cg_bloodLimit "0" seta cg_bloodLimitMsec "330" seta cg_brass "0" seta cg_centerPrintY "-60" seta cg_chatHeight "8" seta cg_chatTime "12000" seta cg_connectionIconSize "0" seta cg_crosshairAlpha "1" seta cg_crosshairAlphaMin "0.5" seta cg_crosshairDynamic "0" seta cg_crosshairEnemyColor "0" seta cg_cursorHints "4" seta cg_debugInfoCornerOffset "0 0" seta cg_descriptiveText "1" seta cg_drawBreathHint "1" seta cg_drawCrosshair "1" seta cg_drawCrosshairNames "0" seta cg_drawFPS "Simple" seta cg_drawFPSLabels "0" seta cg_drawFriendlyFireCrosshair "1" seta cg_drawFriendlyNames "1" seta cg_drawLagometer "1" seta cg_drawMantleHint "0" seta cg_drawSnapshot "0" seta cg_drawTurretCrosshair "1" seta cg_enemyNameFadeIn "250" seta cg_enemyNameFadeOut "250" seta cg_footsteps "1" seta cg_fov "80" seta cg_friendlyNameFadeIn "0" seta cg_friendlyNameFadeOut "1500" seta cg_gameBoldMessageWidth "390" seta cg_gameMessageWidth "455" seta cg_headIconMinScreenRadius "0.015" seta cg_hintFadeTime "100" seta cg_hudChatIntermissionPosition "5 110" seta cg_hudChatPosition "5 204" seta cg_hudDamageIconHeight "64" seta cg_hudDamageIconInScope "0" seta cg_hudDamageIconOffset "128" seta cg_hudDamageIconTime "2000" seta cg_hudDamageIconWidth "128" seta cg_hudGrenadeIconEnabledFlash "1" seta cg_hudGrenadeIconMaxRangeFlash "500" seta cg_hudGrenadeIconHeight "25" seta cg_hudGrenadeIconInScope "1" seta cg_hudGrenadeIconMaxHeight "104" seta cg_hudGrenadeIconOffset "50" seta cg_hudGrenadeIconWidth "25" seta cg_hudGrenadePointerHeight "12" seta cg_hudGrenadePointerPivot "12 27" seta cg_hudGrenadePointerWidth "25" seta cg_hudMapBorderWidth "2" seta cg_hudMapFriendlyHeight "15" seta cg_hudMapFriendlyWidth "15" seta cg_hudMapPlayerHeight "20" seta cg_hudMapPlayerWidth "20" seta cg_hudMapRadarLineThickness "0.15" seta cg_hudProneY "-160" seta cg_hudSayPosition "5 180" seta cg_hudStanceHintPrints "1" seta cg_hudVotePosition "5 220" seta cg_invalidCmdHintBlinkInterval "600" seta cg_invalidCmdHintDuration "1800" seta cg_laserLight "0" seta cg_mapLocationSelectionCursorSpeed "0.6" seta cg_marks_ents_player_only "0" seta cg_nopredict "0" seta cg_overheadIconSize "0.7" seta cg_overheadNamesGlow "0 0 0 1" seta cg_overheadNamesMaxDist "10000" seta cg_overheadNamesSize "0.5" seta cg_overheadRankSize "0.5" seta cg_predictItems "1" seta cg_scoreboardBannerHeight "35" seta cg_scoreboardHeaderFontScale "0.3" seta cg_scoreboardHeight "435" seta cg_scoreboardItemHeight "18" seta cg_scoreboardPingHeight "0.7" seta cg_scoreboardPingWidth "0.036" seta cg_scoreboardRankFontScale "0.25" seta cg_scoreboardScrollStep "3" seta cg_scoreboardWidth "400" seta cg_ScoresPing_BgColor "0.25098 0.25098 0.25098 0.501961" seta cg_ScoresPing_HighColor "0.8 0 0 1" seta cg_ScoresPing_Interval "100" seta cg_ScoresPing_LowColor "0 0.74902 0 1" seta cg_ScoresPing_MaxBars "4" seta cg_ScoresPing_MedColor "0.8 0.8 0 1" seta cg_scriptIconSize "0" seta cg_sprintMeterDisabledColor "0.8 0.1 0.1 0.2" seta cg_sprintMeterEmptyColor "0.7 0.5 0.2 0.8" seta cg_sprintMeterFullColor "0.8 0.8 0.8 0.8" seta cg_subtitleMinTime "3" seta cg_subtitles "1" seta cg_subtitleWidthStandard "520" seta cg_subtitleWidthWidescreen "520" seta cg_teamChatsOnly "0" seta cg_viewZSmoothingMax "16" seta cg_viewZSmoothingMin "1" seta cg_viewZSmoothingTime "0.1" seta cg_voiceIconSize "0" seta cg_weaponCycleDelay "0" seta cg_weaponHintsCoD1Style "1" seta cg_youInKillCamSize "6" seta cl_allowDownload "1" seta cl_anglespeedkey "0" seta cl_anonymous "0" seta cl_connectionAttempts "20" seta cl_freelook "1" seta cl_maxpackets "42" seta cl_maxPing "800" seta cl_maxppf "5" seta cl_mouseAccel "0" seta cl_packetdup "1" seta cl_pitchspeed "140" seta cl_punkbuster "1" seta cl_voice "1" seta cl_wwwDownload "1" seta cl_yawspeed "140" seta com_introPlayed "1" seta com_maxfps "125" seta com_recommendedSet "1" seta compassClampIcons "1" seta compassCoords "740 3590 400" seta compassECoordCutoff "37" seta compassFriendlyHeight "18.75" seta compassFriendlyWidth "18.75" seta compassMaxRange "2500" seta compassMinRadius "0.0001" seta compassMinRange "0.0001" seta compassObjectiveArrowHeight "20" seta compassObjectiveArrowOffset "2" seta compassObjectiveArrowRotateDist "5" seta compassObjectiveArrowWidth "20" seta compassObjectiveDrawLines "1" seta compassObjectiveHeight "20" seta compassObjectiveIconHeight "16" seta compassObjectiveIconWidth "16" seta compassObjectiveMaxHeight "70" seta compassObjectiveMaxRange "2048" seta compassObjectiveMinAlpha "1" seta compassObjectiveMinHeight "-70" seta compassObjectiveNumRings "10" seta compassObjectiveRingSize "80" seta compassObjectiveRingTime "10000" seta compassObjectiveTextHeight "18" seta compassObjectiveTextScale "0.3" seta compassObjectiveWidth "20" seta compassPlayerHeight "15" seta compassPlayerWidth "15" seta compassRadarLineThickness "0.4" seta compassRadarPingFadeTime "4" seta compassRadarUpdateTime "4" seta compassRotation "1" seta compassSize "1" seta compassSoundPingFadeTime "2" seta compassTickertapeStretch "0.5" seta con_errormessagetime "8" seta con_gameMsgWindow0FadeInTime "0.25" seta con_gameMsgWindow0FadeOutTime "0.5" seta con_gameMsgWindow0Filter "gamenotify obituary" seta con_gameMsgWindow0LineCount "4" seta con_gameMsgWindow0MsgTime "5" seta con_gameMsgWindow0ScrollTime "0.25" seta con_gameMsgWindow0SplitscreenScale "1.5" seta con_gameMsgWindow1FadeInTime "0.25" seta con_gameMsgWindow1FadeOutTime "0.01" seta con_gameMsgWindow1Filter "boldgame" seta con_gameMsgWindow1LineCount "5" seta con_gameMsgWindow1MsgTime "8" seta con_gameMsgWindow1ScrollTime "0.25" seta con_gameMsgWindow1SplitscreenScale "1.5" seta con_gameMsgWindow2FadeInTime "0.75" seta con_gameMsgWindow2FadeOutTime "0.5" seta con_gameMsgWindow2Filter "subtitle" seta con_gameMsgWindow2LineCount "7" seta con_gameMsgWindow2MsgTime "5" seta con_gameMsgWindow2ScrollTime "0.25" seta con_gameMsgWindow2SplitscreenScale "1.5" seta con_gameMsgWindow3FadeInTime "0.25" seta con_gameMsgWindow3FadeOutTime "0.5" seta con_gameMsgWindow3Filter "" seta con_gameMsgWindow3LineCount "5" seta con_gameMsgWindow3MsgTime "5" seta con_gameMsgWindow3ScrollTime "0.25" seta con_gameMsgWindow3SplitscreenScale "1.5" seta con_inputBoxColor "0.25 0.25 0.2 1" seta con_inputHintBoxColor "0.4 0.4 0.35 1" seta con_matchPrefixOnly "1" seta con_minicon "0" seta con_miniconlines "5" seta con_minicontime "4" seta con_outputBarColor "1 1 0.95 0.6" seta con_outputSliderColor "0.15 0.15 0.1 0.6" seta con_outputWindowColor "0.35 0.35 0.3 0.75" seta con_typewriterColorGlowCheckpoint "0.6 0.5 0.6 1" seta con_typewriterColorGlowCompleted "0 0.3 0.8 1" seta con_typewriterColorGlowFailed "0.8 0 0 1" seta con_typewriterColorGlowUpdated "0 0.6 0.18 1" seta con_typewriterDecayDuration "700" seta con_typewriterDecayStartTime "6000" seta con_typewriterPrintSpeed "50" seta customclass1 "Custom Slot 1" seta customclass2 "Custom Slot 2" seta customclass3 "Custom Slot 3" seta customclass4 "Custom Slot 4" seta customclass5 "Custom Slot 5" seta drew_notes "5" seta dynEnt_active "0" seta fx_draw "1" seta fx_drawClouds "1" seta fx_marks "0" seta fx_marks_ents "0" seta fx_marks_smodels "0" seta g_allowvote "1" seta g_banIPs "" seta g_clonePlayerMaxVelocity "80" seta g_deadChat "1" seta g_dropForwardSpeed "10" seta g_dropHorzSpeedRand "100" seta g_dropUpSpeedBase "10" seta g_dropUpSpeedRand "5" seta g_log "games_mp.log" seta g_logSync "1" seta g_oldVoting "1" seta g_playerCollisionEjectSpeed "25" seta g_redCrosshairs "1" seta g_useGear "1" seta g_useholdspawndelay "500" seta g_voiceChatTalkingDuration "500" seta g_voteAbstainWeight "0.5" seta hud_deathQuoteFadeTime "1000" seta hud_enable "1" seta hud_fade_ammodisplay "1.7" seta hud_fade_compass "0" seta hud_fade_healthbar "0" seta hud_fade_offhand "1.7" seta hud_fade_sprint "1.7" seta hud_fade_stance "1.7" seta hud_fadeout_speed "0.1" seta hud_flash_period_offhand "0.5" seta hud_flash_time_offhand "2" seta hud_health_pulserate_critical "0.5" seta hud_health_pulserate_injured "1" seta hud_health_startpulse_critical "0.33" seta hud_health_startpulse_injured "1" seta in_mouse "1" seta loc_forceEnglish "0" seta loc_language "0" seta m_filter "0" seta m_forward "0.25" seta m_pitch "0.022" seta m_side "0.25" seta m_yaw "0.022" seta monkeytoy "0" seta name "Morphic Jackzor" seta net_noipx "0" seta net_noudp "0" seta net_socksEnabled "0" seta net_socksPassword "" seta net_socksPort "1080" seta net_socksServer "" seta net_socksUsername "" seta r_aaAlpha "dither (fast)" seta r_aaSamples "1" seta r_altModelLightingUpdate "1" seta r_aspectRatio "auto" seta r_autopriority "0" seta r_customMode "" seta r_debugLineWidth "1" seta r_depthPrepass "0" seta r_displayRefresh "120 Hz" seta r_distortion "0" seta r_dlightLimit "0" seta r_dof_enable "0" seta r_drawDecals "1" seta r_drawSun "1" seta r_drawWater "1" seta r_fastSkin "0" seta r_fullscreen "1" seta r_gamma "2.11458" seta r_glow_allowed "0" seta r_ignorehwgamma "0" seta r_inGameVideo "1" seta r_lodBiasRigid "0" seta r_lodBiasSkinned "0" seta r_lodScaleRigid "1" seta r_lodScaleSkinned "1" seta r_mode "1024x768" seta r_monitor "0" seta r_multiGpu "1" seta r_picmip "0" seta r_picmip_bump "0" seta r_picmip_manual "0" seta r_picmip_spec "0" seta r_picmip_water "0" seta r_polygonOffsetBias "-1" seta r_polygonOffsetScale "-1" seta r_portalBevels "0.7" seta r_preloadShaders "0" seta r_rendererPreference "Default" seta r_specular "0" seta r_texFilterAnisoMax "4" seta r_texFilterAnisoMin "1" seta r_texFilterMipMode "Unchanged" seta r_vsync "0" seta r_zFeather "0" seta ragdoll_enable "0" seta ragdoll_max_simulating "16" seta rate "25000" seta sensitivity "5" seta server1 "" seta server10 "" seta server11 "" seta server12 "" seta server13 "" seta server14 "" seta server15 "" seta server16 "" seta server2 "" seta server3 "" seta server4 "" seta server5 "" seta server6 "" seta server7 "" seta server8 "" seta server9 "" seta sm_enable "0" seta sm_maxLights "4" seta snaps "30" seta snd_cinematicVolumeScale "0.85" seta snd_enableEq "1" seta snd_errorOnMissing "0" seta snd_khz "44" seta snd_levelFadeTime "250" seta snd_outputConfiguration "5.1 speakers" seta snd_slaveFadeTime "500" seta snd_touchStreamFilesOnLoad "0" seta snd_volume "0.8" seta sv_allowDownload "1" seta sv_floodprotect "4" seta sv_hostname "CoD4Host" seta sv_maxclients "24" seta sv_maxPing "0" seta sv_maxRate "25000" seta sv_minPing "0" seta sv_punkbuster "1" seta sv_reconnectlimit "3" seta sv_voice "1" seta sv_wwwBaseURL "" seta sv_wwwDlDisconnected "0" seta sv_wwwDownload "0" seta sys_configSum "4379996" seta sys_configureGHz "8.6759" seta sys_gpu "NVIDIA GeForce 9800 GTX " seta sys_sysMB "2048" seta ui_bigFont "0.4" seta ui_browserFriendlyfire "-1" seta ui_browserHardcore "-1" seta ui_browserKillcam "-1" seta ui_browserMod "0" seta ui_browserOldSchool "-1" seta ui_browserShowDedicated "0" seta ui_browserShowEmpty "1" seta ui_browserShowFull "1" seta ui_browserShowPassword "-1" seta ui_browserShowPunkBuster "-1" seta ui_browserShowPure "1" seta ui_currentMap "0" seta ui_currentNetMap "0" seta ui_dedicated "0" seta ui_drawCrosshair "1" seta ui_extraBigFont "0.55" seta ui_gametype "0" seta ui_joinGametype "0" seta ui_maxclients "32" seta ui_netGametype "0" seta ui_netGametypeName "dm" seta ui_netSource "1" seta ui_serverStatusTimeOut "7000" seta ui_smallFont "0.25" seta vehDriverViewHeightMax "50" seta vehDriverViewHeightMin "-15" seta vid_xpos "3" seta vid_ypos "22" seta voice_deadChat "0" seta voice_global "0" seta voice_localEcho "0" seta winvoice_mic_mute "1" seta winvoice_mic_reclevel "65535" seta winvoice_mic_scaler "1" seta winvoice_save_voice "0" con_hidechannel *; con_showchannel dontfilter error gamenotify boldgame subtitle obituary logfile_only console_only gfx sound files devgui profile ui client server system playerweap ai anim physics fx leaderboards parserscript script Holy shit Wizid, you need a hobby. Spend some more time in your new bar. Thanks BobNP Wiz IDIOTS.... Agreed, IDIOTS! Awards
chris4874 Posted October 24, 2011 Member ID: 2491 Group: **- Inactive Registered Users Followers: 0 Topic Count: 37 Topics Per Day: 0.01 Content Count: 354 Content Per Day: 0.06 Reputation: 0 Achievement Points: 2140 Solved Content: 0 Days Won: 0 Joined: 05/11/11 Status: Offline Last Seen: Never Birthday: 04/20/1961 Posted October 24, 2011 Damage_inc- /rate 25000 /cl_maxpackets 100 /com_maxfps 125 /cl_packetdup 1 /snaps 30 just set these they work best for ping all the other 4 pages of stuff people are presenting are for fps gl i agree [well sort off ] max fps 125 is for fps not ping, packetdup 1, great if you are close to the server [no losing packets must be great]mine is set to 2, and we were asked about making the game smoother?,so fps comes into it hence the config files posted, i have found that since mucking around with my file my ping went down ,only to 99 some nights but still an improvment, over what it was,but boy my game looks crap
Damage_inc- Posted October 24, 2011 Member ID: 2048 Group: ***- Inactive Clan Members Followers: 0 Topic Count: 294 Topics Per Day: 0.05 Content Count: 6689 Content Per Day: 1.18 Reputation: 4709 Achievement Points: 48999 Solved Content: 0 Days Won: 5 Joined: 12/15/10 Status: Offline Last Seen: November 29, 2023 Birthday: 05/30/1967 Posted October 24, 2011 chris4874 Damage_inc- /rate 25000 /cl_maxpackets 100 /com_maxfps 125 /cl_packetdup 1 /snaps 30 just set these they work best for ping all the other 4 pages of stuff people are presenting are for fps gl i agree [well sort off ] max fps 125 is for fps not ping, packetdup 1, great if you are close to the server [no losing packets must be great]mine is set to 2, and we were asked about making the game smoother?,so fps comes into it hence the config files posted, i have found that since mucking around with my file my ping went down ,only to 99 some nights but still an improvment, over what it was,but boy my game looks crap i agree 100% Awards
VHS2 Posted October 24, 2011 Member ID: 2056 Group: ++ COD4 Admin Followers: 54 Topic Count: 58 Topics Per Day: 0.01 Content Count: 1134 Content Per Day: 0.20 Reputation: 1170 Achievement Points: 9954 Solved Content: 0 Days Won: 5 Joined: 12/18/10 Status: Offline Last Seen: Wednesday at 09:04 AM Birthday: 01/17/1960 Device: Windows Posted October 24, 2011 As I am in France, it's hopeless. I should move or maybe buy a satellite? What do u think? Awards
BattlewolF Posted October 24, 2011 Member ID: 2028 Group: *** Clan Members Followers: 12 Topic Count: 42 Topics Per Day: 0.01 Content Count: 1740 Content Per Day: 0.31 Reputation: 545 Achievement Points: 10637 Solved Content: 0 Days Won: 0 Joined: 12/10/10 Status: Offline Last Seen: June 12 Birthday: 03/10/1963 Device: Windows Posted October 24, 2011 Awards
Labob Posted October 24, 2011 Member ID: 42 Group: *** Clan Members Followers: 50 Topic Count: 338 Topics Per Day: 0.06 Content Count: 8394 Content Per Day: 1.37 Reputation: 6143 Achievement Points: 54511 Solved Content: 0 Days Won: 14 Joined: 09/01/09 Status: Offline Last Seen: May 28 Birthday: 01/30/1959 Device: Windows Posted October 24, 2011 VHS2 don't come to ontario we got quebec move to texas they got a wierd accent and the women will go nuts over you accent Awards
GorillaXI Posted October 24, 2011 Member ID: 62 Group: **- Inactive Registered Users Followers: 73 Topic Count: 480 Topics Per Day: 0.08 Content Count: 4124 Content Per Day: 0.67 Reputation: 1413 Achievement Points: 27905 Solved Content: 0 Days Won: 10 Joined: 09/02/09 Status: Offline Last Seen: July 4, 2015 Birthday: 06/16/1972 Posted October 24, 2011 We don't need him here.

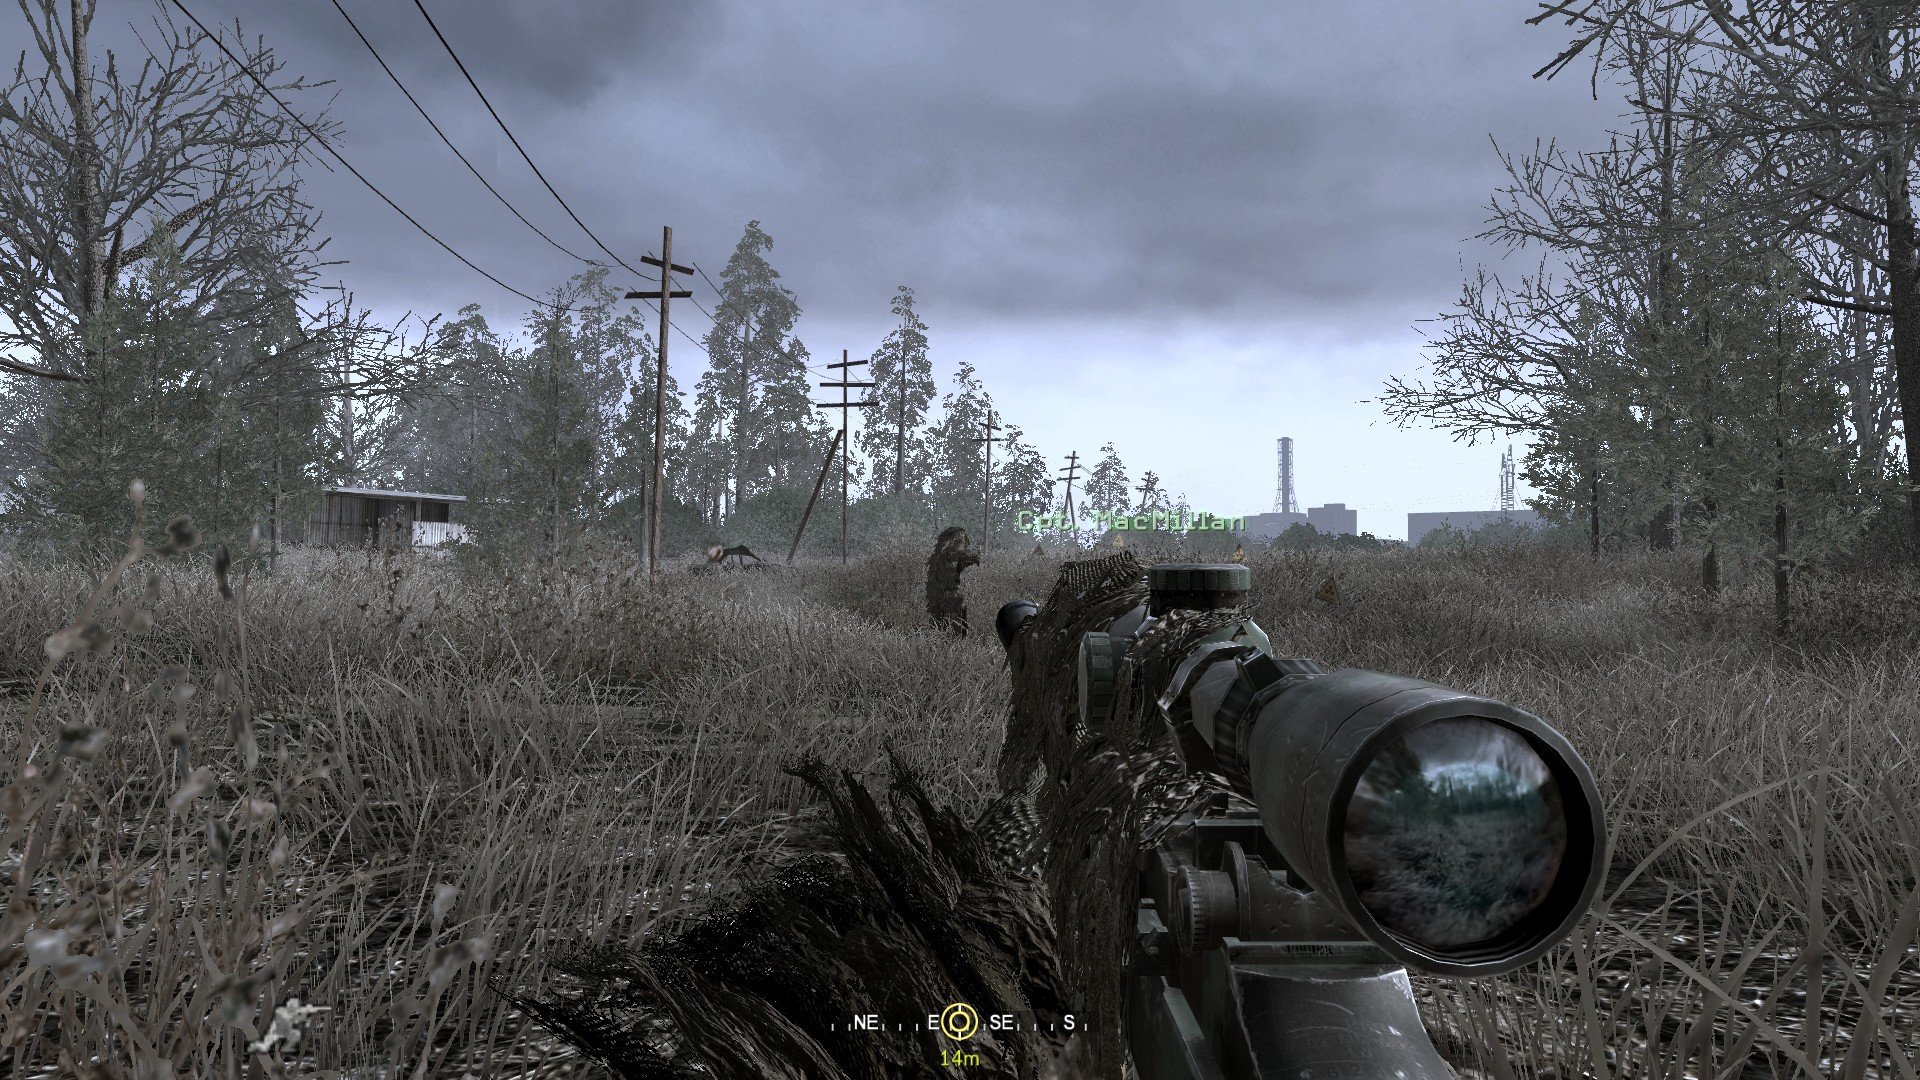


Recommended Posts